


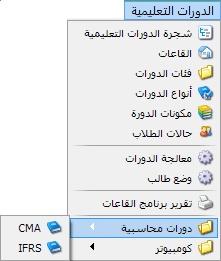
The Training Course Management module organizes an educational institute’s activities. It manages courses, tracks enrolled students and amounts due or paid, and monitors classroom availability and reservations. The module contains the following tools, as shown below.
.
.
1. Training Course Tree #
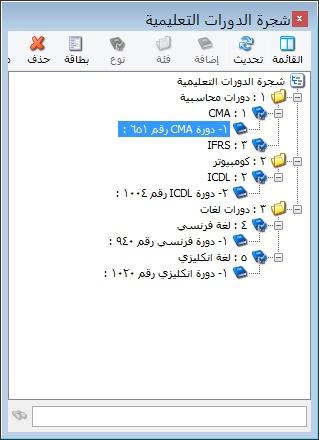
Define new course types and organize them into course categories, or browse existing courses, as illustrated below.
.
.
2. Classrooms #
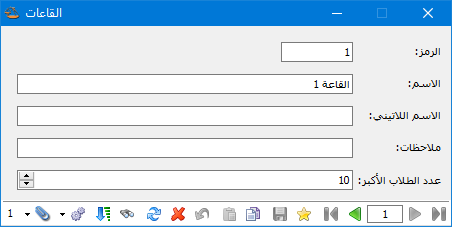
Define the institute’s classrooms and specify the maximum number of students each can accommodate, as shown below.
.
.
3. Course Categories #
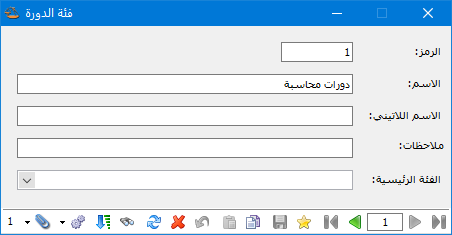
Define the course categories offered by the institute, as described in the Training Course Tree. Consider the following example.
An institute offers Accounting, Computer Skills and Languages. Its Accounting category includes course types such as CMA and IFRS.
The Course Categories window is shown below.
.
.
4. Course Types #
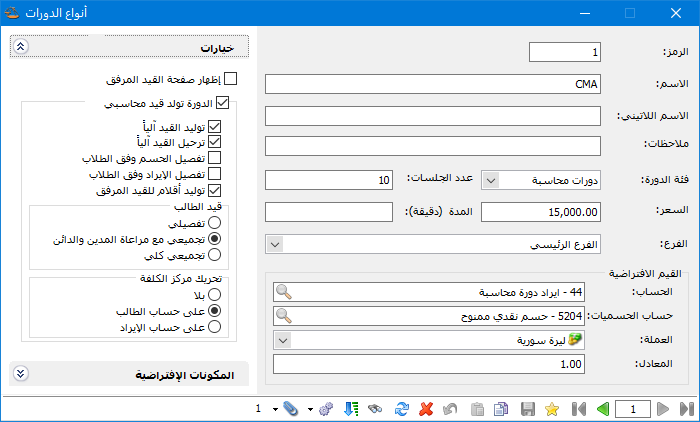
Define the course types offered by the institute and assign them to categories. This window contains the following fields:
.
.
- Code: Generated automatically, but it can also be specified by the user.
- Name: Enter the course name.
- Latin Name: Enter the course name in Latin characters.
- Notes: Enter notes about this course type.
- Course Category: Select the category to which this course type belongs.
- Number of Sessions: Specify the number of course sessions.
- Price: Enter the course price.
- Duration (Minutes): Specify each session’s duration in minutes.
- Branch: If the institute has multiple branches offering different categories or types, select the branch where this course is held.
Default Values: #
This section contains:
- Account: Select the account to which course revenue is posted.
- Discount Account: Select the account to which course discounts are posted.
- Currency: Select the currency used for the course price.
- Exchange Rate: Enter the rate if the selected currency differs from the base currency.
Options: #
This section includes:
Show Attached Entry Tab: Enable this option to show the attached journal entry tab in the course window.
Course Generates a Journal Entry: #
Enable this option if creating a course record should generate a journal entry. The following related options then become editable.
Generate Entry Automatically: Generate a journal entry when the new course record is saved. Otherwise, generate it manually using Operations in the course record window.
Post Entry Automatically: Post the generated journal entry automatically when the new course record is saved. Otherwise, post it manually.
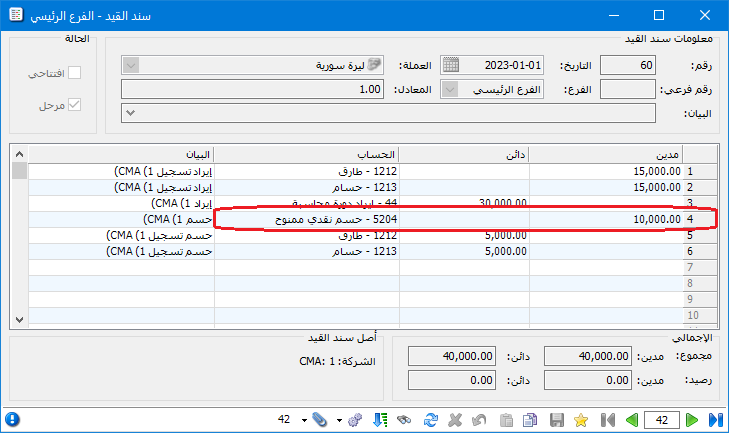
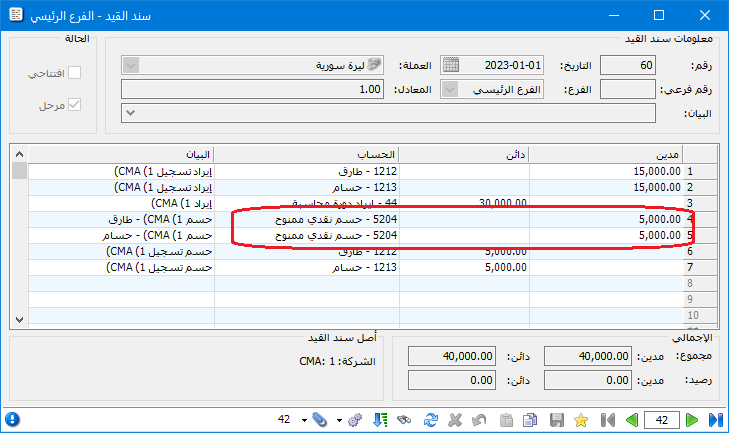
Break Down Discounts by Student: Record the discount account separately for the amount allowed to each student. The following illustrations compare enabled and disabled settings.
Entry When the Option Is Disabled:
.
.
Entry When the Option Is Enabled:
.
.
Note: This option depends on Discount Account under Default Values. It is read-only when that account is blank and becomes editable after an account is entered.
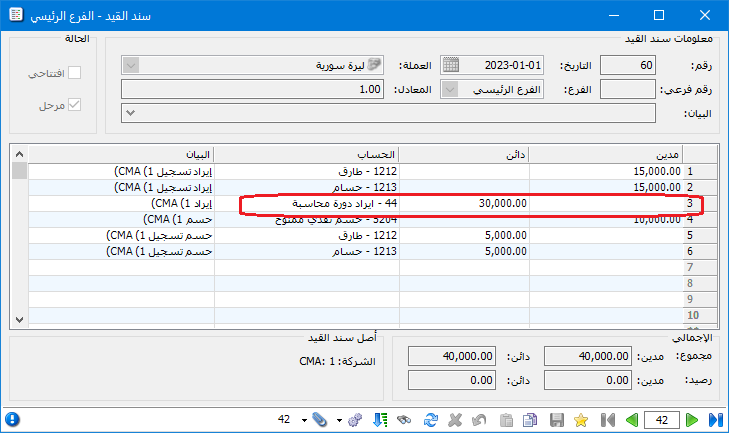
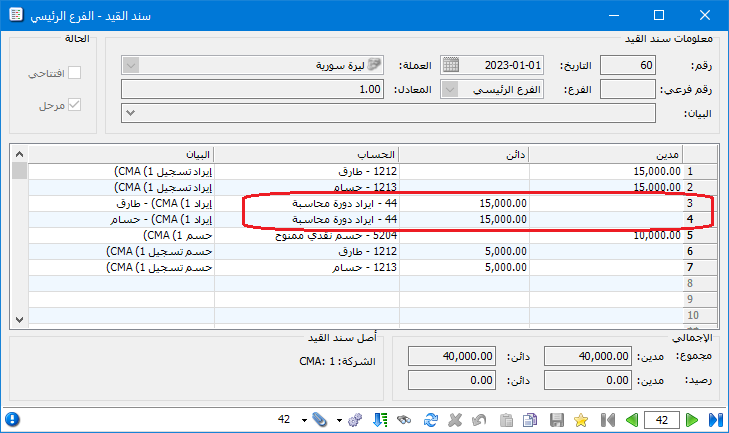
- Break Down Revenue by Student: Record the revenue account separately for each student, as illustrated below.
Entry When the Option Is Disabled:
.
.
Entry When the Option Is Enabled:
.
.
Generate Attached Entry Lines: Generate journal lines for the attached journal voucher.
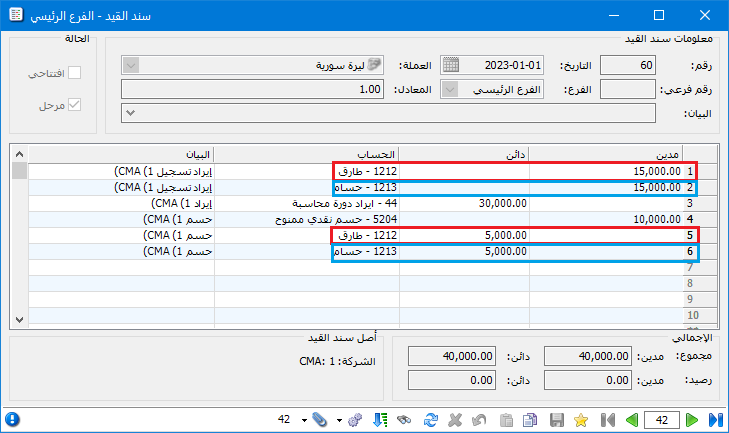
Student Entry: #
Detailed: Show individual student account movements, as illustrated below.
.
.
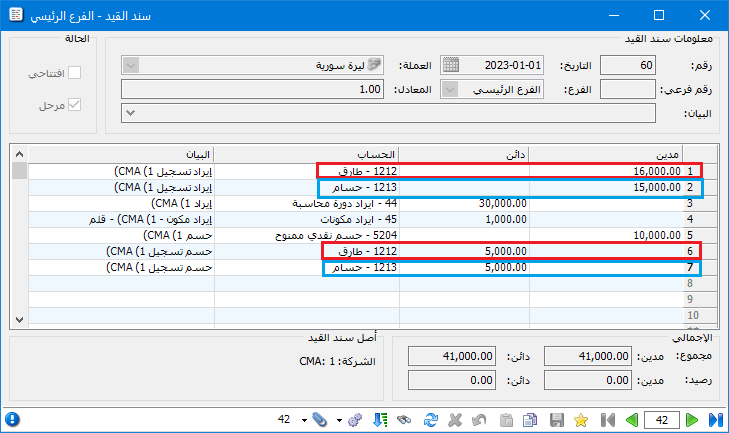
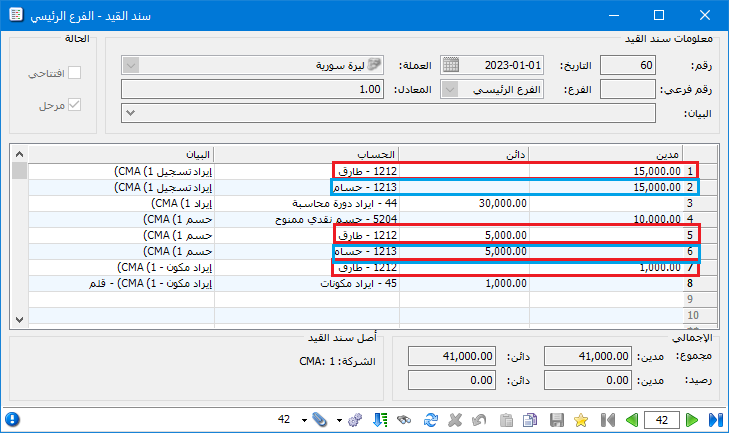
- Aggregate by Debit and Credit: Combine debit movements together and credit movements together. Detailed mode keeps each movement separate without grouping by side, as illustrated below.
Entry with Aggregate by Debit and Credit Enabled:
.
.
Entry with Detailed Enabled:
.
.
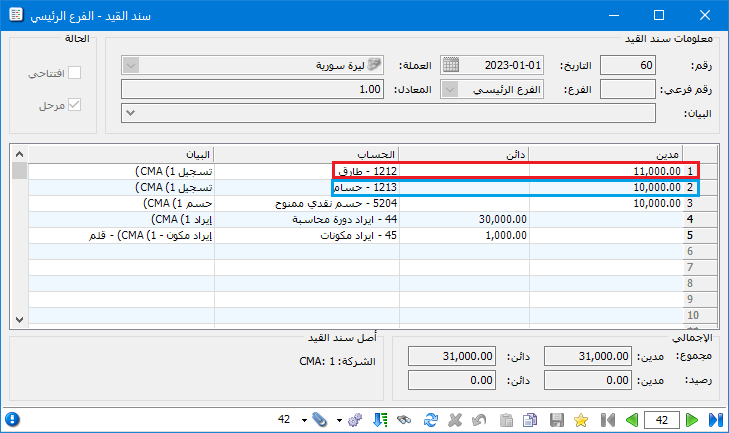
- Full Aggregation: Combine the student account into a single movement, as illustrated below.
.
.
- Cost Center Posting
- None: Do not generate cost center movements.
- Student Account: Assign cost center movements to the student account.
- Revenue Account: Assign cost center movements to the course revenue account.
- Learn More About Cost Centers
.
.
5. Course Components #
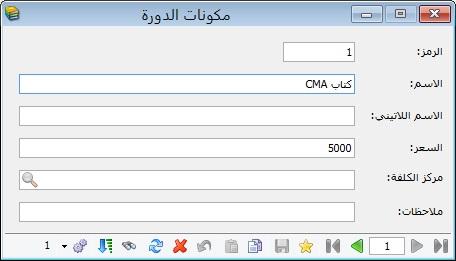
Define components offered with courses, such as certificates and books, in Course Components, as shown below.
.
.
6. Student Statuses
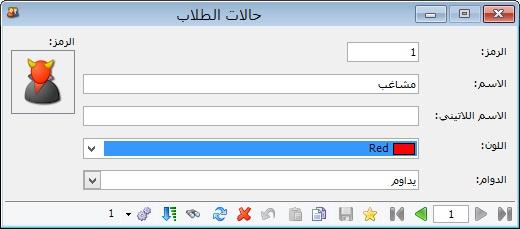
Define student statuses, such as active, withdrawn or diligent. Choose the text color, whether the student attends, and an image for each status, as illustrated below.
.
.
7. Process Courses #
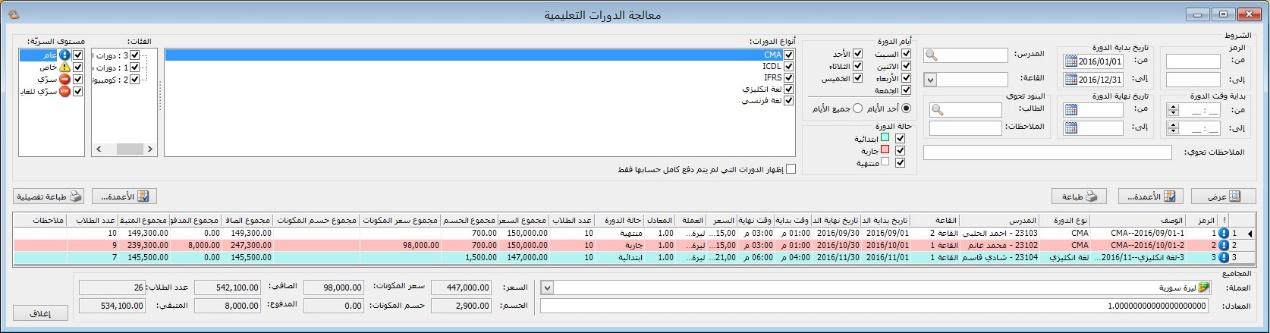
Monitor completed, ongoing and planned courses using the criteria in this window. The main criteria include:
Display courses in a specific category or of a specific type.
Display courses by confidentiality level.
Display courses in a specific classroom, taught by a specific instructor, or attended by a specific student.
Display courses starting or ending at specific times, dates or on particular days.
Display courses whose accounts have not been closed.
After displaying courses, you can:
Print them in different formats or export them to Word or Excel.
Review totals for student payments, student discounts, supplied components, component discounts, net course amounts, paid amounts and outstanding balances.
As illustrated below:
.
.
8. Student Position #
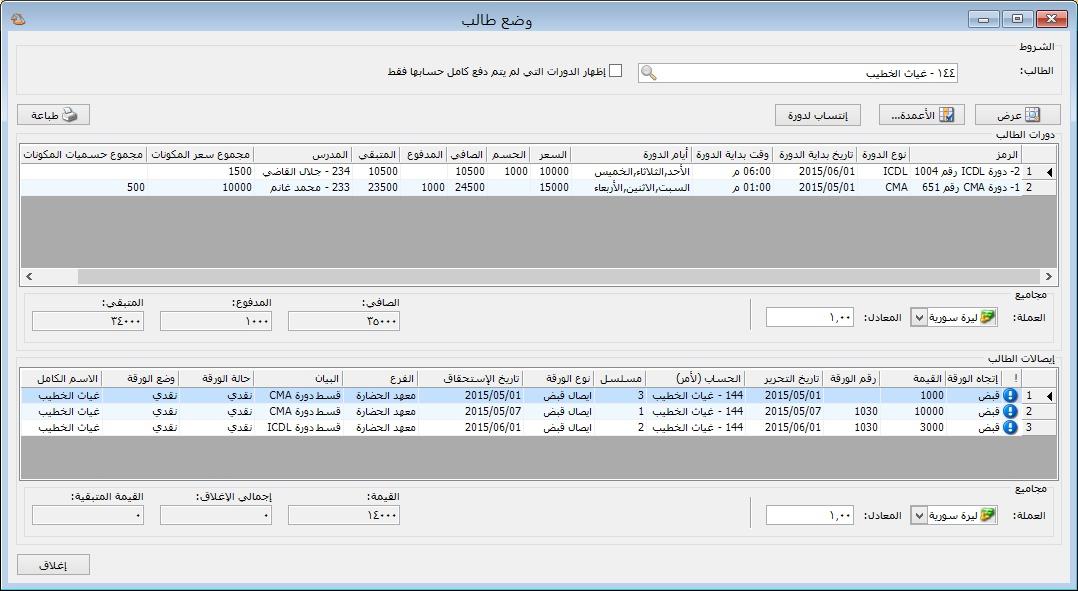
Enter a student’s name to view enrolled courses, payments for each course and overall totals.
You can also record outstanding payments for any course, or define a new student and enroll them directly without returning to the course card.
The following image illustrates the setting:
The following image illustrates the setting:
.
.
9. Classroom Schedule Report #
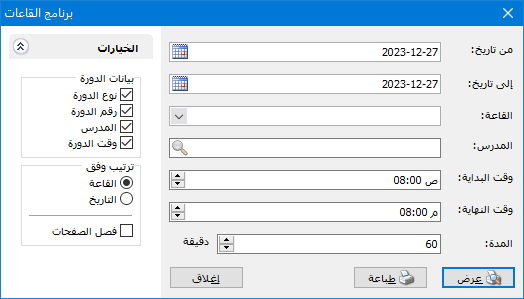
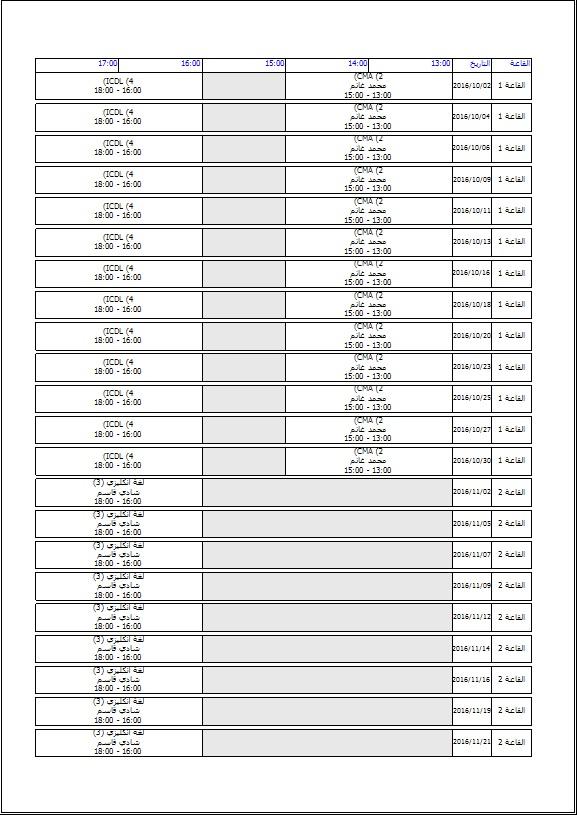
Review classroom availability and occupied periods using the criteria in Classroom Schedule Report. The report identifies available time slots and classroom use according to the selected criteria, as shown below.
.
.
From Date / To Date: Set the report’s date range.
Classroom: Select a classroom to show its schedule, available hours and occupied hours. Leave blank to include all classrooms.
Instructor: Filter the report to classrooms where the selected instructor teaches.
Start Time: Set a start-time criterion for the report.
End Time: Set an end-time criterion for the report.
Duration: Set a duration criterion for the report.
Options: Select course details to display, such as type, number, instructor and time. Sort by classroom or date. Enable Separate Pages to print each classroom separately.
The following image illustrates the setting:
.
.
10. Open a Course Card #
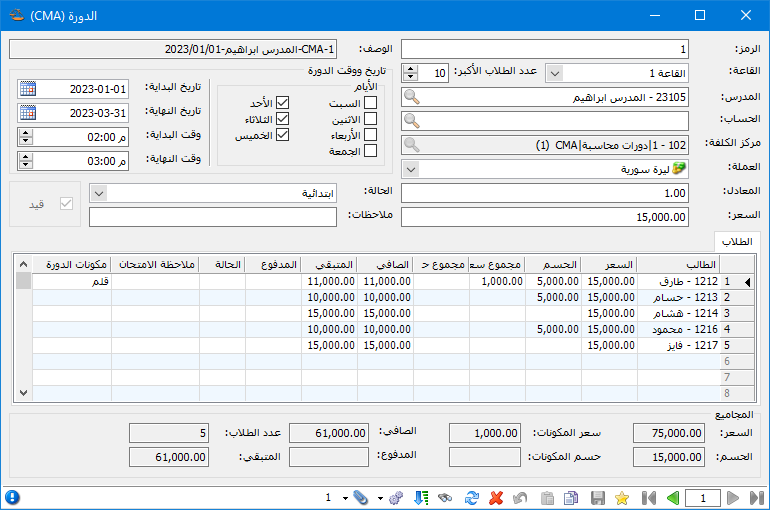
Each defined course type can have multiple individual courses, each with its own card. Access cards through the Training Course Tree or the program menu. You can:
Set the classroom, course days, times for each day, and start and end dates.
Select the course instructor.
Create a dedicated course revenue account.
Generate a dedicated cost center automatically to track this course’s net profit or loss.
Set a general course price for enrolled students and specify the payment currency.
Set the course status to Planned, Ongoing or Completed for searching and processing.
Add enrolled students and define new students directly. Each student card can store phone numbers, addresses and other details, with attachments such as a photo or certificates.
Set each student’s status and display color using the defined Student Statuses.
Add student-specific course components with their own prices and discounts.
Record student payments.
Review course totals, including student payments, discounts, component values and discounts, net amounts, paid amounts and outstanding balances.
View the actual student count, calculated automatically from each student’s status.
Set the confidentiality level to control which program users can view the course.
.
.
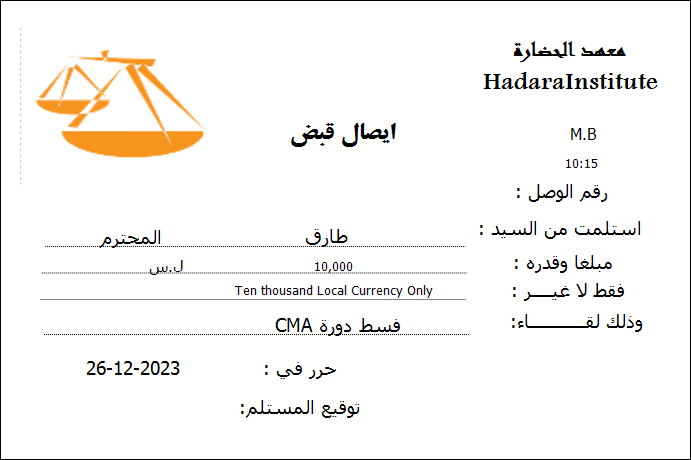
Course Installment Receipt Example:
.

.
Printed Course Installment Receipt Example:
.
.
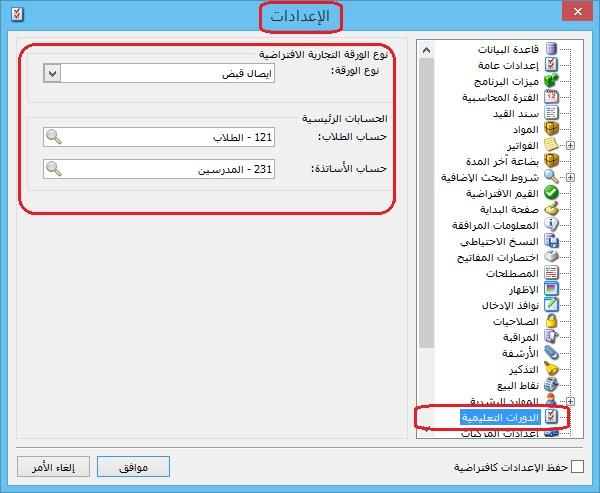
Important: To enable student payments, open Settings and Training Courses and select a commercial paper type such as Receipt in Paper Type. Also specify the parent Student and Instructor accounts from the chart of accounts; new student and instructor accounts are added beneath them.
The following image illustrates the setting:
.
.


