


Point of Sale simplifies retail transactions with quick entry, calculations, sales recording, reports and inventory management.
Open Point of Sale to access the following tools.
1-POS Types: #
Open POS Types to define the tills used in the database. The window contains these fields.
.
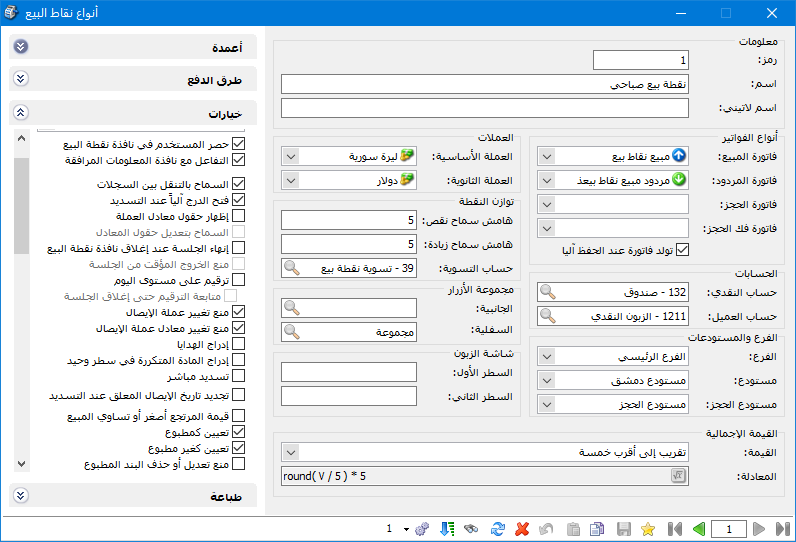
.
Code: Enter the POS code.
Name: Enter the POS Arabic name.
Latin Name: Enter its English name.
Invoice Types: #
Invoice Types contains:
Sales Invoice: Select the invoice type used to post POS sales, usually POS Sales.
Return Invoice: Select the invoice type used to post POS returns, usually POS Sales Return.
Reservation Invoice: Reserve goods for a customer without selling them. Use a virtual reservation warehouse and a transfer without price to move the goods from the main warehouse to the reservation warehouse, keeping them unavailable for ordinary sales.
Release Reservation Invoice: Cancel an earlier reservation using a reverse transfer without price from the reservation warehouse back to the main warehouse, making the goods available again.
Generate Invoice Automatically on Save: Generate an invoice when saving a POS receipt.
Generate a Combined Invoice When Closing a Session: Combine a session’s receipts into one invoice, with separate invoices for returns and each customer as required. Generate this from Process POS Sessions.
POS Mode: #
The following options are available.
Sales / Returns: Three options are available:
Sales and Returns: Allow both.
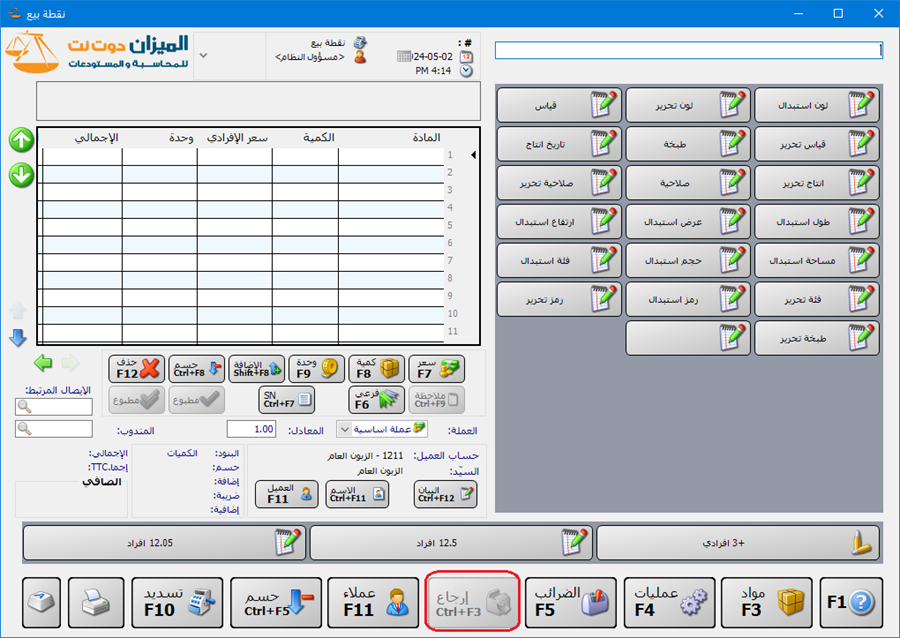
Sales Only: Allow sales and prevent returns.
The Return button is unavailable, as illustrated below.
.
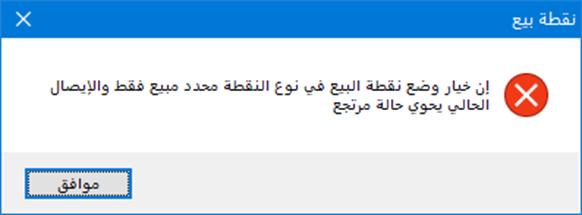
Attempting a return produces the blocking message shown below.
.
Returns Only: Allow returns and prevent sales.
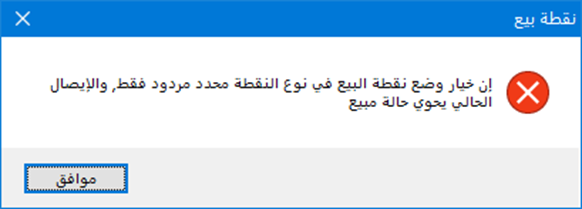
Attempting a receipt containing sales produces the blocking message shown below.
.
Returns Are the Default: Treat scanned or inserted items as sales returns by default, as illustrated below.
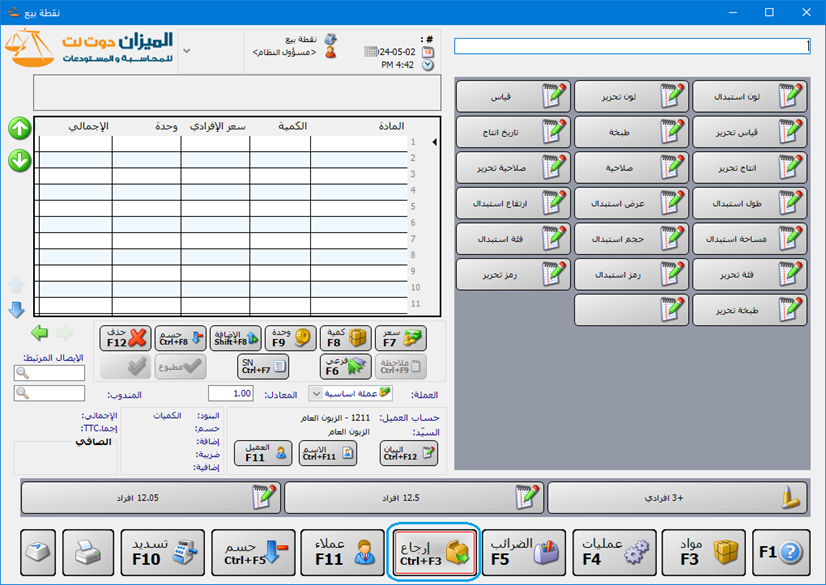
.
Accounts: Two account fields are available:
Cash Account: : The account receiving cash sales collected through POS.
Customer Account: The customer account for the sale.
Branch and Warehouses: #
Three fields are available:
Branch: Select the branch handling POS invoices.
Warehouse: Select the warehouse from which sold goods are issued or to which returns are received..
Reservation Warehouse: Select the virtual warehouse holding reserved goods transferred from the normal warehouse above.
Currencies: #
Two currency fields are available:
Base Currency: The main currency used in POS.
Secondary Currency: An additional currency accepted in POS.
POS Balancing: #
Record small underpayments or overpayments within permitted limits while treating the receipt as Cash rather than On Account. The following fields are available.
Underpayment Tolerance / Overpayment Tolerance: Enter permitted differences between receipt value and payment. A receipt remains Cash if the difference is within these limits. Without a tolerance, any difference is charged to the customer as an outstanding balance.
Adjustment Account: Select the account used to close positive or negative balancing differences.
Button Groups #
Side Button Group: Select the group displayed on the right of the main POS screen, usually containing frequently sold items. Group design is explained later.
Bottom Button Group: Select the group displayed below the main POS screen, usually containing buttons opening other groups. Group design is explained later.
Customer Display: Enter the first and second text lines to show on an attached customer display.
Total Value: #
Round receipt value to a chosen increment using the following options.
- No Change: Do not round.
- Round Down to 0.001.
- Round to the Nearest 0.001.
- Round Up to 0.001.
- Round Down to 0.01.
- Round to the Nearest 0.01.
- Round Up to 0.01.
- Round Down to 0.1.
- Round to the Nearest 0.1.
- Round Up to 0.1.
- Round Down to a Whole Unit.
- Round to the Nearest Whole Unit.
- Round Up to a Whole Unit.
- Round to increments such as 5, 10, 25, 50, 100, 500 or 1,000 using Up, Down or Nearest.
- Custom: Select an existing rounding option, then Custom to edit its mathematical formula.
Columns Tab: Enable fields to display on the main POS screen and adjust their order.
Payment Methods Tab: Enable the payment methods used by the POS and order them using the blue arrows, as shown below.
.
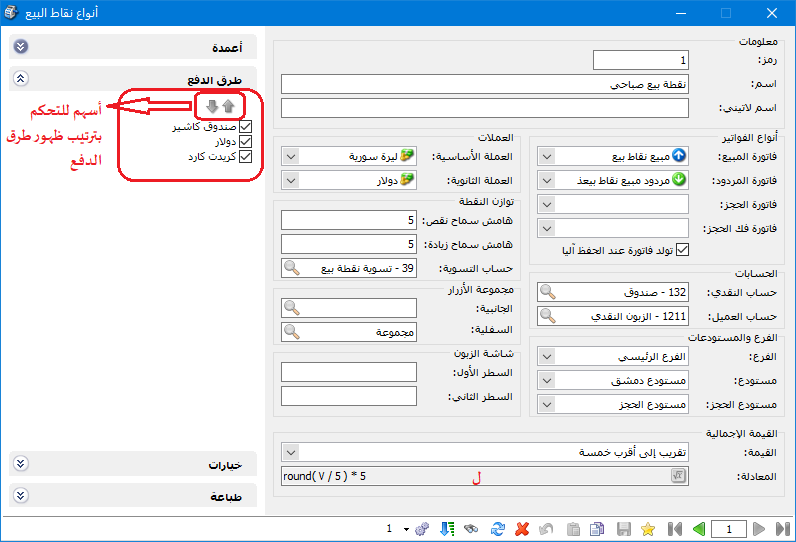
.
Options Tab: #
This contains:
POS Window Size: #
Three options are available:
- 800 × 600: Suits the matching display size and hides the bottom button panel.
- 1024 × 780: Shows the bottom button panel.
- 1024 × 780 Custom: Shows the bottom button panel and is intended for lower-specification graphics hardware.
General Options: #
- Restrict User to POS Window: Limit the user’s program activity to POS, preventing access to other windows or commands.
- Interact with Related Information: Allow the POS window to display details through Related Information.
- Allow Record Navigation: Show the lower toolbar for navigation, undo, deleting the current record and other standard operations.
- Open Cash Drawer Automatically: Open the drawer when Payment is clicked in POS.
- Show Exchange Rate Fields: Display each payment method’s exchange rate on the receipt payment screen.
- Allow Editing Exchange Rates: Allow changing the displayed payment exchange rates. The payment screen is explained later.
- End Session When Closing POS: End the current session when closing the window or choosing Exit from Operations.
- Prevent Temporary Session Exit: Do not allow closing POS while keeping the session open. Closing ends the session, and Temporary Exit is hidden from Operations, leaving Exit.

Numbering Options: #
- Number Receipts by Day: Start a new receipt numbering sequence each day.
- Continue Numbering Until Session Ends: With daily numbering, continue the sequence until the session closes even if the day changes.
- Prevent Changes to Receipt Currency: Keep the currency fixed for receipts of this POS type.
- Prevent Changes to Receipt Exchange Rate: Keep the receipt exchange rate fixed for this POS type.
- Insert Free Units: Insert free units automatically from the item card.
- Insert Repeated Items on One Line: Merge repeated items during new item insertion.
- Direct Payment: Clicking Payment settles the receipt directly without opening the payment screen.
Note: This works only when the POS has a single payment method.
- Return Value Must Not Exceed Sales Value : Prevent returning goods with a value greater than the sales value.
Line Options: #
- Mark as Printed : Allow marking a line as printed when the POS receipt is paid or printed.
- Mark as Unprinted : Allow clearing a line’s printed status even after the receipt is paid or printed.
Prevent Editing or Deleting Printed Lines : Prevent changing or deleting a printed line’s item, price, quantity or other data after payment or printing.
Insert Discount Percentage: #
Available policies include:
- None: Do not insert a discount.
- Customer Discount Only: Use the percentage defined in the customer card.
- Item Discount Only: Use the percentage defined in the item card.
- Item Discount If No Customer Discount: Use the customer discount first; if none exists, use the item discount.
- Customer Discount If No Item Discount: Use the item discount first; if none exists, use the customer discount.
- Lower of Customer and Item Discount Rates: Compare item and customer rates and choose the lower.
- Higher of Customer and Item Discount Rates: Compare item and customer rates and choose the higher.
Insert Addition Percentage: #
Available policies include:
- None: Do not insert an addition.
- Customer Addition Only: Use the customer card’s addition percentage.
- Item Addition Only: Use the item card’s addition percentage.
- Item Addition If No Customer Addition: Use the customer addition first; if none exists, use the item addition.
- Customer Addition If No Item Addition: Use the item addition first; if none exists, use the customer addition.
- Lower of Customer and Item Addition Rates: Compare both and choose the lower.
- Higher of Customer and Item Addition Rates: Compare both and choose the higher.
Sales on Account: #
A receipt is on account when payment or refund differs from its net amount beyond allowed balancing tolerances. Choose how POS responds.
Allow : Allow an on-account sale or return without warning.
Warn : Warn when settling an on-account receipt, allowing the user to continue or cancel, as shown below.
.
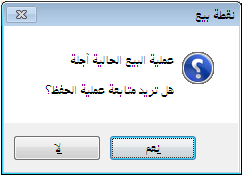
.
- Block : Prevent settlement until payment details are corrected so the receipt is treated as Cash, as illustrated below.
.
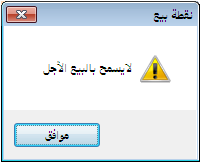
.
Delete Line: #
Two display options are available:
- Remove the Line : Hide the deleted line from the POS screen.
- Keep Visible : Keep the deleted row visible with a different color and strikethrough, but exclude it from receipt totals and printing, as illustrated below.
.
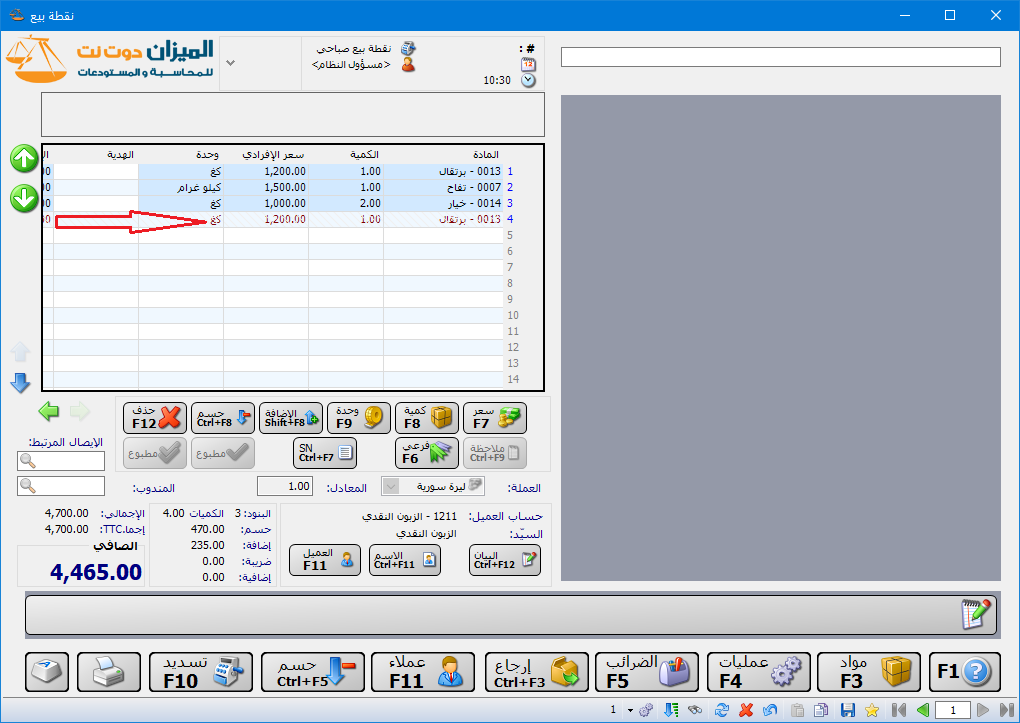
.
- Show Receipt Payment Summary: After payment, display Net, Received, Refunded and Outstanding amounts.
- Save Receipt After Session Closure : When a receipt is created in a closed session, three policies are available.
- Warn Before Saving: Ask whether to save in the closed session, as shown below.
- .
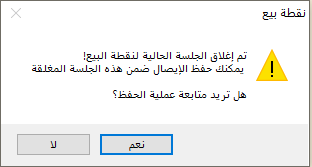
.
- Save as Suspended Receipt Only: Allow suspending the receipt but prevent payment or other saving operations.
- Prevent Saving : Allow only undoing changes or deleting the receipt.
- Close Visit Automatically When Receipt Is Paid : Close the linked restaurant visit after POS payment. This interacts with the Restaurants module.
- Ask Before Closing Visit: After payment, ask whether to close the linked visit. This requires automatic visit closure to be enabled.
Show Suspended Receipts From: #
- All Suspended Receipts : Display suspended receipts for all users in all sessions.
- Same Session: Display suspended receipts for users sharing the current session.
- Same POS Type: Display suspended receipts for users working with the same POS type.
- Selected POS Types: Choose the POS types whose suspended receipts users can see.
Include in Tax Register: #
Register the POS receipt in the configured Syrian or Saudi tax module.
Note : After registration, the receipt cannot be edited or deleted through the ordinary receipt workflow.
- Insert Automatically on Save: Register the receipt directly after payment or saving.
- Ask Before Insertion: Ask whether the user wants to add the receipt to the tax register.
- Show Dialog When Inserting: Enable this option to display a summary of tax registration.
- Prevent Printing Before Insertion: Enable this option to prevent printing until the transaction has been entered in the tax register.
Print tab: #
The fields on this tab define two templates for printing POS invoices: a first template and a second template. Each template contains the following fields:
Design: The name of a design created in Print Designer with the design type “POS Receipt.” To create one, open Tools > Print Designer.“ Click New and select the “POS Receipt” design type, as shown below:
.
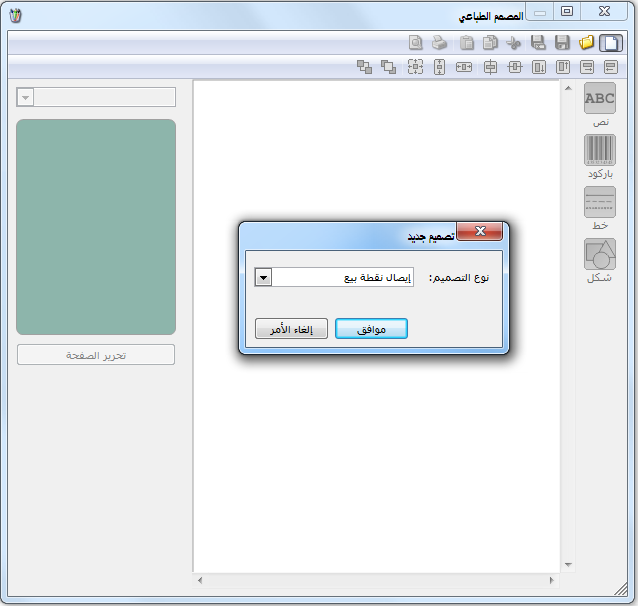
.
Then design the POS receipt to suit your business.
Page: Select the page specified when creating the design above.
Printer: Select the default printer for POS receipts.
Copies: Enter the number of copies to print automatically using the selected design.
Group: Select a design group to print all designs defined in that group. Creating these groups is explained earlier under “Managing Design Groups.”
Print Automatically on Save: Enable this option to print the POS receipt immediately after payment is completed.
Print Automatically on Hold: Enable this option to print the POS receipt immediately when it is placed on hold.
2. Button Groups: #
Use the Button Groups window to create item or account buttons on the POS screen. Clicking an item button automatically adds that item to the invoice lines.
This speeds up item entry and reduces manual input errors. Instead of searching for an item or entering it manually, the user can click its button to add it to the invoice.
Customize button groups to match your business or store. Organize items logically by category or department to make POS transactions faster and more efficient.
To define the buttons displayed on the POS screen, select “Button Groups” from the “Point of Sale” menu. The following window opens:
.
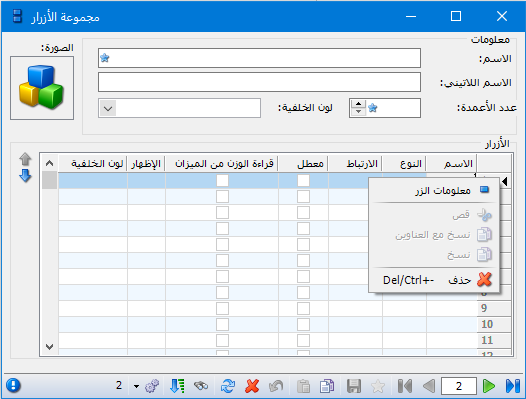
.
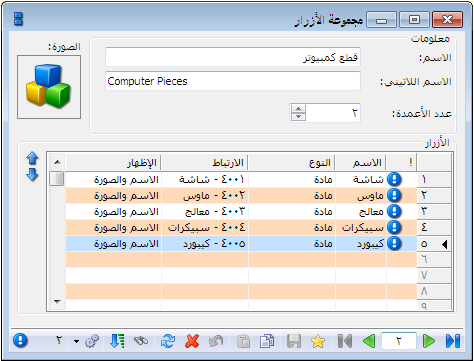
In the “Button Group” window, define a parent button that displays a group of child buttons when clicked. For example, create a “Computer Parts” group containing a monitor, mouse, speakers, and processor as follows:
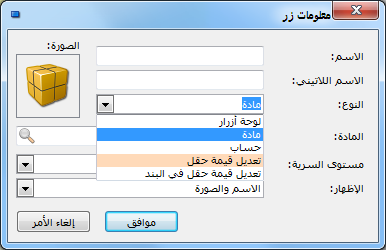
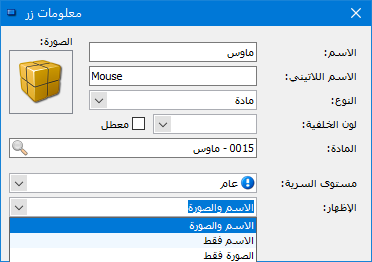
Enter the parent button name in the Name field and “Computer Parts” in the Latin Name field. Define the mouse, monitor, speakers, and processor as child buttons in the grid. Right-click beside a row, as shown above, and select Button Information. The following window defines the child button and contains these fields:
.
.
Fields in the POS Button Window #
Name: The child button name, such as Mouse.
Latin Name: The same name in English.
Type: The button type. Three types are available:
Button Panel: #
Select this option to include an existing parent button within the group being defined. For example, if a “Processors” group already contains child buttons for different processor models, select “Button Panel” to include that existing group within “Computer Parts.”
Item: Select this option to add a specific item to the POS invoice lines when the button is clicked.
Account: #
Select this option to load an account into the POS screen.
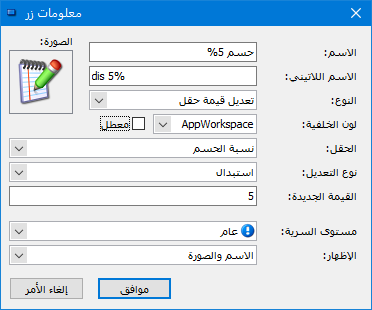
Modify Field Value: #
Select this option to make the button change the invoice-wide discount percentage or discount amount. Choosing a field displays two additional fields: Modification Type, which specifies Replace, Add, or Multiply, and New Value, which specifies the numeric value to use. The following example defines a button that applies a 5% invoice-wide discount:
.
.
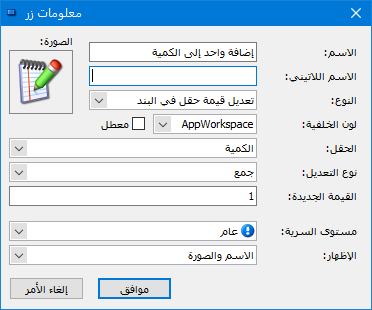
Modify a Line Field Value: #
Select this option to change a field on the selected invoice line, such as quantity, unit price, unit, price level, color, or size. Choosing a field displays Modification Type (Replace, Add, or Multiply) and New Value. The following example defines a button that adds one to the item quantity each time it is clicked.
.
.
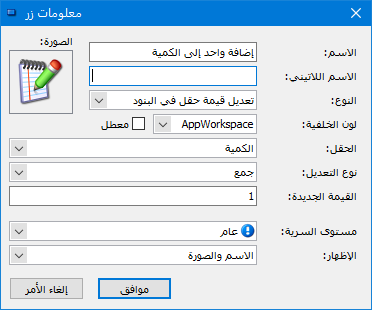
Modify a Field Across Lines: #
Select this option to change a field across all invoice lines, such as quantity, unit price, unit, price level, color, or size. Choosing a field displays Modification Type (Replace, Add, or Multiply) and New Value. The following example defines a button that adds one to each item quantity whenever it is clicked.
.
.
Item, Button Panel, or Account: #
Select the target for the chosen Type. For Item, select the required item; for Account, select the required account; and for Button Panel, select a previously defined button group.
Background Color: Choose the POS button background color.
Disabled: Enable this option to disable the POS button.
Confidentiality Level: Select the access level for the button being defined.
- Appearance: Choose “Name and Image,” “Name Only,” or “Image Only.” Assign an image to the button and decide whether the POS screen displays its name with the image, its name alone, or its image alone, as shown below:
.
.
Define the remaining items as child buttons in the same way to create the following button group:
.
.
To change the display order, select a button and move it using the two blue arrows on the left of the window.
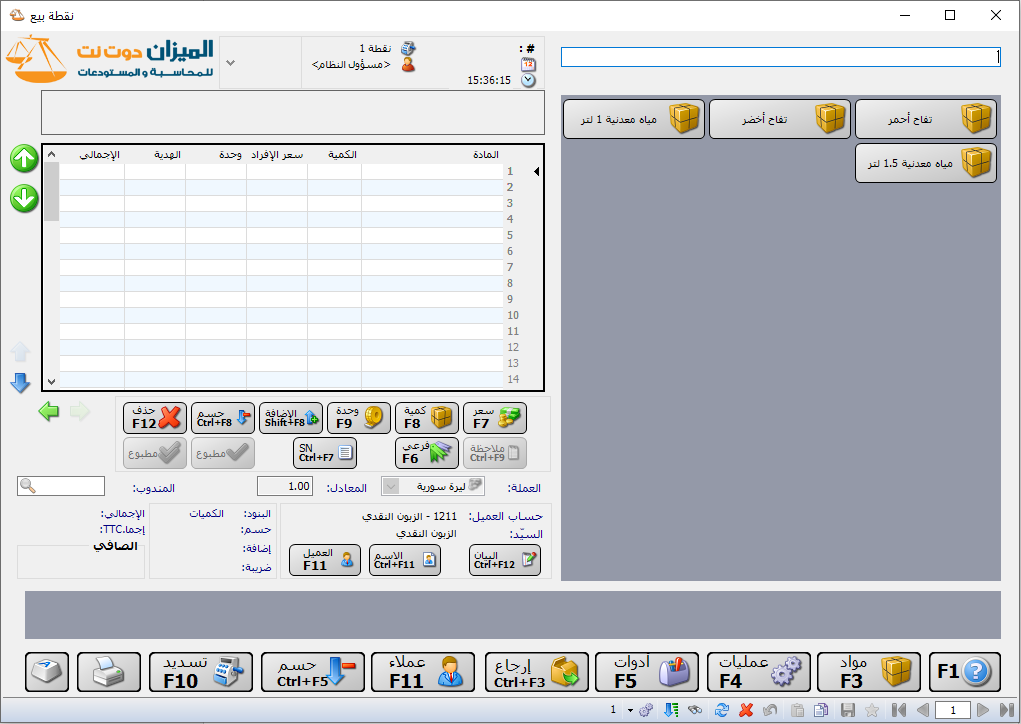
If this group is selected in the Main Button Group field of the POS Types window, its buttons appear directly on the main POS screen, as shown below:
.
.
Example: Designing POS Buttons #
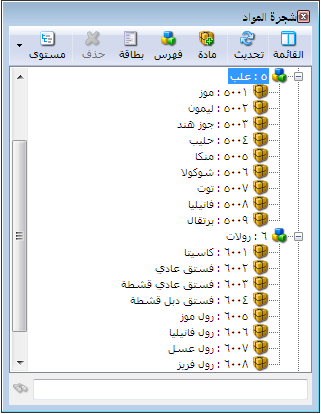
Suppose an ice cream company sells tubs and rolls. Tubs come in flavors such as banana, orange, milk, and lemon, each defined as an item. Rolls include pistachio, double pistachio, and banana. To display roll varieties on the main POS screen because they sell more frequently, with a button that opens the tub varieties, proceed as follows:
.
.
- Define the items in the item tree, as shown below:
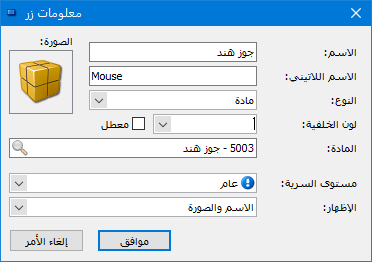
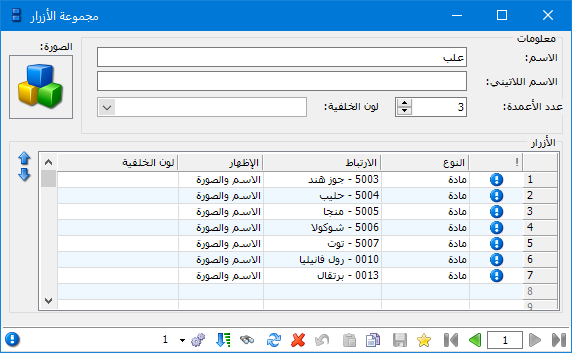
- Create a button group named “Tubs.” Each button has the Item type and uses the name of its assigned item, as shown below:
.
.
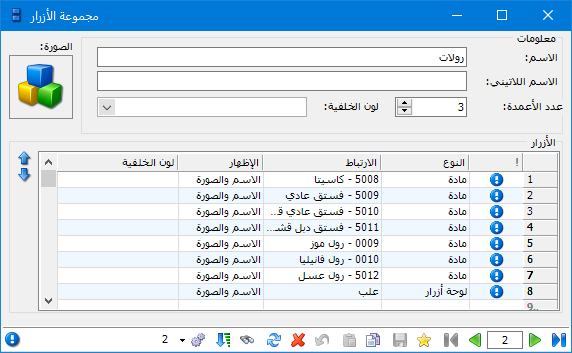
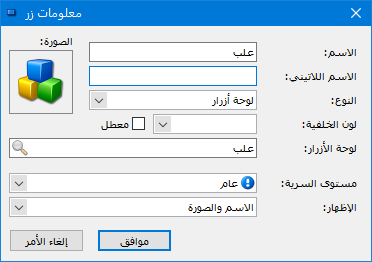
- Create another group named “Rolls,” containing the items in the Roll category and a button that opens the Tubs group, as shown in the next two figures:
.
.
- Return to the Tubs group and add a button named “Back.” Set its type to Button Panel and select the previously created Rolls panel. This button returns from Tubs to Rolls; without it, users cannot leave the Tubs panel after opening it.
.
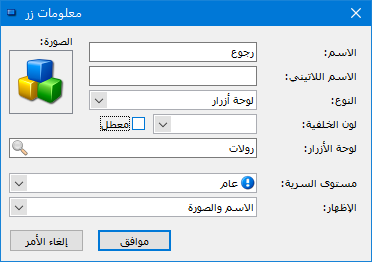
.
- In the POS Types window, select the Rolls panel in the Main Button Panel field so that it appears on the main POS screen, as shown below:
.
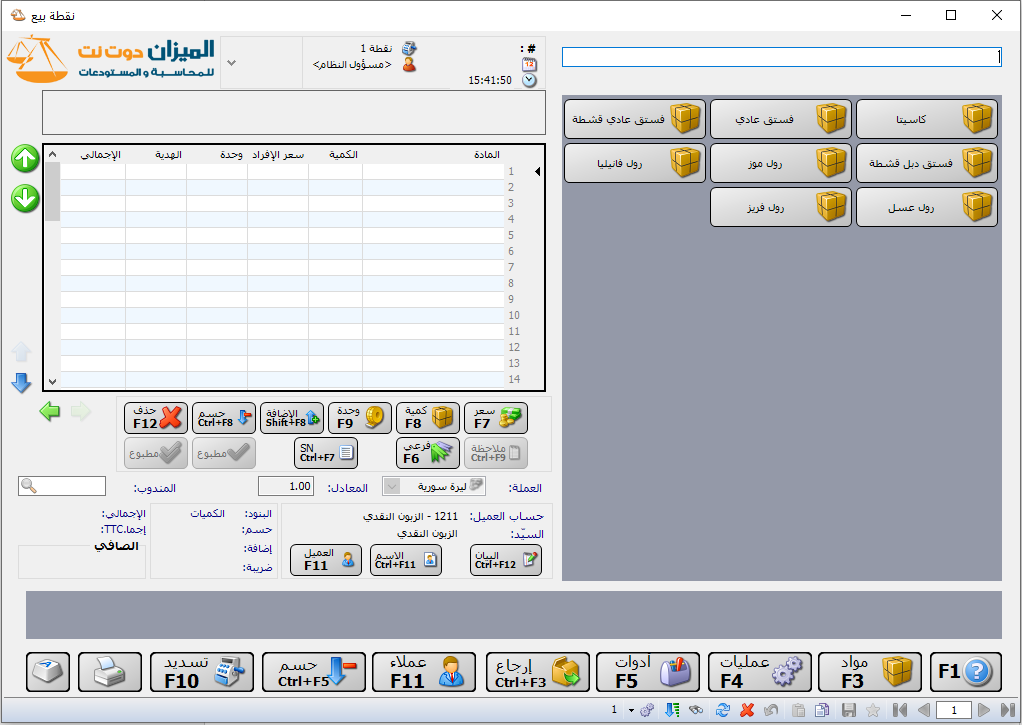
.
3. The POS Window: #
.
 #
#
.
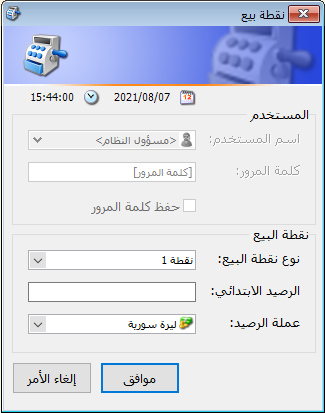
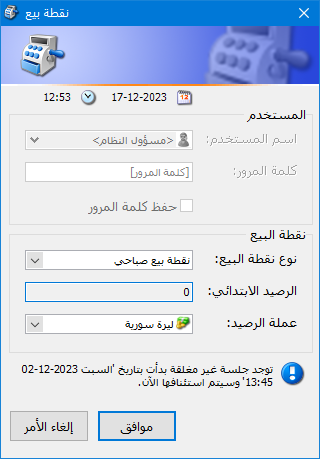
Select “Point of Sale” from the “Point of Sale” menu to open the following window:
- Date and Time: Displayed at the top of the window, showing the date and time of entry into the POS session.
- Username and Password: The current database user’s username and password are populated automatically.
- POS Type: Select a POS type defined in the POS Types window.
- Opening Balance: The cash balance in the drawer at the start of the sales session.
- Balance Currency: Enter the currency of the opening balance.
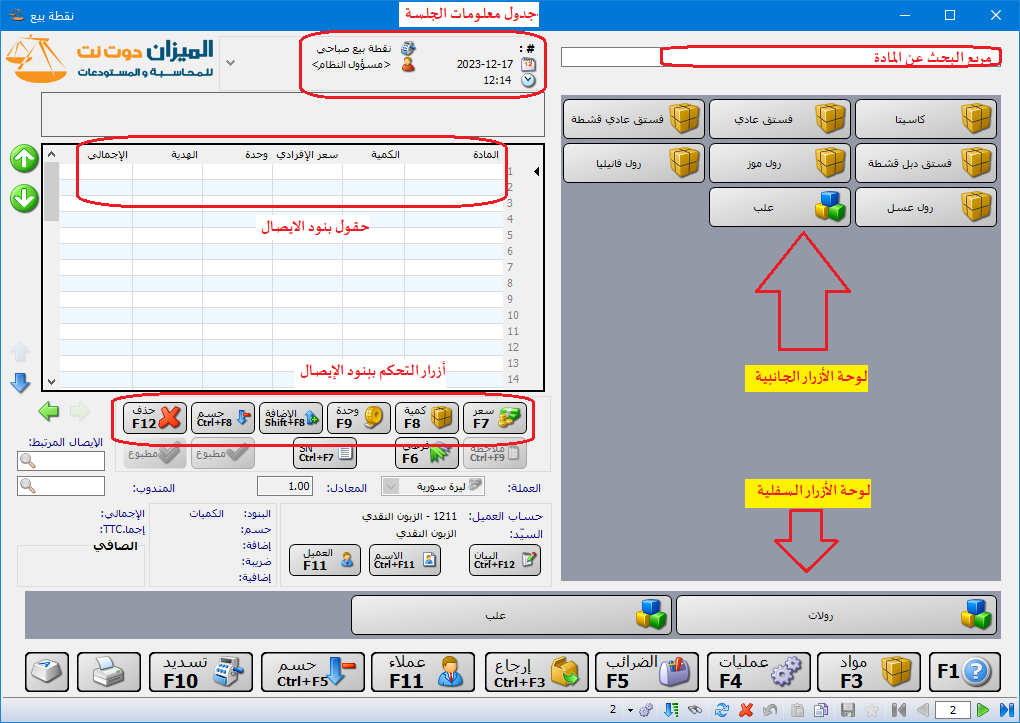
The POS window contains the following controls, as shown below:
.
.
Item Search Box: Search for the item to add to the POS screen using its code, name, barcode, serial number, or other identifying information.
Side Button Panel: Create buttons for frequently used items in this panel. Its design is explained earlier.
Bottom Button Panel: This panel usually contains buttons that each open a separate button panel. Its design is explained earlier.
Session and Receipt Information Fields: These fields show general session or receipt information: receipt number, session date, time, POS type, and username.
Invoice Line Fields: Enter the items handled by the POS, their quantities, prices, and other details. Choose the columns displayed here in POS Types > Columns, as explained earlier.
Receipt Line Controls: These buttons modify information in the POS receipt grid, including quantity, price, and unit:

Change Price: Select the item line whose unit price you want to change, click this button, and adjust the price using the same procedure described for quantity.

Change Quantity: Select an item line and click this button to open the quantity editor on the right of the screen. Enter the new quantity with the numeric buttons or use the operators (−, +, ×, ÷ ) to adjust the existing quantity. For example, to reduce a quantity of 25 by three units, enter −3; the resulting quantity is 22.

Change Unit: Select an item line and click this button to open the item unit editor on the right of the screen.

Change Serial Number: Use this button to change an item’s serial number when Serial Numbers is enabled on the Advanced tab of its item card.

Change Line Discount: Change the discount on the selected invoice line only. Enter the discount as either a percentage or an amount.

Delete Selected Line: Select an existing item line and click this button. Depending on the deletion option configured in POS Types, the line is either crossed out and its inventory and accounting effects removed while remaining visible, or removed entirely.

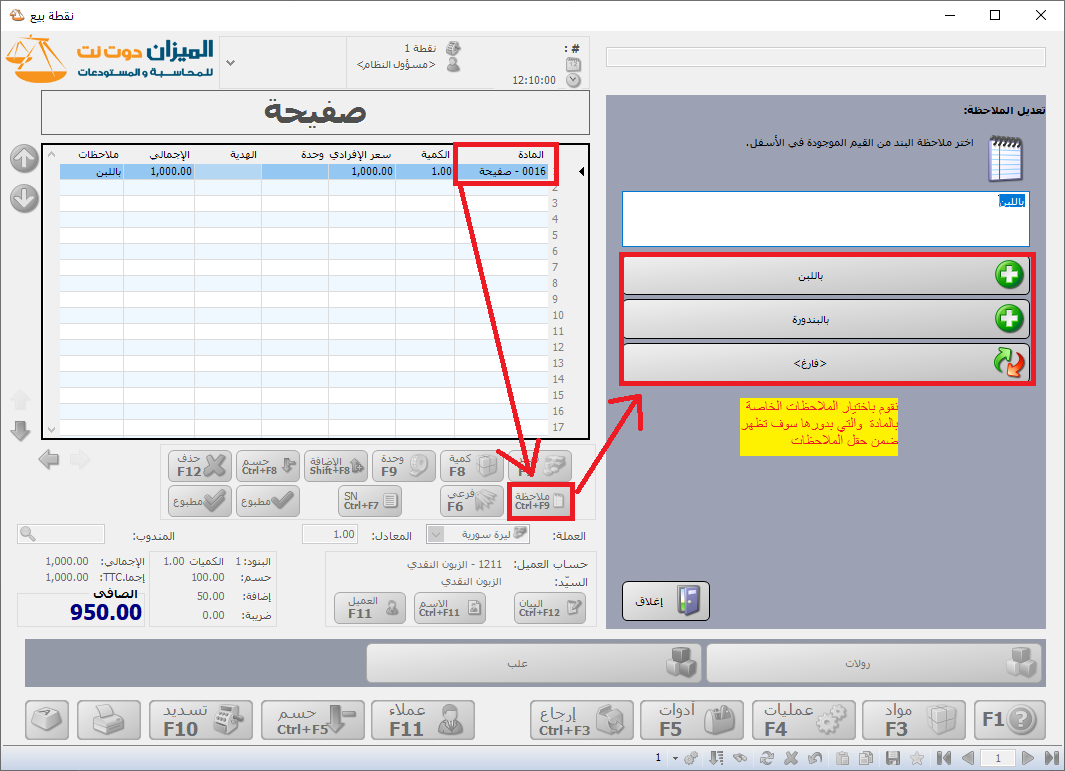
Select Note: Edit the Notes field for an item line. This button is available when Notes is enabled in POS Types and lets the user insert a useful predefined note.
Example: Using POS Notes
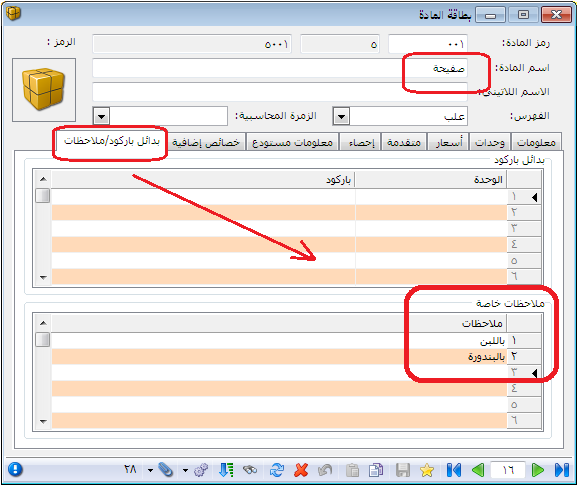
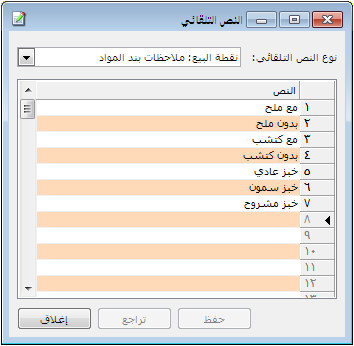
Suppose a fast-food restaurant wants item notes for extra salt, no ketchup, added sauce, and other meal preferences. Define them either on the item card’s Alternative Barcodes / Notes tab or in AutoText under “Point of Sale: Item Line Notes.” Both appear through Select Note. AutoText notes are general and available for every item; item-card notes appear only when editing that item’s note. The following figures show how to enter and select these notes:
Entering Item Notes on the Item Card:
.
.
Entering Notes in AutoText:
.

Change Customer (Customer Name Field): #
Change the customer associated with this receipt by changing the customer name. Click this button to display customer cards and select a customer from the list.

Change Customer Account: #
Change the default customer account shown in the Customer Account field, originally configured in POS Types. Clicking this button opens the company’s customer accounts on the right of the screen; select the required account.
Totals Fields: #
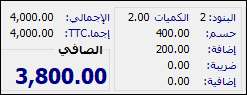
These fields summarize the current receipt: lines, quantities, discount, surcharge, total, and net amount, as shown below:
Whole-Receipt Controls: #
These buttons act on the entire receipt, allowing you to print, settle, hold, cancel, and perform other actions. From left to right, they are:

On-Screen Keyboard: #
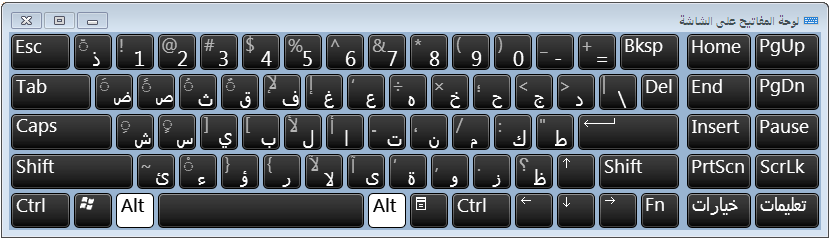
Click this button to display an on-screen keyboard for entering letters or numbers. It is useful when the device has no physical keyboard or the keyboard is faulty. The following keyboard appears:

Print Receipt: #
To print an earlier receipt, open the POS, enable record navigation buttons, navigate to the receipt, and click Print Receipt.
Note: If a design is specified in the Free Printing field of POS Types, clicking Print opens the following window for selecting the design to print:
Settle: #
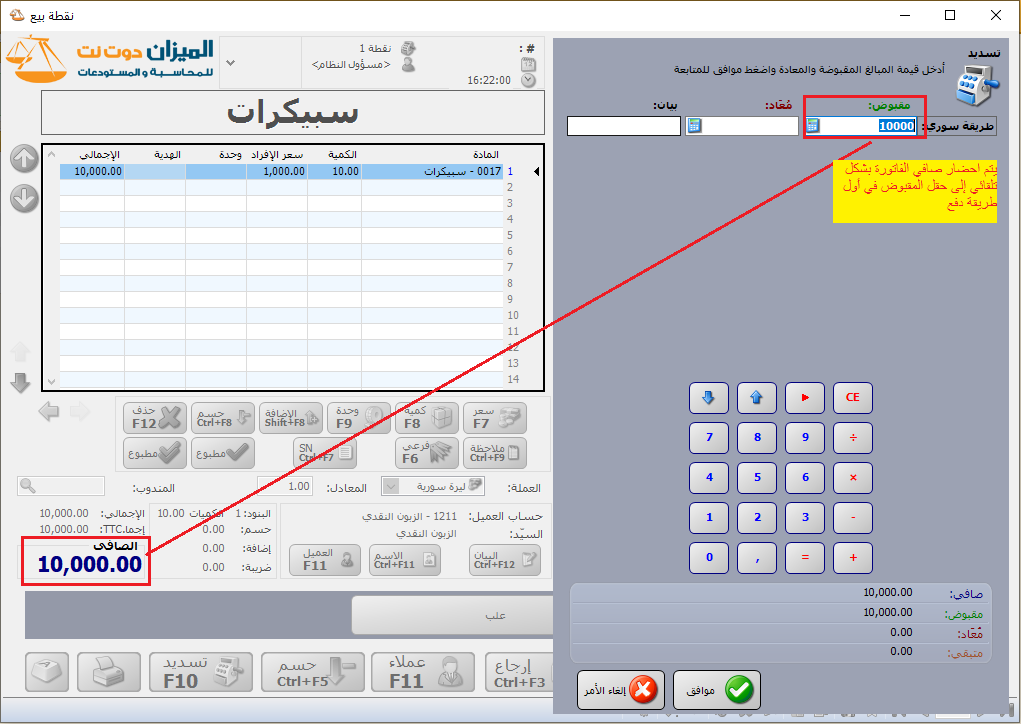
Use this button to collect payment for POS sales or refund returned items. For example, ten speakers at SYP 1,000 each total SYP 10,000. Clicking Settle opens the payment panel on the right, with amount fields for the currencies of payment methods enabled in POS Types > Payment Methods and numeric buttons for editing them. The invoice net amount is loaded into the first payment method by default; adjust it if necessary, then click OK to complete settlement, as shown below:
.
.
Important Rules for Received and Returned Amounts on the Settlement Screen: #
If the receipt net amount is positive, meaning sales exceed returns, clicking Settle loads it into the Amount Received field of the first payment method.
Example: #
For a sales invoice of 500 currency units, clicking Settle enters 500 in Amount Received for the first defined payment method.
If the receipt net amount is negative, meaning returns exceed sales, clicking Settle loads its absolute amount into Amount Returned for the first payment method that permits refunds.
Example: #
For a sales return of 300 currency units, clicking Settle enters 300 in Amount Returned for the first payment method that permits refunds.
- For a sales invoice, entering an amount received greater than the invoice net amount automatically calculates the customer’s change and places it in Amount Returned for the first method that permits refunds.
Example: #
For a sales invoice of 750 currency units, Settle initially shows 750 received. Changing this to 1,000 calculates change of 250 and enters it in Amount Returned.
- For a sales return, entering a returned amount greater than the invoice net amount leaves that amount unchanged and posts the invoice as a credit transaction.
Example: #
For a sales return of 250 currency units, Settle initially enters 250 returned. If changed to 200 or 300, the invoice is posted as a credit sales return with a payment of 200 or 300 currency units.
- When amounts are received through multiple payment methods, change is calculated automatically using the first method that permits refunds so that the receipt balance is zero and the receipt is posted as a cash transaction.
- Changing a payment method’s currency exchange rate automatically adjusts the returned amount so that the receipt is posted as a cash transaction.
- All these calculations take each payment method’s currency and exchange rate into account.
- If none of the payment methods permits refunds, the receipt is posted without calculating any Amount Returned fields.
- The exchange rate of a payment method linked to the base currency cannot be changed.
- The description entered beside each payment method on the settlement screen is copied automatically to that method’s amount line in the generated journal entry.
- To calculate change using a payment method other than the first eligible method, click “Calculate Remaining Amount Automatically,” the small calculator button in each Amount Returned field. The net amount received must exceed the receipt amount.
- As a general rule, changing an Amount Received field or an exchange rate adjusts change to bring the remaining balance to zero, unless net receipts are less than the receipt amount. Changing an Amount Returned field never changes received or returned amounts for other payment methods.
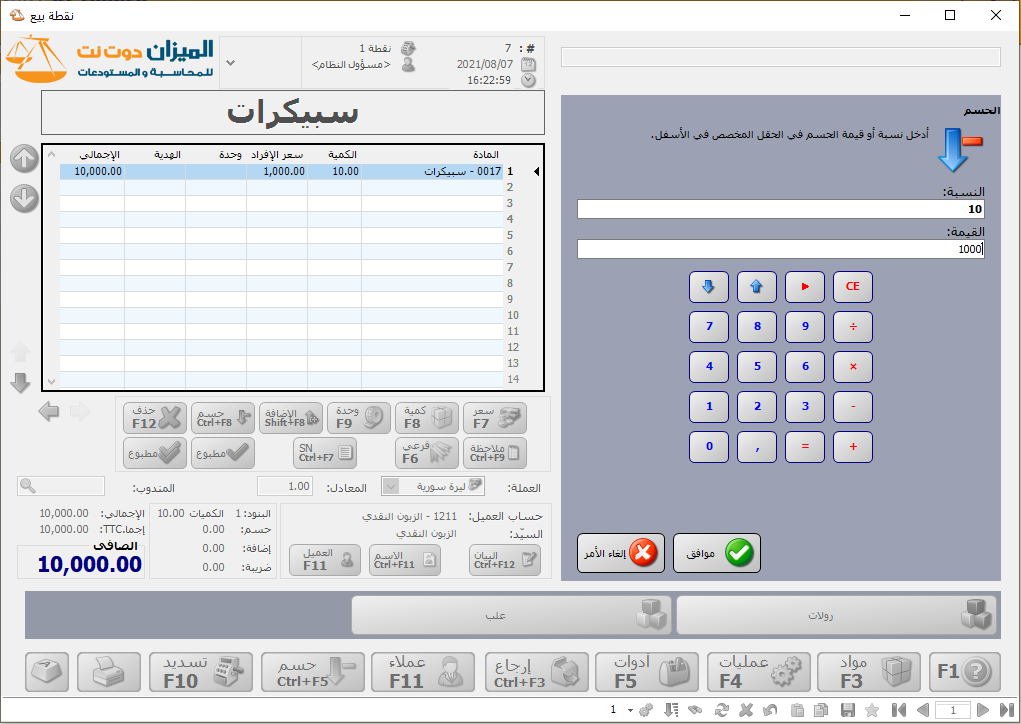
Change Discount: #
Use this button to change the invoice-wide discount by entering either a percentage or an amount. The following window opens:
.

Change Customer Account: #
Change the default customer account shown in the Customer Account field, originally configured in POS Types. Clicking this button opens the company’s customer accounts on the right of the screen; select the required account.
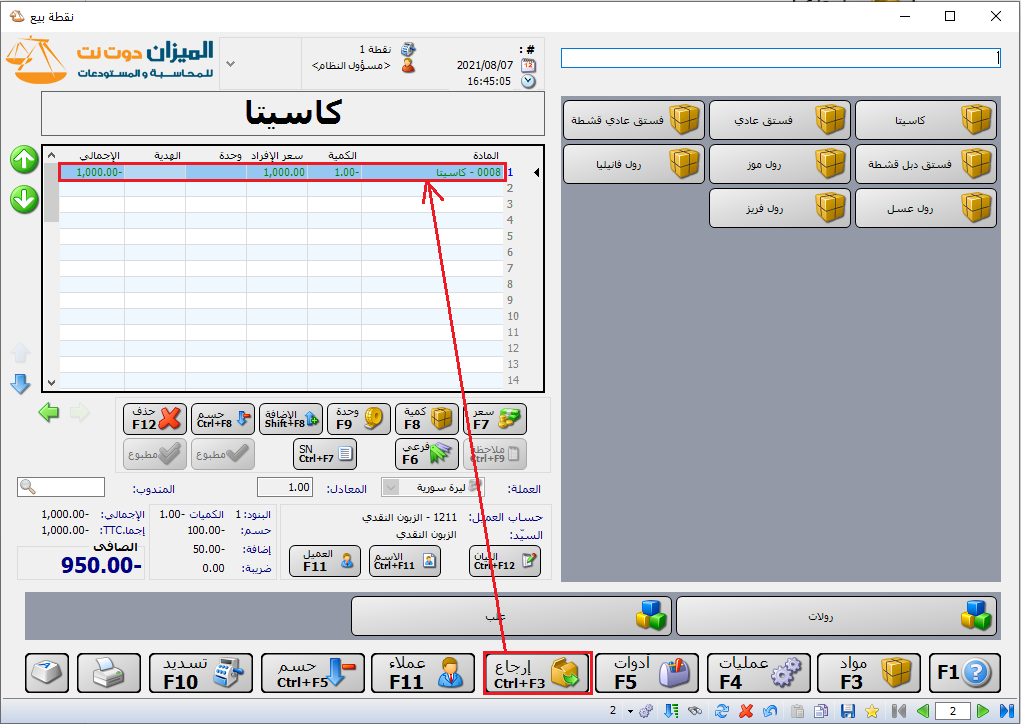
Return: #
Use this button to return all or part of a previous sale. Click Return, select the item, and adjust its quantity or price if needed. Returned items appear in a different color with negative quantities so they are easy to distinguish, as shown below:
.
Taxes: #
Click Taxes to display the taxes selected in Invoice Types and calculate them using the configured rates. See the Invoice Types guide.
Operations: #
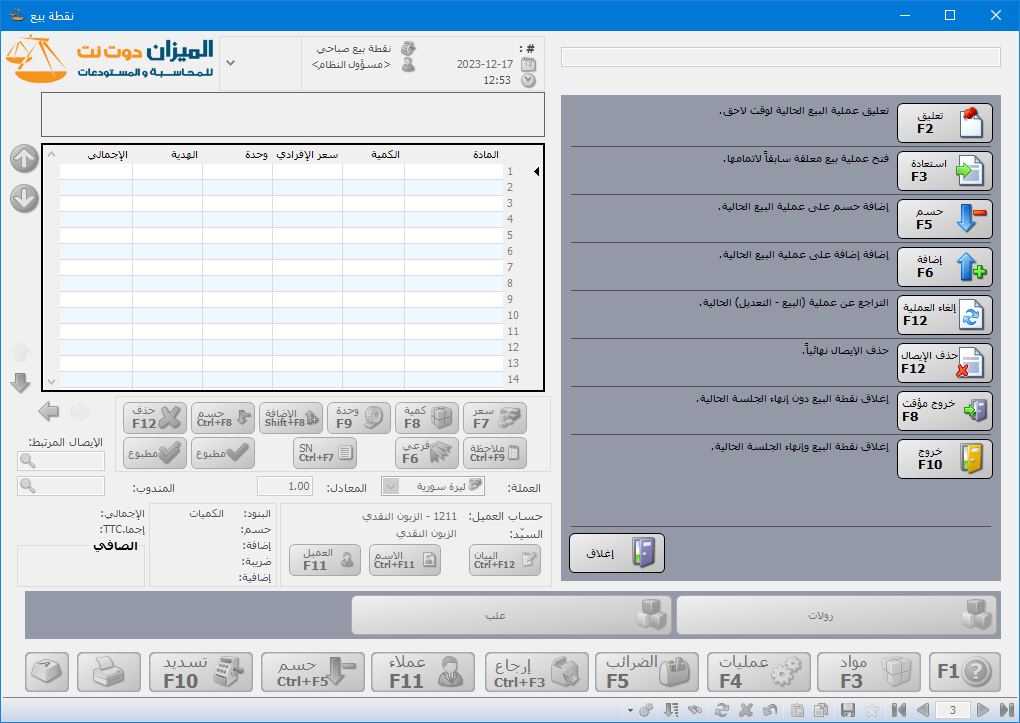
Click Operations to open the following controls on the right of the POS screen:
- Hold: Place the current sale on hold so you can recall and complete it later.
- Recall: Recall a sale that was previously placed on hold.
- Discount: Apply a discount to the total of the current sale.
- Add: Apply a surcharge to the total of the current sale.
- Cancel Operation: Discard changes to, or the addition of, the current POS receipt.
- Delete Receipt: Permanently delete the current POS receipt.
- Temporary Exit: Close the POS window and pause the current session. Opening the POS again resumes it. The following login window indicates that an existing temporarily closed session will now be resumed:
.
- Exit: End the current session and exit the POS.
The following figure shows the Operations panel with these commands:
Items: #
Click Items to display an item list on the right of the POS screen.. As shown below:
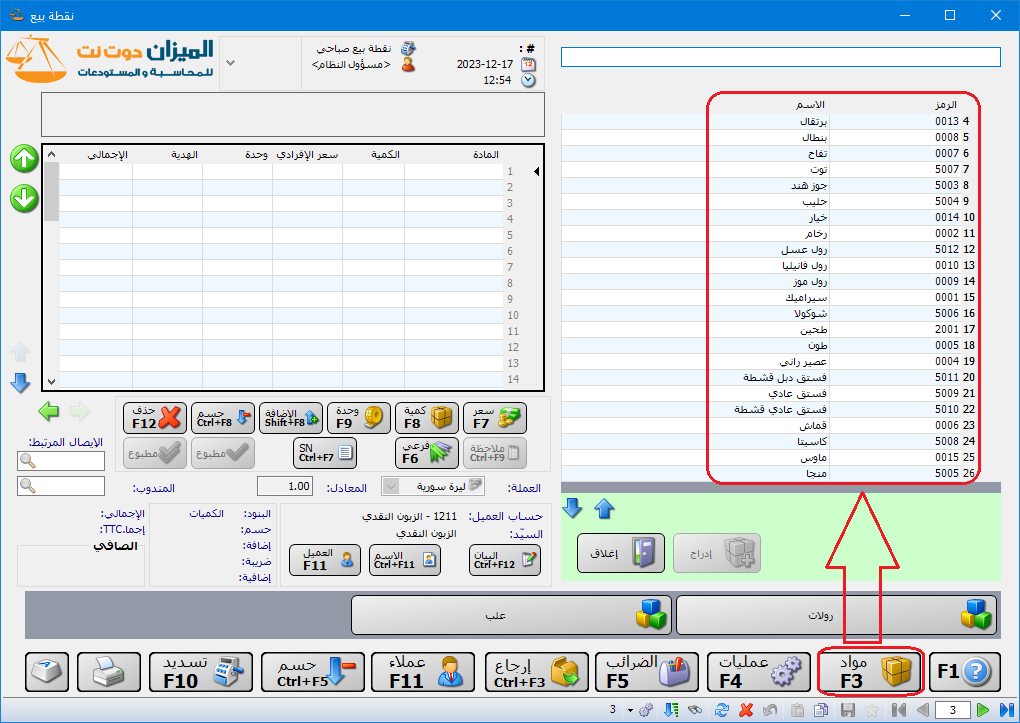
.
4-Processing POS Sessions: #
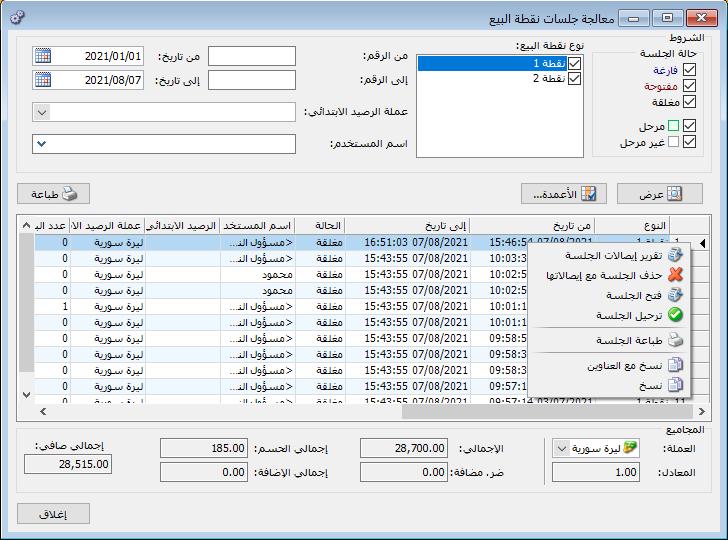
Use this window to view the sales sessions recorded through the POS.
Select Processing POS Sessions to open the following window:
.
Session Status: #
The following options are available:
- Empty: Select this option to show sessions that were opened and closed without any transactions.
- Open: Enable this option to show details of open sessions.
- Closed: Enable this option to show details of sessions that have been closed.
- Posted: Enable this option to show posted sessions whose cash drawers have been closed and transferred.
- Unposted: Enable this option to show sessions that have not been posted.
POS Type: #
Select the POS types whose sessions you want to review.
From Number / To Number: #
Specify a number range to display sessions within that range.
From Date / To Date: #
Specify a date range to display sessions within that period.
Opening Balance Currency: #
To view sessions whose opening balance was in US dollars, select US Dollar here. Only sessions that began with a dollar-denominated opening balance are shown.
User Name: #
Select a user to display POS sessions created and operated by that user.
Show Button: #
Use this button to display sessions matching the preceding filter criteria.
Columns Button: #
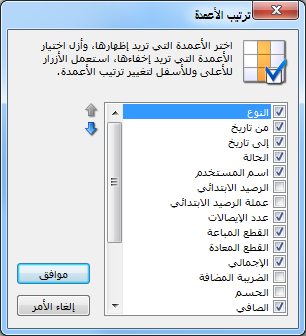
Click Columns to choose which session detail fields appear as report columns. Select a field and use the two blue arrows at the upper left to change the column order.
Print: #
Use this button to print the session processing report.
Currency and Exchange Rate: #
Select the currency used to display the total value of the listed sessions and its exchange rate against the base currency.
Total, Total Discount, Added Tax, and Net Total: #
These fields show aggregate statistics for all listed sessions in the selected currency and exchange rate.
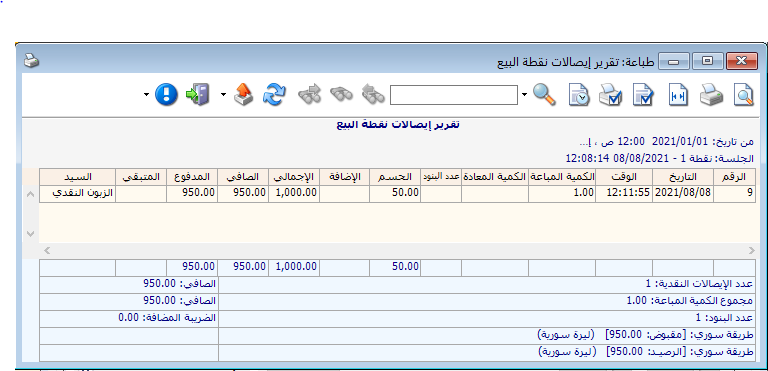
Session Receipts Report: Right-click a session in the processing window and select “Session Receipts Report” to view its details, as shown below:
5-Posting a POS Session (Generating the Closing Journal Entry): #
After closing a POS session, transfer its amounts to the company’s main cash account, or “Closing Cash Account.” POS cash drawers are often separate from the main company cash account and require regular transfers. Al Mizan .NET automates this process while letting you select closing accounts and accounts for any cash shortage or surplus.
Posting is configured in the Payment Method Types window, described earlier and reviewed here:
Information: #
Code: The record number.
Name: The payment method name in Arabic.
Latin Name: The payment method name in English.
Currency: The currency used for payment.
Account: The account to which paid amounts are posted.
Commissions: #
Collection Commission Percentage: Enter the commission rate charged for this payment method, if applicable. Credit card payments are a common example, as shown above.
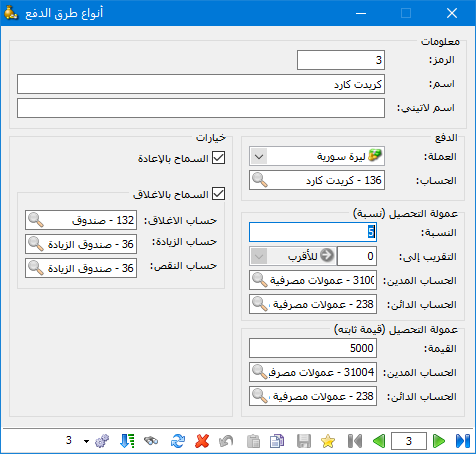
.
Collection Commission– Debit Account: Enter the debit account for collection commission, usually an expense account.
Collection Fee– Credit Account: Enter the credit account for collection commission, usually a commission payable account.
Allow Refunds: Enable this option to permit refunds through the defined payment method.
Closing: #
Account: Enter the main cash account to which the POS drawer balance is transferred.
Cash Surplus Account: Enter the account used to record a surplus in the point-of-sale cash drawer.
Cash Shortage Account: Enter the account used to record a shortage in the point-of-sale cash drawer.
Suppose a closed session has three receipts of SYP 1,500 each. To transfer the SYP 4,500 total from the POS drawer to the main cash account, open Processing POS Sessions, right-click the session, and select “Post Session,” as shown below:
.
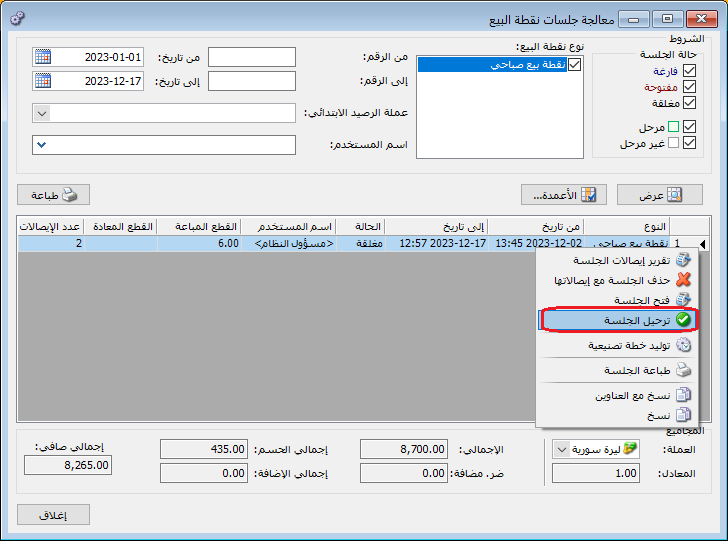
.
Clicking Post Session opens the posting window with the following settings:
Date: #
Enter the posting date, usually today’s date.
Payment Method Lines: #
The window automatically lists payment methods used in the session, with their net received or paid amounts in the Amount field. Default closing, surplus, and shortage accounts are also shown and can be changed. Enter the actual cash drawer amount, which may equal, exceed, or fall below the recorded net amount. At the bottom, Add inserts a payment method, Delete removes one from the list, OK confirms posting, and Cancel cancels the operation.
Using the previous example, the following cases illustrate the journal entries generated by posting:
Journal Entries Generated by Posting: #
Case 1: #
Actual Cash Drawer Amount: 4,500
Leave the default amounts unchanged and enter only the posting date, as shown below:
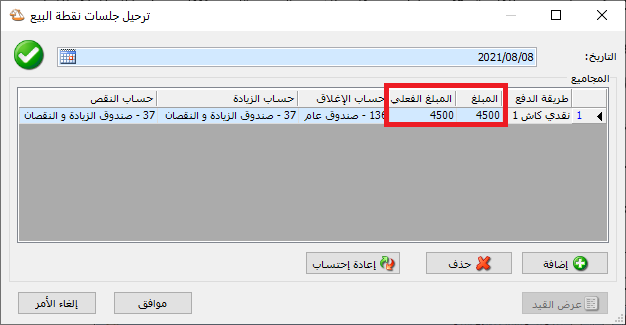
.
Click OK to generate the following journal entry:
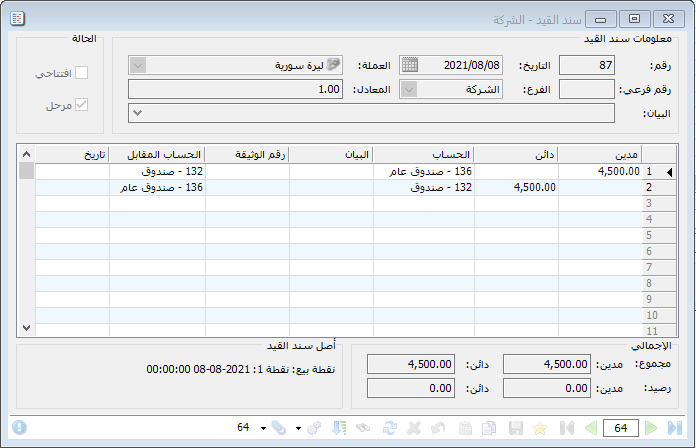
.
The entry transfers the POS drawer balance to the main cash account without any shortage or surplus.
Case 2: #
Actual Cash Drawer Amount: 4,400
Change Actual Amount to 4,400. The posting window appears as follows:
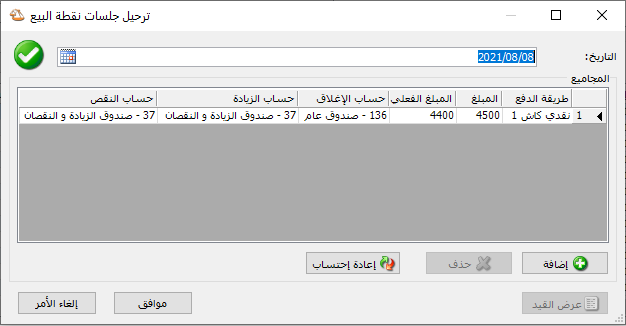
.
Click OK to generate the following journal entry:
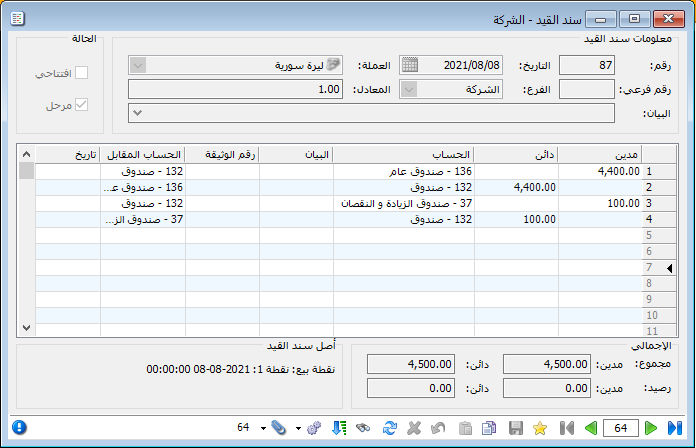
.
The entry transfers SYP 4,400 from the POS drawer to the main cash account and records the SYP 100 shortage in the shortage account.
Case 3: #
Actual Cash Drawer Amount: 4,600
Change Actual Amount to 4,600. The posting window appears as follows:
.
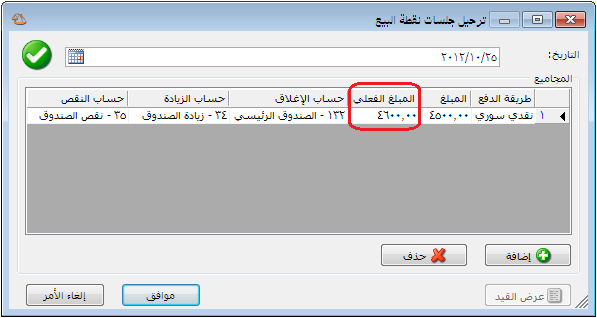
.
Click OK to generate the following journal entry:
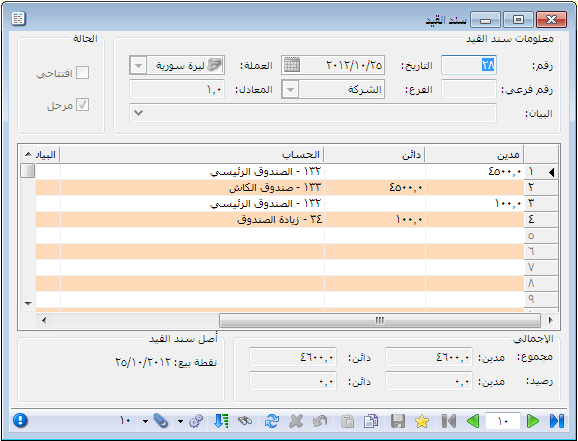
.
The entry transfers the recorded SYP 4,500 balance plus the SYP 100 surplus to the main cash account and records the surplus in the surplus account.
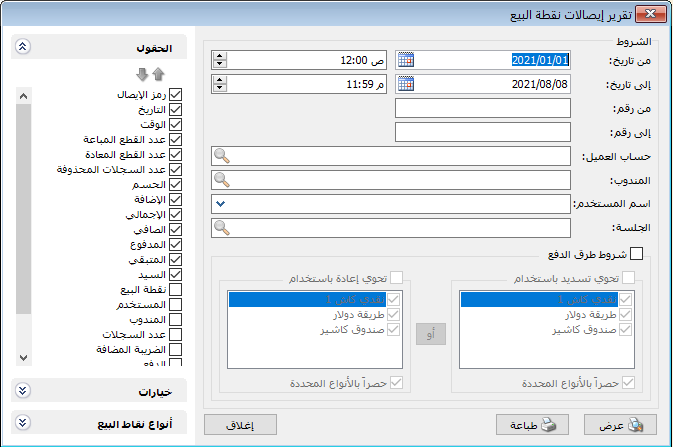
6. POS Receipts Report: #
 #
#
.
Use this report to view detailed information for a set of POS receipts. The report criteria window contains the following fields:
Conditions: #
From Date / To Date: Specify a date range to show receipts dated within that period.
Time Fields: Set the start and end times for the dates entered in From Date and To Date.
Customer Account: Select an account to display its associated receipts.
Representative: Select a representative to display their associated receipts.
User Name: Select a user to display receipts entered by that user.
Session: Select a session to display its receipts.
Fields: #
Select the fields to include in the final report on this tab.
Options: #
It contains the following options:
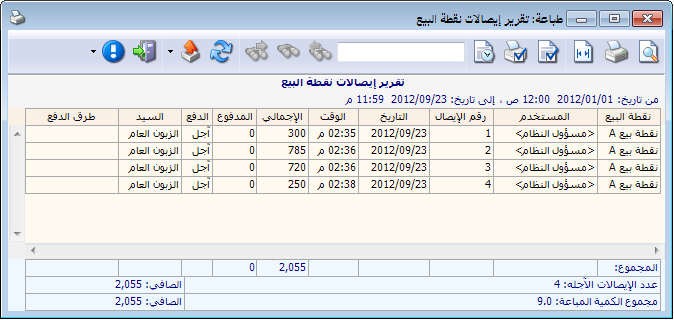
- Show Totals Only: When this option is disabled, each receipt appears separately, as shown below:
.
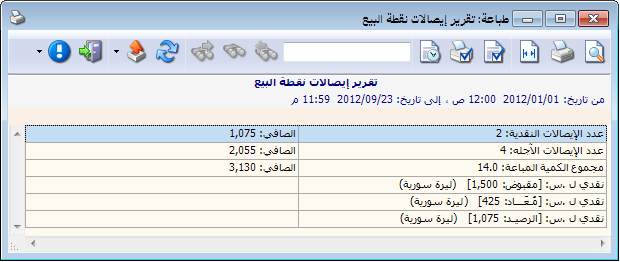
When enabled, the report shows aggregate information for all receipts matching the criteria, as shown below:
.
- Cash Receipts: Enable this option to display cash receipts.
- Credit Receipts: Enable this option to display credit receipts.
- Show Held Receipts: Enable this option to display receipts placed on hold for later recall and completion.
POS Types: Use this tab to select the POS types whose receipts you want to display.
.


