


Invoices mainly consist of the sections illustrated below.
.

.
Main Sections of the Default Invoice:
Invoice Header: #
The header contains the following fields:
Number: #
The unique invoice number. Enter it manually or let the program assign sequential numbers.
Subnumber: #
Entered manually, this is usually the external document or reference number used to record the invoice and retrieve it later.
Date: #
Set the transaction date for a purchase, sale or other operation. It defaults to today but can be entered manually within the accounting period.
Description: #
Enter any notes specific to this invoice.
Customer Account: #
Select the customer account associated with the invoice: a supplier for purchases or a customer for sales.
Customer Display Name: #
This field serves two purposes: printing a name different from the account name, and recording the actual customer or supplier name in cash transactions without creating a separate account. Reports can then use this field to identify cash customers or suppliers.
Payment Method: #
There are three main ways to settle an invoice:
Cash : Receive or pay the goods value in cash.
On Account : Charge the value to the customer account or credit the supplier account.
Commercial Paper: Convert the amount into a commercial paper payable on its specified due date.
Warehouse: #
Select the warehouse receiving or issuing the invoice items.
Debit Cost Center : Assign the invoice item value to the debit side of a cost center.
Credit Cost Center : Assign the invoice item value to the credit side of a cost center.
Currency: #
Select the currency used to value the invoice items.
Exchange Rate : Enter its rate against the base currency. The rate is automatically 1 when using the base currency.
Accounts: #
Cash Account : Select the account used to receive or pay the invoice amount, such as Cash or Bank.
Item Account: Select the account for the invoiced items, such as Purchases, Sales, Purchase Returns or Sales Returns. This field is optional. If blank, the account is taken from the item’s accounting group, if available, otherwise from the invoice type settings.
Status: #
This read-only indicator shows whether the invoice is finalized and whether it has generated a journal entry.
Items Tab: #
Enter the items received into or issued from warehouses, along with quantities, prices and units.
Method 1:
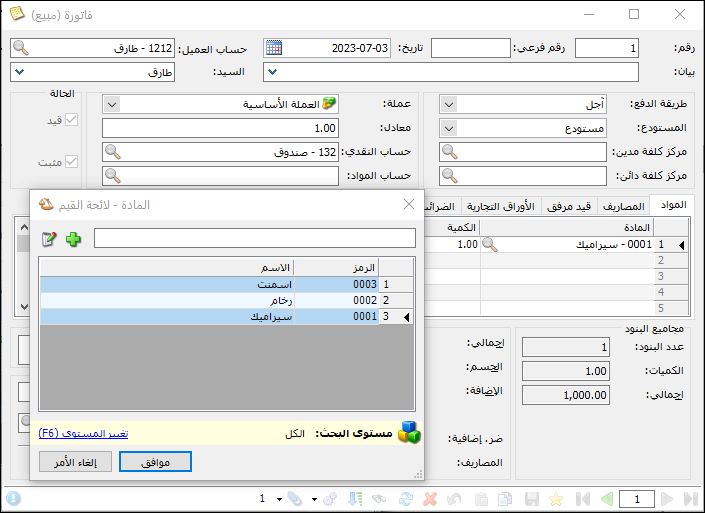
Enter an item code, name or part of its name. A unique match is inserted automatically. If multiple items match, select the required item in the displayed window and click OK, as illustrated below.
.
.
Method 2: #
In the Item field, press F4 or click the lookup icon. Enter part of an item name to filter the list, select the item and click OK. To select multiple items, hold Ctrl while clicking them, then click OK to insert all selected items.
After selecting an item, enter quantity and price. Total is calculated automatically as quantity multiplied by price. Enter the quantity in the selected unit, such as pieces or boxes, as defined in the item card.
.
.
Some quantities depend on two or more fields rather than being entered directly.
Example: #
For a marble factory, quantity in square meters can equal length × width × number of identical pieces ÷ 10,000, when length and width are in centimeters. Apply this formula as follows.
Open Definitions and Invoice Types, navigate to Sales Invoice and enable Length, Width and Independent Quantity under Columns, as shown below.
.

.
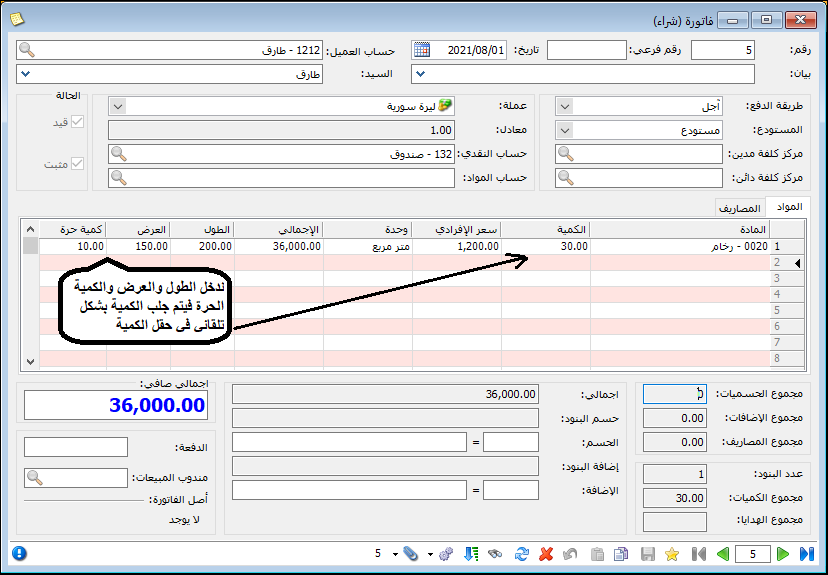
Return to the Sales Invoice and insert Marble. Enter length, width and the piece count in Independent Quantity; the quantity in square meters is calculated automatically. For example, ten pieces measuring 200 × 150 cm at SYP 1,200 per square meter produce the invoice shown below.
.
.
Right-Click Options: #
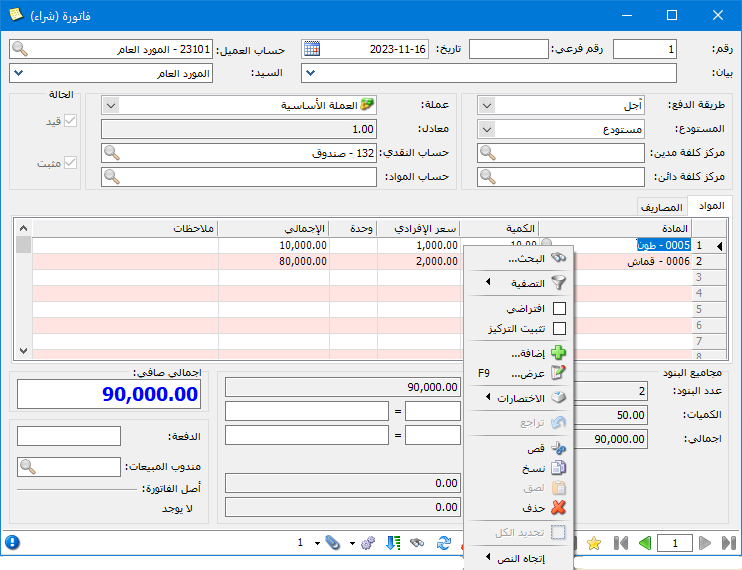
Right-click a column heading, such as Item, Quantity, Unit Price or Unit, to display these additional options.
Sort Options: #
Original Order: Keep the order in which items were inserted.
Ascending: Sort items by code from lowest to highest.
Descending: Sort items by code from highest to lowest. #
Search:
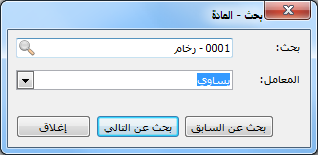
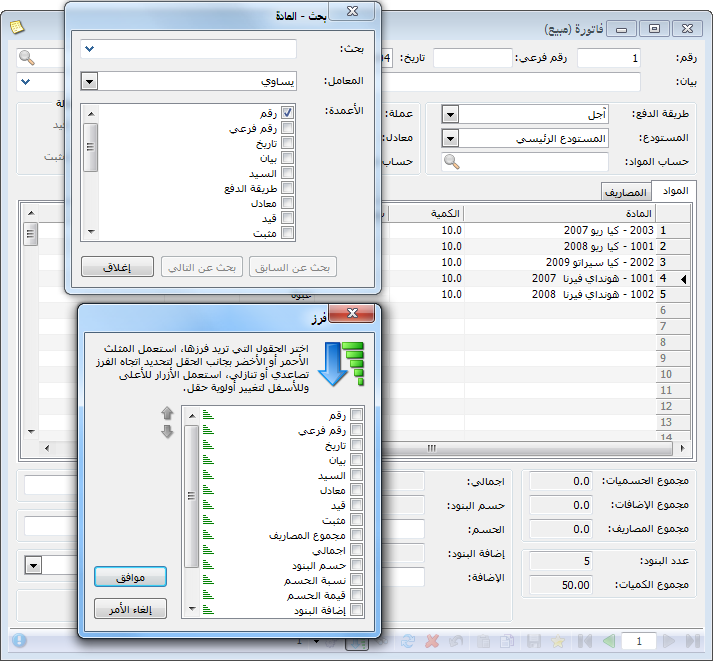
For an invoice with many items, right-click the Item heading and choose Search. Enter the item name and click Find Next to locate it. Click Next again if the item appears more than once. The menus and search window are illustrated below.
.
.
Filter: #
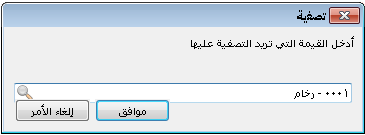
Display only lines matching a criterion without deleting other lines. For example, right-click Item, choose Filter and Equals, enter Marble and click OK to show only marble lines, as illustrated below.
.

.
Empty displays lines with no value in the selected field. For example, right-click Length, choose Filter and Empty to show lines with no length. Not Empty does the reverse.
Important Note:
This line filter differs from Filter on the invoice toolbar. Line filtering uses item-table columns, such as item name, quantity or price. Toolbar filtering selects invoice records using header or footer fields, such as Customer Account or Payment Method, excluding individual item-line fields.
Lock Focus: #
Right-click a field, such as Date or Customer Account, and choose Lock Focus. New invoices then place the cursor in that field automatically.
Apply a Value to All Lines: #
Use this option to assign a value across a selected invoice column, such as setting Quantity to 5.
Defaults: #
Right-click a field such as Date, Customer Account or Payment Method and choose Default to retain its current value in new invoices. For example, a saved default date of 1 July 2010 is inserted into each new invoice.
Prices: #
Right-click Unit Price to select prices such as Retail, Special Retail or Semi-Wholesale. The selected price is retrieved from the item card if available, allowing a different pricing level from the invoice type’s default.
Note:
Right-click the blank corner above the first row number to access options applying to the entire item table.
The following options are available:
Blank Corner Options: #
- Undo: Revert the latest changes to the Items tab.
- Copy: Copy previously selected rows.
- Select All: Select every invoice row.
- Automatically Size Columns: Resize columns for the best fit within the window.
- Add New Row: Add an empty row when the last row already contains an item.
- Search: Find a value in a selected field using the search window shown below.
.
.
Sort: #
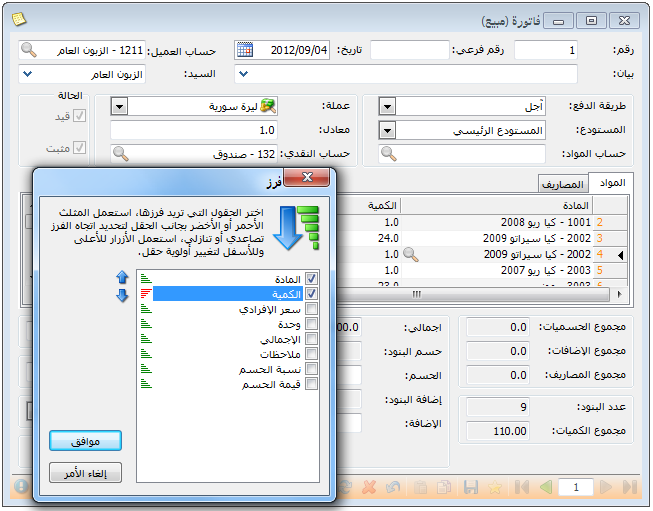
Sort invoice lines by multiple fields with ascending or descending order and field priorities. For example, sort first by Item, then by Quantity to order repeated lines of each item by their quantities, as illustrated below.
.
.
Enter Serial Numbers for Purchased Units:
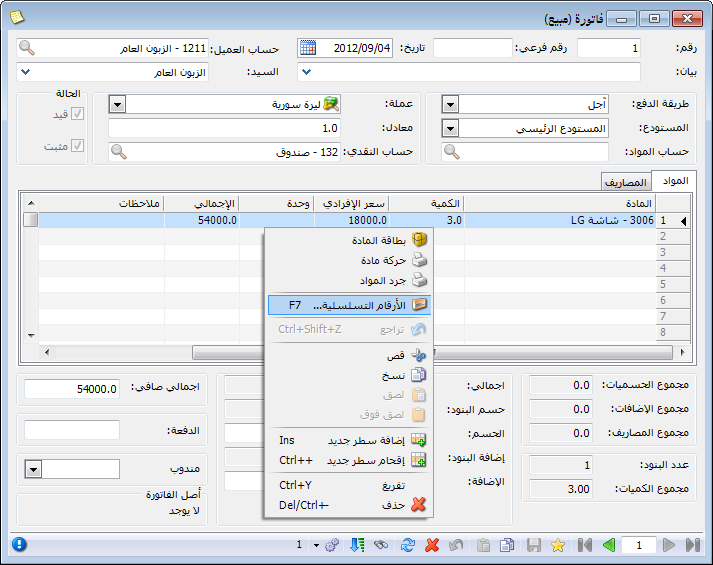
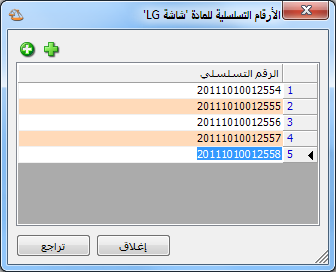
For an item with Serial Numbers enabled in its advanced settings, right-click its purchase invoice line and choose Serial Numbers. The window contains one row for each purchased unit; enter the serial numbers as illustrated below.
.
.
Expenses Tab: #
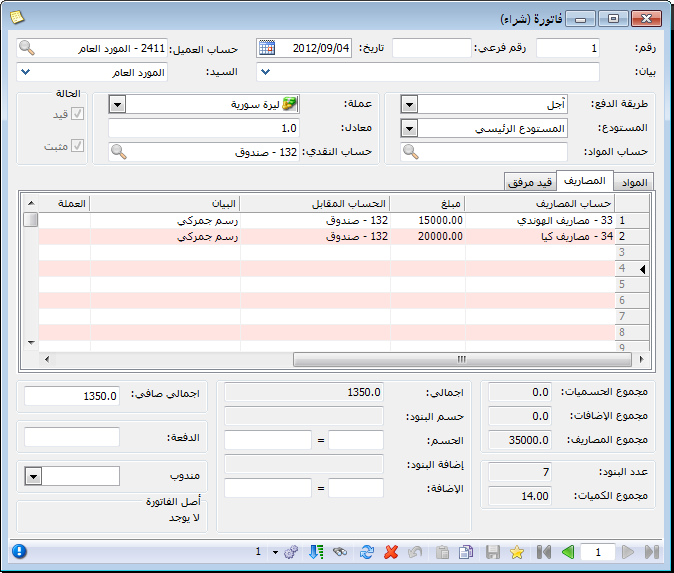
Record expenses specific to this invoice, such as costs incurred when purchasing Hyundai and Kia vehicles. This tracks invoice expenses and, if Expenses Affect Cost is enabled in the invoice settings, distributes them among purchased units according to their values. Expenses recorded in a separate journal voucher cannot be allocated this way through the invoice.
Enter the expense account, amount, counterpart account such as Cash, Supplier or Payment Paper, description, currency and exchange rate, optional debit cost center and any date differing from the invoice date. The tab is shown above.
.
.
Attached Entry Tab: #
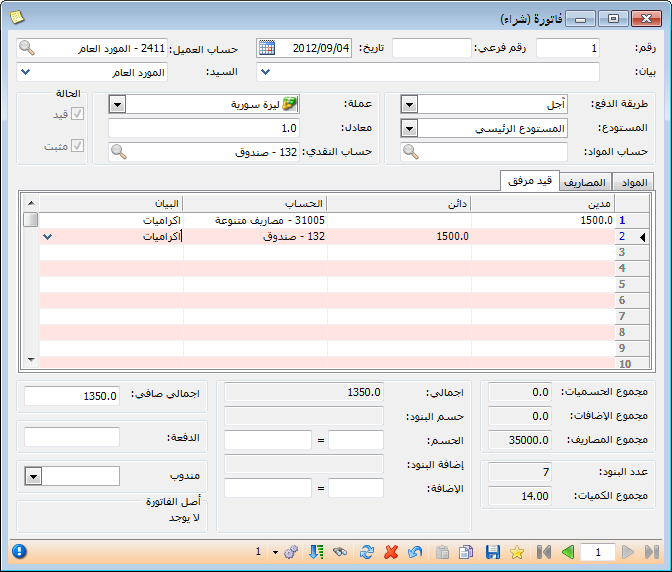
Record other journal entries related directly or indirectly to the invoice. For example, SYP 1,500 of food and drink expenses incurred while purchasing goods can be entered as shown below.
.
.
Invoice Footer: #
The footer contains calculated totals for discounts, additions, expenses, line count, quantities, gross total, line discounts and line additions. These change when Items or Expenses data changes. It also includes the following editable fields:
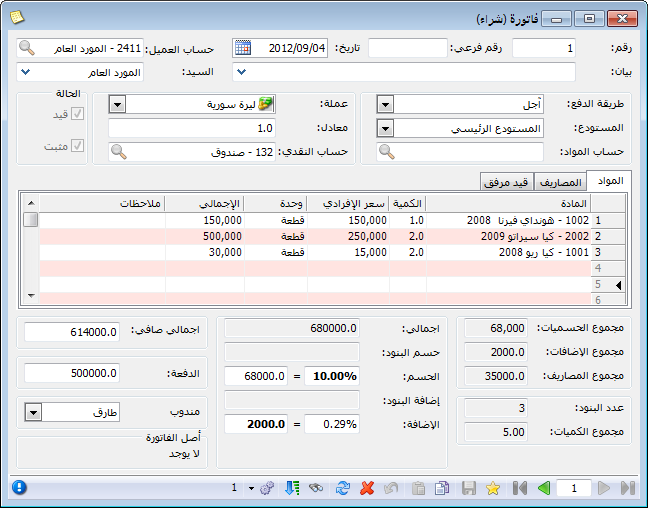
Discount: Enter a whole-invoice discount as a percentage in the first box or an amount in the second. The entered value appears bold; its calculated counterpart appears regular. For example, entering 10% makes the percentage bold, while entering SYP 500 makes the amount bold.
Addition: Enter an addition to the invoice total. Its display follows the same rules as Discount.
Payment: Enter the immediate payment for this invoice. Later receipts are recorded using Cash Receipts.
Representative: If multiple representatives exist, link each invoice to the representative who made the sale using Representative. This supports representative sales reports, explained in the reporting chapter.
Net Total: #
This reflects item values plus invoice-level discounts and additions. Increasing Net Total records the difference as an addition; reducing it records the difference as a discount.
.
.
Invoice Toolbar: #
The toolbar provides record navigation, Add New Record, Save, Copy, Paste, Undo, Delete, Refresh, Search, Filter and Sort. Search works on header and footer values; Filter selects invoice records by criteria; Sort orders them by selected header or footer fields.
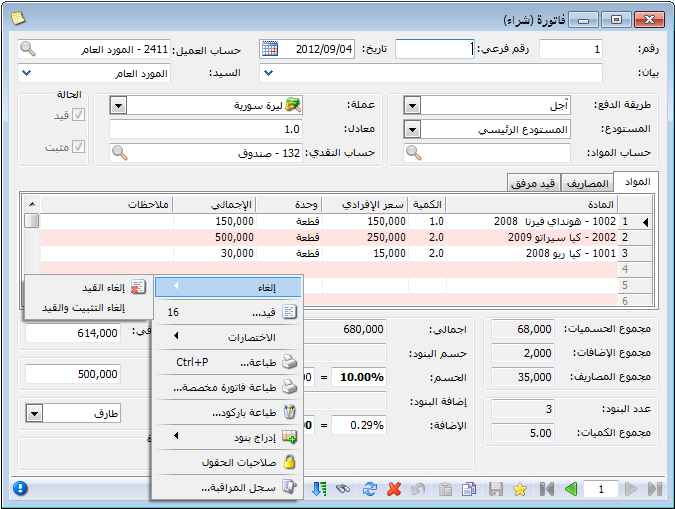
Operations differs from the corresponding item and account card button. Invoice Operations includes the following commands.
.
.
Audit Log: #
View the record’s Audit Log to identify who created, edited or deleted the invoice, when the action occurred and which computer was used. Audit Log is explained in a later chapter.
Field Permissions: #
Control each user’s access to fields in the header, footer, Items, Expenses, Attached Entry and Commercial Papers tabs. Field permissions are explained later.
Insert Lines from an Invoice: #
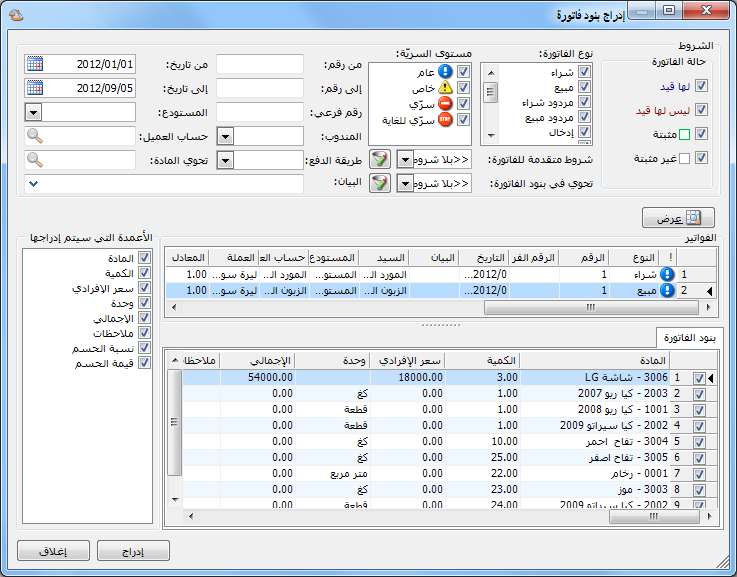
Build an invoice using another record, such as a customer order, quotation or previous purchase. Choose Operations and Insert Lines from an Invoice, set any filters and click Show. Select the source invoice, required lines, expenses and columns. Choose to insert items only, expenses only, both, or items with expense values distributed among them. The selected data is inserted into the current blank invoice, as illustrated below.
.
.
Note:
Insertion Options: #
Three source selection options are available:
From a Specific Invoice: Specify its invoice type and number.
From an Invoice: Use the available criteria to select a source invoice, as shown above.
From Multiple Invoices: Select more than one invoice to insert lines from all of them.
Journal Entry: #
Entry: Open the journal entry generated by the invoice, if its type generates one.
Delete Entry : Remove the generated journal entry while keeping the invoice finalized. Its inventory effect remains if the invoice type affects stock.
Delete Entry and Undo Finalization : Remove the journal entry and all finalization effects, including inventory movements, leaving a provisional invoice.
Printing: #
Print: Print the invoice using the program’s fixed default layout. It cannot be substantially redesigned except through changes to the invoice itself.
Custom Printing: Print using a layout configured in Tools and Print Designer. Clicking Print Custom Invoice opens the following window.
Choose the invoice design and matching page layout. Click Preview to inspect it or Print to print it. Creating designs and page layouts is explained in Print Designer.
Print Barcode: If purchased goods do not have barcode labels, select Print Barcode from the purchase invoice. Choose a barcode design and suitable page layout in the same window. Barcode label design is explained in Print Designer.
.
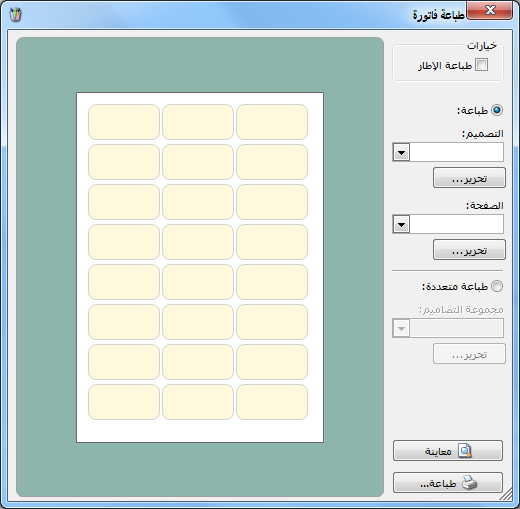
The item card must contain a barcode, either generated automatically through Item Settings or linked to a barcode schema. Use the appropriate barcode field in the label design.
Shortcuts: Create a task linked to this invoice, which appears in Task List as explained later.
.


