


Settings control calculation, numbering, journal vouchers, invoices and other program behavior. Open Tools and Settings to display the following window.
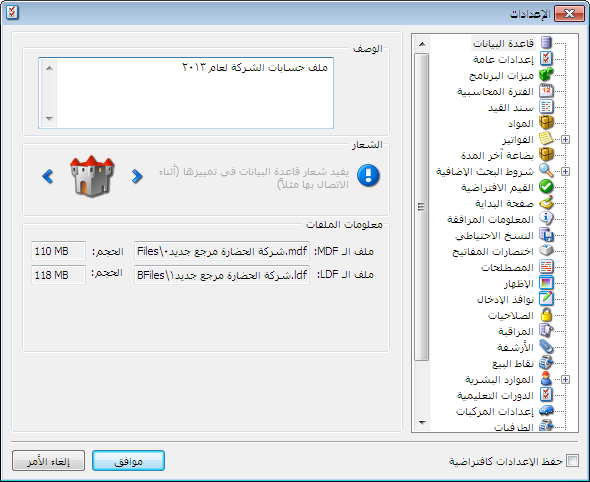
.
Database: #
This section contains:
Description: #
Enter a database description to display in the connection window, making databases easier to distinguish when their names are abbreviated, as illustrated below.

.
Logo: #
Change the database logo using the buttons on either side or by right-clicking and choosing from the logo list. This also helps distinguish databases.
Information Files : Each database has MDF and LDF files.
MDF: The primary data file storing database information and used when attaching a database.
LDF: The transaction log file associated with the database. It records transaction-log information and accompanies the MDF file when attaching the database.
General Settings: #
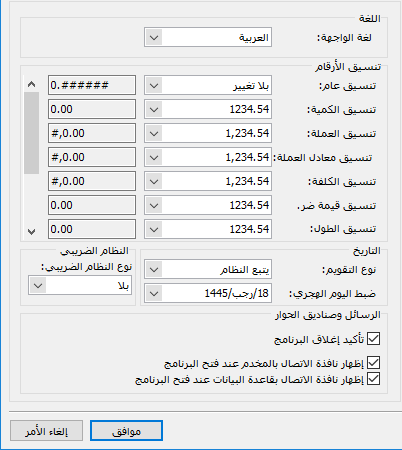
Choose Arabic or English as the interface language and set decimal and thousands-separator formats for currencies, quantities, costs and exchange rates. Several formats are available.
This window also contains:
.
Calendar Type: #
Choose Arabic Gregorian, Western Gregorian, Hijri or Follow System, using Windows settings.
Adjust Hijri Day: #
Set the Hijri day corresponding to the computer’s Gregorian date.
Tax System Type: #
Choose None, Syrian Tax or Saudi Tax from the available program options.
Note : This option requires the tax module to be enabled in the program’s protection device. The systems described here are the Syrian and Saudi modules.
Confirm Program Exit: #
Enable this option to request confirmation when closing the program. Otherwise, it closes without a confirmation prompt.
Show Server Connection Window at Startup: #
Enable to choose the database server computer when starting the program, particularly on a network with multiple computers.
Show Database Connection Window at Startup: #
Enable to choose a database at startup when the server contains multiple databases.
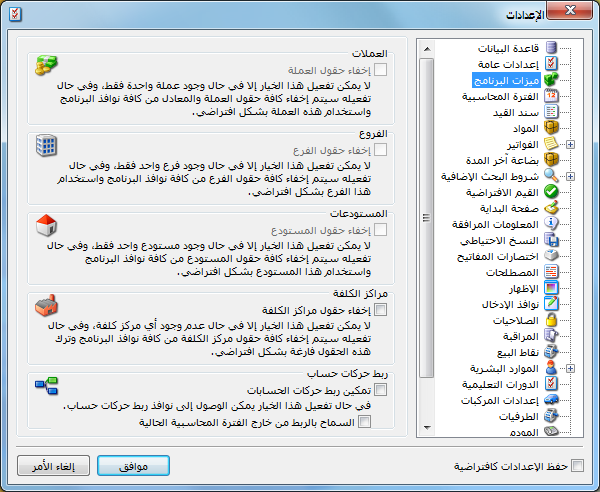
Program Features: #
Simplify invoices, journal entries and other input windows by hiding fields unnecessary for the company’s setup.
.
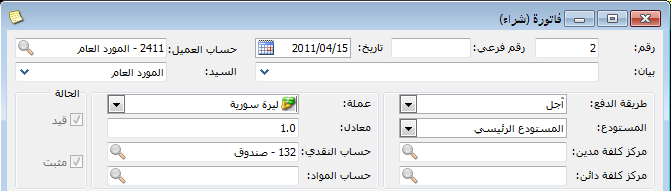
For example, a company with one branch, no cost centers and only SYP transactions can hide branch, cost center and currency fields using these settings. The following illustrations compare invoice headers before and after.
Note:
The warehouse simplification option is unavailable if the company has multiple warehouses, because the warehouse field remains necessary to identify stock movements.
Invoice Header Before the Change:
.
Invoice Header After the Change:
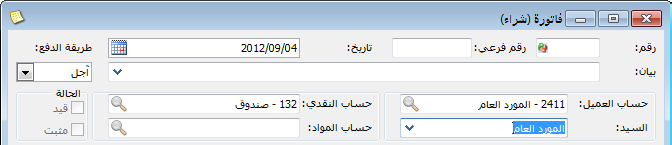
.
Account Transaction Linking is explained in Receivables and Payables Aging.
Accounting Period: #
Define multiple accounting periods when retaining successive periods in one database rather than rolling into a new database.
The Accounting Period tab contains:

.
Accounting Periods: #
Lists the periods defined in the program.
Set as Current: #
Select a period and click Set as Current Period to switch to it.
Manage: #
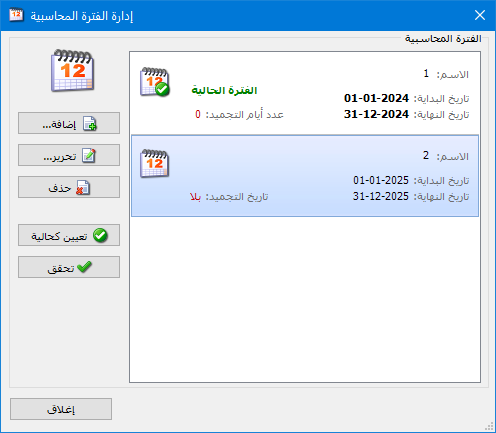
Click Manage to add or edit accounting periods. The following window contains:
Accounting Period: #
Lists the periods defined in the program.
Add: #
Define a new period with its code, name and date range.
Edit: #
Select a period and click Edit to change it.
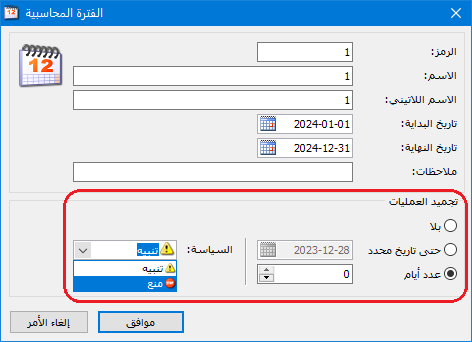
Edit opens Accounting Period, whose lower section contains Freeze Operations.
Freeze recorded operations, such as invoices, journal vouchers and commercial papers, using these options:
None: #
Do not freeze operations; allow edits to records.
Specific Date: #
Freeze operations from the period start through the selected date.
Number of Days: #
Freeze operations through a date relative to today. For example, -1 freezes records through yesterday; the cutoff moves forward daily.
Policy: Two options are available.
Warn : Warn when editing a frozen period, allowing the user to continue with Yes or cancel with No.
Block: Block saving changes to frozen-period operations.
The following image illustrates the setting:
.
Delete : Select a period and click Delete. A period can only be deleted if it contains no data.
Set as Current : Select a period and click Set as Current Period to switch to it.
Check : Display movements falling outside the defined accounting periods.
The Manage Accounting Period window is illustrated below.
.
Journal Voucher: #
Journal Voucher settings contain the following controls.
These include:
Post Manual Entries Automatically: #
Enable this to post entries entered through Journal Voucher automatically. Otherwise, post them manually using Operations and Post Entry.
.
Important Note:
This setting does not control entries generated by invoices or Cash Receipts and Payments. Configure those in Invoice Types and Custom Voucher Types, as explained later.
Balance Journal Vouchers Automatically: #
Enable this to insert a balancing amount when an account is added after earlier voucher lines containing debit or credit amounts.
See Entering and Managing Journal Voucher Data.
Fields in Windows: #
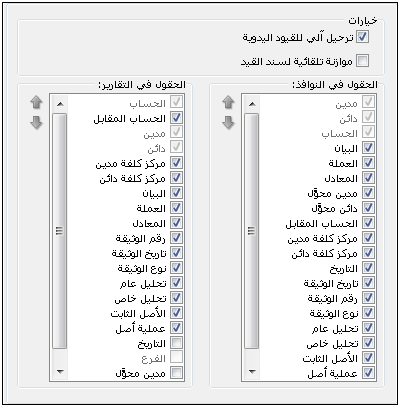
Control the visible columns and their order in standard journal vouchers.
Enable or disable columns, then select a field and use the blue arrows on the left to change its order.
Fields in Reports: #
Control columns and their order in journal-related reports. These settings also affect standard journal voucher printing.
Items: #
Item settings contain the following options.

.
Code Separator: #
Choose a character, number or symbol separating the item’s own code from its category code.
Item Code: #
Choose Own Code or Full Code for reports, invoices and most other windows, excluding Item Tree.
Code in Tree: #
Choose Own Code or Full Code specifically for Item Tree.
Prevent Duplicate Own Codes: #
Enable to keep item codes unique. If disabled, duplicate own codes are allowed across different items.
Code Direction: #
Three options are available:
Follow Interface: Use the program interface language’s direction.
Left to Right: Display codes from left to right.
Right to Left: Display codes from right to left.
Prevent Duplicate Names: #
Enable to require unique item names. If disabled, several items may share a name.
Note:
Existing duplicates prevent these uniqueness options from being enabled. Prefer enabling them when first setting up the program.
Name Direction: #
Three options are available:
- Follow Interface.
- Left to Right.
- Right to Left.
Search Without Word Order: #
Enable to find items containing the entered search terms regardless of their order in the item name.
Barcode — Default Schema: #
Select a schema defined under Items and Barcode Schema for item barcode printing, as explained earlier.
Generate Barcode Automatically on Save: #
Enable to generate an item barcode automatically. Configure the following properties:
Barcode Type: #
Available formats include:
- Variable Length: Choose the length using Barcode Length.
- EAN-13: Generate a thirteen-digit barcode.
- EAN-8: Generate an eight-digit barcode.
Barcode Length: #
The number of barcode digits, such as twelve.
Barcode Prefix: #
A fixed starting sequence shared by generated barcodes, such as 999.
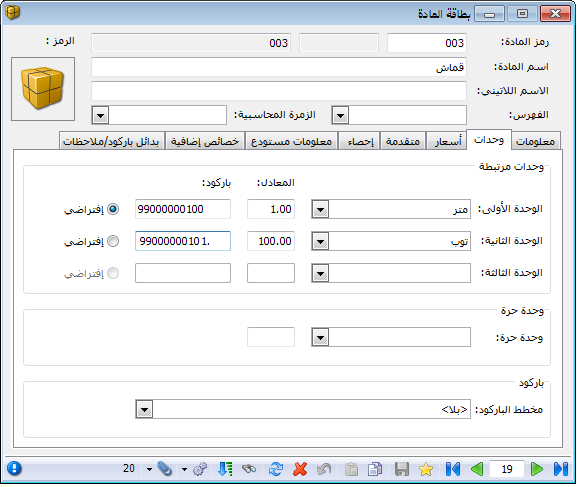
Save a newly defined item to generate its barcode on the Units tab, as illustrated below.
.
For an existing item, make a small change and save its card to trigger automatic barcode generation.
Warn Before Generating an Automatic Barcode: #
Display a warning before the barcode is generated when saving the card.
Prevent Duplicate Barcodes: #
Prevent the same barcode from being used on multiple item cards.
Print Barcode Labels Using Independent Quantity When Available: #
When printing invoice barcodes, use Independent Quantity instead of the main Quantity for the label count.
Invoices: #
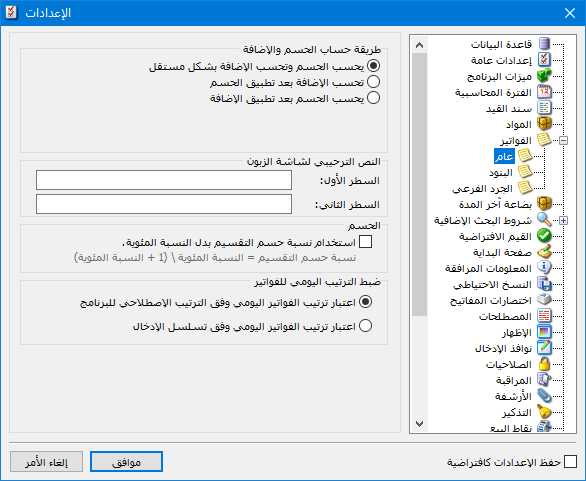
.
Invoice settings contain the following sections:
General Tab: #
This tab contains the following controls.
Discount and Addition Calculation Methods: #
Three main methods are available:
1- Calculate Discount and Addition Independently: #
The discount and addition are both calculated separately from the gross amount. Consider this example.
An invoice totals SYP 1,000 with a 10% discount and a 20% addition. Net amount is calculated as follows:
Net = Gross Total + Addition − Discount
Net = 1,000 + (1,000 × 20%) − (1,000 × 10%)
Net = 1,000 + 200 − 100 = SYP 1,100.
2- Calculate Addition After Discount: #
Consider the following example.
Using the same figures, calculate the net amount as follows:
Net = Gross Total − Discount + Addition
Net = 1,000 − (1,000 × 10%) + [1,000 − (1,000 × 10%)] × 20%
Net = 1,000 − 100 + (900 × 20%)
Net = 1,000 − 100 + 180 = SYP 1,080.
The addition is smaller because it is calculated after applying the discount.
3- Calculate Discount After Addition #
Reverse the calculation order as follows.
Net = Gross Total + Addition − Discount
Net = 1,000 + (1,000 × 20%) − [1,000 + (1,000 × 20%)] × 10%
Net = 1,000 + 200 − (1,200 × 10%)
Net = 1,000 + 200 − 120 = 1,080
The net amount is the same as before, but the discount and addition amounts differ.
Customer Display Welcome Text: #
Enter two text lines to display on an attached customer display, if available.
Discount — Use Division Discount Instead of Standard Percentage: #
Division discount is used in some sectors, including clothing retail. For the same percentage, it produces a smaller discount than the standard calculation.
The following example compares the methods.
ExampleAn item costs SYP 1,000 and has a 60% discount rate.
Standard Discount = 1,000 × 60% = SYP 600.
Division Discount = 1,000 × [60% ÷ (1 + 60%)] = SYP 375.
Daily Invoice Order: Available options are #
Use the Program’s Standard Daily Order: Prioritize receipt invoices before issue invoices.
Use Data Entry Sequence for Daily Order: Order invoices by entry sequence regardless of type.
Lines Tab: #
As shown below, this window contains the following:
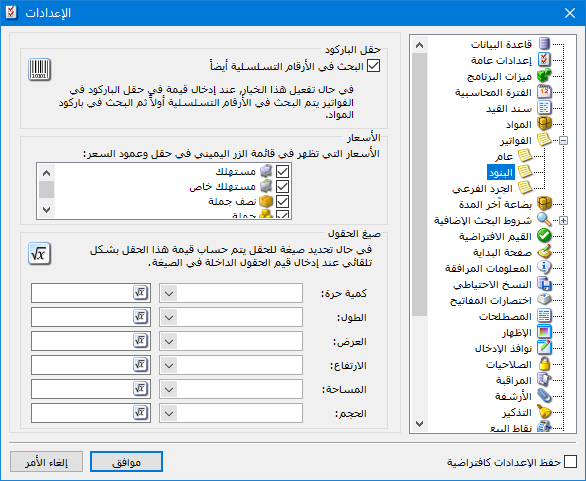
.
Barcode Field: #
Also Search Serial Numbers:
Serial numbers identify individual units, such as particular phones, allowing their movements to be tracked. A shared item barcode identifies the item type rather than each individual unit.
Without this option, record an item and its purchased units’ serial numbers, then select the item by barcode when selling and enter the sold units’ serial numbers manually.
With this option and scannable serial numbers, scanning a serial number inserts both the item and its serial number. The program recognizes the item because that number was linked to it in the purchase invoice.
Prepaid top-up cards are a common example, with separate barcodes for the item type and individual serial number.
Prices in the Price Field and Column Right-Click Menu: #
Enable the item price levels to display when right-clicking a price field in an invoice.
Field Formulas: #
.
Unit definitions can contain formulas calculating the main invoice quantity from fields such as length, width and count. These formulas belong to the unit because different units may require different calculations. For example, marble sold by square meter or square centimeter, with dimensions entered in centimeters, uses these formulas:
Square Meters = Length (cm) × Width (cm) ÷ 10,000
Square Centimeters = Length (cm) × Width (cm)
Define these through item units, as explained earlier.
Other invoice fields can also use formulas to provide additional information separately from the main quantity used to calculate invoice values.
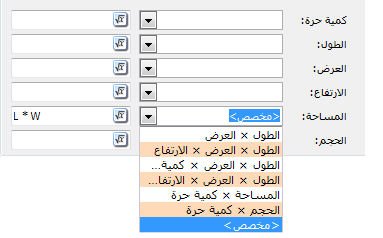
For example, choose Length × Width for the Area field, as shown above.
Select a formula and choose Custom to modify it, as illustrated below.
.
Sub-Inventory Tab: #
As shown below, this window contains the following:

.
Sub-Inventory Window Settings for Issue Invoices: #
- Show Available Quantities: Three options are available.
- In Invoice Warehouse: Search within the warehouse selected in the invoice.
- In All Warehouses of the Invoice Branch: Search every warehouse belonging to the invoice branch.
- In All Warehouses of All Branches: Search all company warehouses.
- Insert Item Manually by Code or Name:
- Insert Quantity {1} into Quantity: Set quantity to 1 when inserting an item.
- Insert the Full Available Sub-Inventory Quantity: Insert the entire available quantity into Quantity.
- Do Not Show the Window If Only One Choice Exists: Skip the sub-inventory window when only one choice is available.
- Insert Item by Barcode / POS:
- Insert Quantity {1} into Quantity: Set quantity to 1 when scanning the item barcode or inserting it in POS.
- Insert the Full Available Sub-Inventory Quantity: Insert the entire available quantity into Quantity.
- Do Not Show the Window If Only One Choice Exists: Skip the sub-inventory window when only one choice is available.
- Default Assign Quantity to Line Option After F6:
- Assign: Replace the previously entered quantity with the selected quantity when F6 is pressed.
- Do Not Assign: Keep the previously entered quantity when F6 is pressed.
Closing Inventory: #
This window contains the following options.
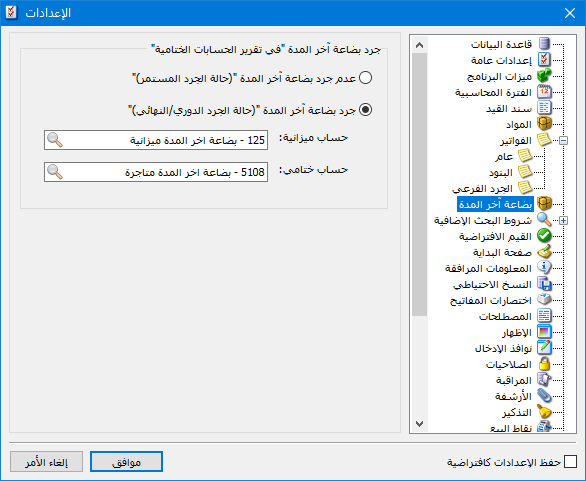
Do Not Calculate Closing Inventory: #
Use this with perpetual inventory when the Inventory account balance already reflects warehouse stock value. A separate closing stock calculation is not needed for the same value.
.
Closing Inventory: #
With periodic inventory, determine stock at the reporting date to calculate gross profit using the Trading Account and the following formula.
Gross Profit or Loss = (Sales + Purchase Returns + Closing Inventory) − (Purchases + Opening Inventory + Sales Returns + Purchase Expenses)
The Trading Account appears as follows.
Trading Account
| Opening Inventory | Sales | ||||||
| Purchases | Purchase Returns | ||||||
| Purchase Expenses | Closing Inventory | ||||||
| Sales Returns | |||||||
| Balancing Gross Profit | Balancing Gross Loss | ||||||
Under periodic inventory, calculate stock at the reporting date to determine gross profit. Enable closing inventory valuation, then select its Trading and Balance Sheet accounts. The program includes the calculated inventory value in those final accounts under the specified account names.
Additional Search Criteria: #
These simplify data entry in invoices and journal vouchers. Two main sections are available.
Account Criteria: #
Consider the following example.
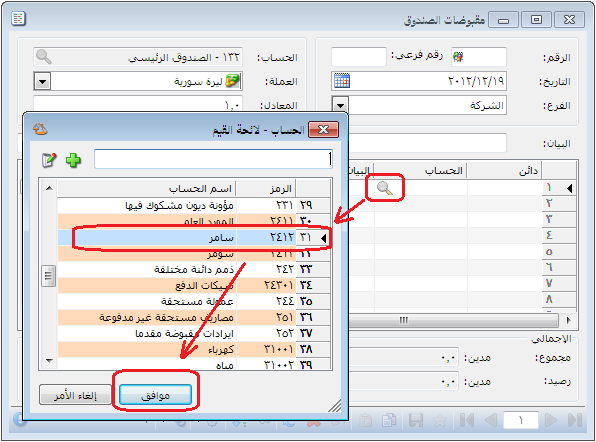
Suppose twenty customers are divided equally among Damascus, Aleppo, Sweida and Rural Damascus, with their area stored in Classification 1. To record a receipt from Samer in Damascus without additional criteria, press F4 or the lookup icon in Account and select him from the full account list.
.
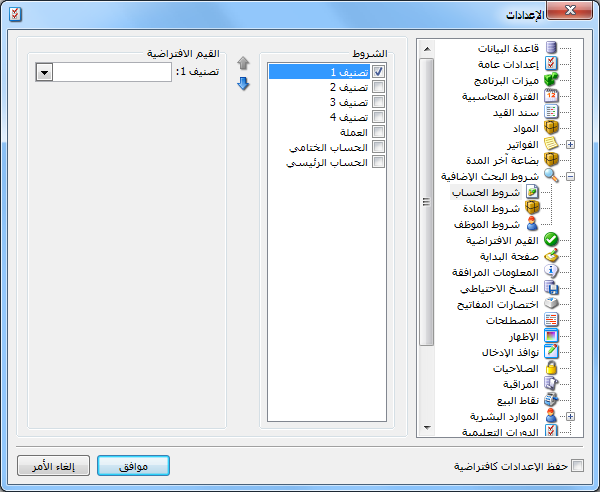
Enable Classification 1 under Additional Search Criteria and Account Criteria, then click OK, as illustrated below.
.
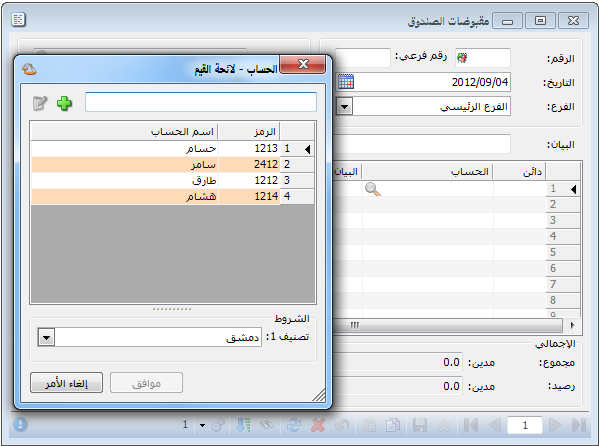
Open Cash Receipts and the account lookup. A Classification 1 field now appears at the bottom. Select Damascus to show only its five customers, then choose Samer, as illustrated below.
.
Item Conditions: #
Use the same approach for item criteria, such as category or origin, to simplify invoice entry.
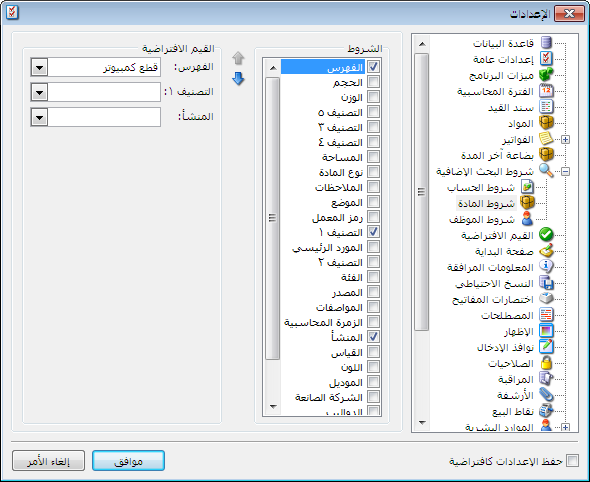
.
Note 1:
Enable several item fields at once, such as Category, Classification 1 and Origin. Then search for items matching all entered values; for example, Computer Parts from France classified as Hard Drives.
Note 2:
Set additional criteria during entry or assign defaults. For example, default Category to Computer Parts so item lookup initially displays only that category. Clear the default to show all items.
Default Values: #
Set default Currency, Branch and Warehouse values to insert in new records, as illustrated below.
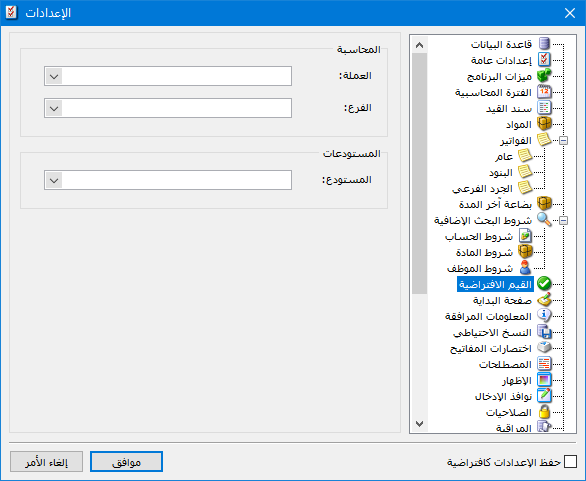
.
Start Page: #
Start Page settings contain the following controls.
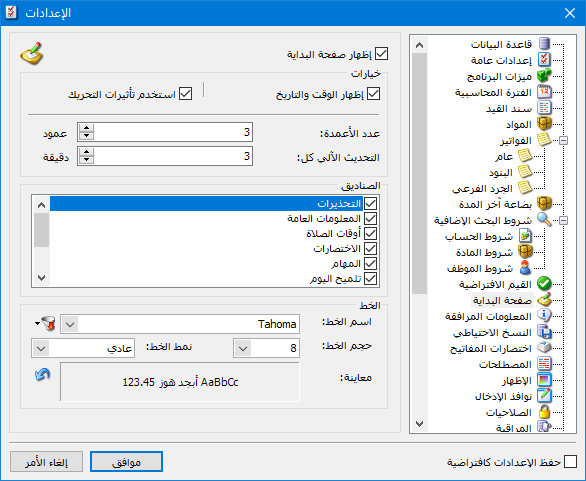
.
Show Start Page: #
Enable to show the default Start Page.
Show Time and Date: #
Enable to show time and date at the upper left.
Number of Columns: #
Choose the Start Page column count.
Automatic Refresh Every: #
Set the refresh interval in minutes.
Panels: #
Select the panels to include.
Properties Button: #
Select a panel and click Properties to its left to open its configuration.
Font: #
Set the Start Page font name, size and regular or bold style.
Related Information: #
The Related Information window provides concise details without requesting separate reports. Open it from Tools and Related Information..
It provides information on the following:
Accounting and Inventory Information: #
- Account : Select an account in the tree, invoice, journal voucher or another window to see its debit, credit and balance.
- Customer: Select a customer in any applicable window to see the account’s debit, credit and balance.
- Journal Voucher : In Process Journal Vouchers, select a voucher to view its date, branch, currency, exchange rate, debit and credit totals and other details.
- Item : Select an item in its tree or invoice to see unit price, available quantity, cost, unit profit and total profit for its movement in the invoice, together with warehouse and branch information.
- Invoice : In Process Invoices, select an invoice to see its date, branch, warehouse, currency, exchange rate, payment method, gross and net totals, discounts and profit.
- Branch : Select a branch in Branch Tree, a journal voucher or another branch field to see its details.
- Warehouse : Select a warehouse in Branch Tree, an invoice or another warehouse field to see its details.
- Cost Center : Select a cost center in Branch Tree, an invoice or another cost center field to see its details.
- Currency : Select a currency to see whether it is the base currency, its code, exchange rate and fractional unit name.
Human Resources Information: #
- the Employee : Select an employee to see their basic details.
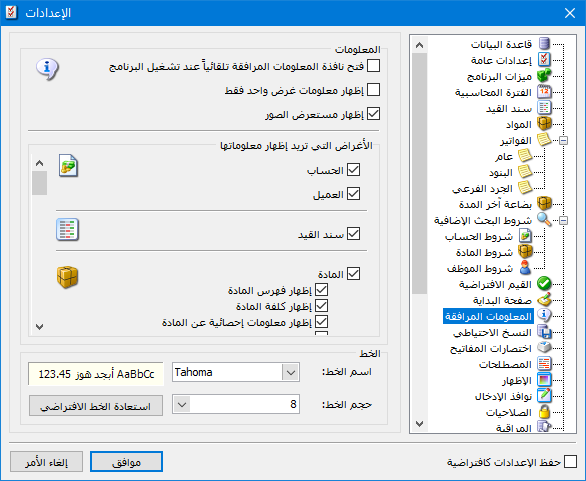
.
Configure the displayed information using these settings:
- Open Related Information Automatically at Startup: Enabled by default. Clear it to stop the window opening automatically.
- Show Information for One Object Only: When disabled, display details about the selected account or item and its invoice or journal voucher. When enabled, display only one object’s details at a time.
- Show Image Viewer: Display the item image.
- Font: Set the Related Information font type and size.
Backup: #
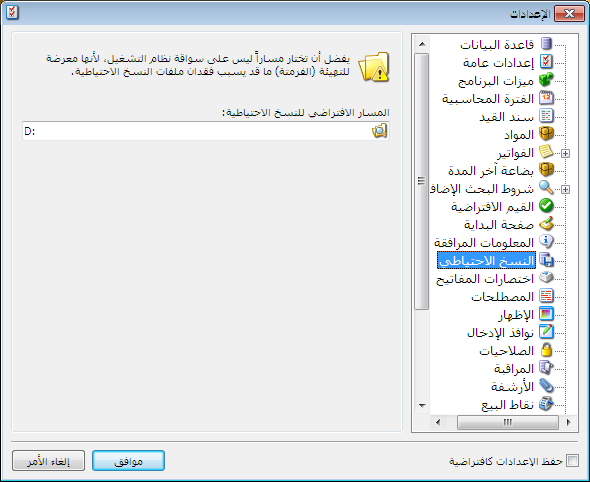
.
Set the default destination for manual backups created through File and Create Backup, or automatic backups configured in Tools and Schedule Backup.
Keyboard Shortcuts: #
Assign keys to open program windows using the selected shortcuts, as shown below.

.
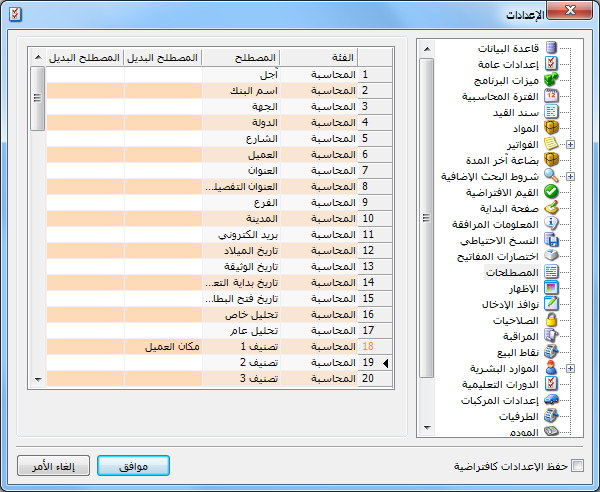
Terminology: #
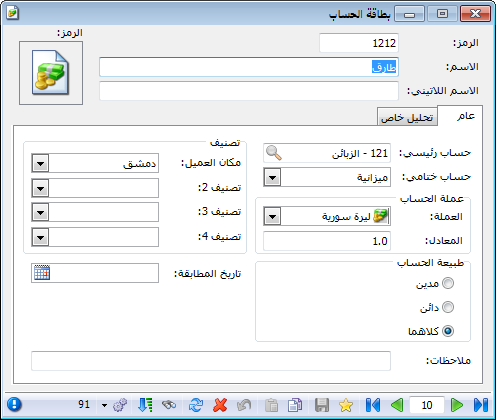
Replace database terminology using Alternative Term. For example, change Classification 1 to Customer Location, as illustrated below.
The account card then reflects the renamed field, as shown below.
.
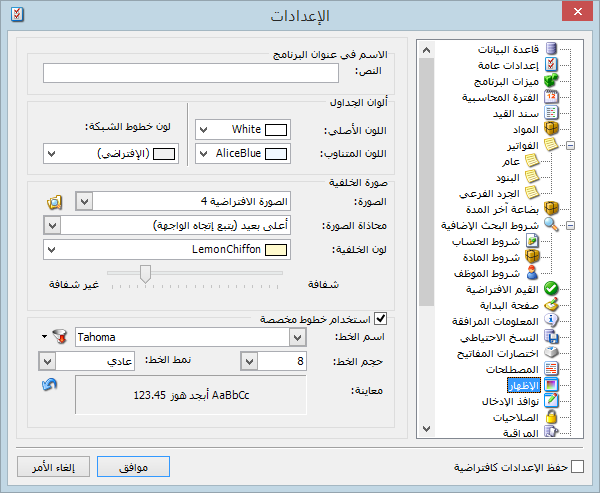
Appearance: #
Set text shown beside Al Mizan .NET in the title bar, table row colors, invoice and journal gridline colors, and an interface background image with alignment and transparency. Also set font type, size and style for program windows. The blue button at the lower left restores the default font.
.
Data Entry Windows: #
Data Entry Windows contains the following options.
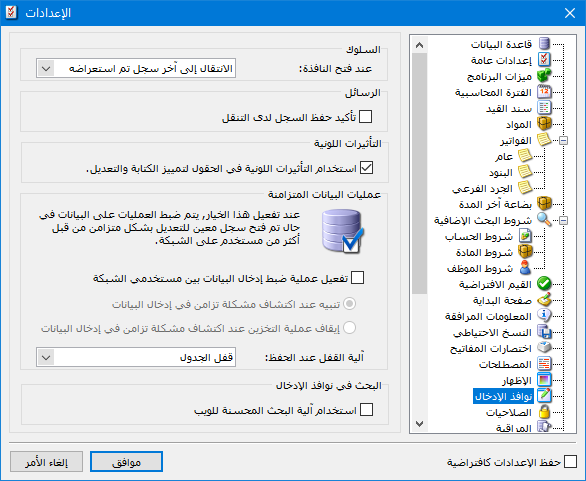
.
Behavior — When Opening a Window: #
Two options are available:
Go to the Last Viewed Record: #
Open the last record viewed in a window, such as an invoice, journal voucher or account card.
Open a New Record: #
Open a new blank record when the window is opened.
Messages — Confirm Saving When Navigating: #
Ask to save the current record before moving to another record in any record window.
Color Effects — Highlight Entry and Editing: #
Highlight changed fields in pale orange. The highlighting disappears after saving.
Concurrent Operations: #
When two network users open the same account card, invoice or journal voucher and one saves changes first, Warn on Synchronization Conflict displays the following message to the other user when saving.
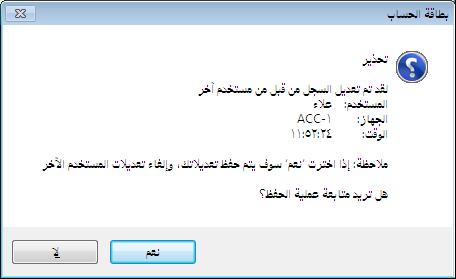
.
If Stop Saving on Synchronization Conflict is selected,
the other user receives the following message.
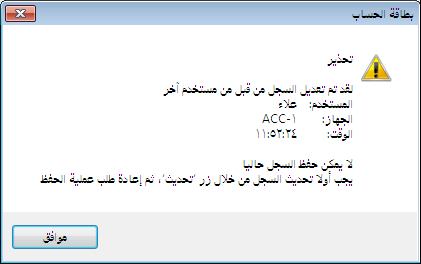
.
Permissions: #
This section contains the following controls.
Menus: Two options are available. #
- Disable Unauthorized Menu Items and Show a Lock: Keep unavailable windows visible as locked.
- Hide Unauthorized Menu Items: Remove unavailable windows from the user’s menus.
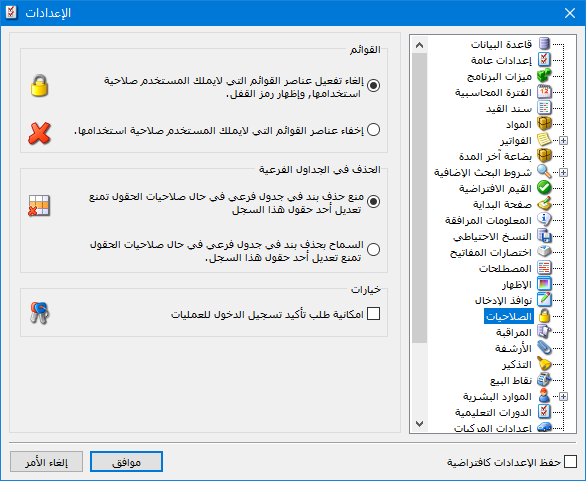
.
Options — Allow Login Confirmation for Operations: #
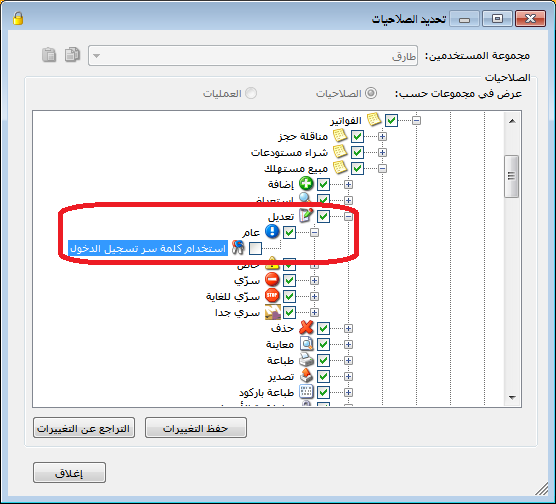
Enable this to allow operations to require renewed login confirmation. A Use Login Password option appears in permission settings and is enabled by default. Keeping it enabled uses the current login; clearing it for a window requires the user to enter their password again for its operations.
Consider the following example:
For example, enable login confirmation, open Tarek’s permissions and navigate to Invoices, Retail Sales Invoice, Edit and Public confidentiality level. Clear Use Login Password, as illustrated below.
.
When Tarek edits and saves a Public sales invoice, the login confirmation window requests his password again. Saving cannot finish without confirmation, as shown below.

.
Audit: #
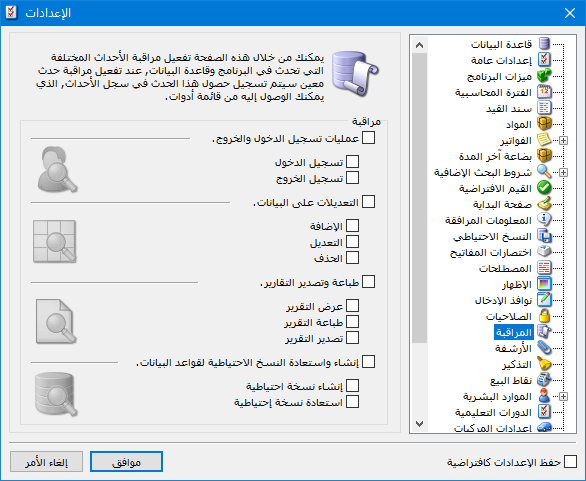
Enable the database events to record in Audit Log using this window. The following illustration shows the available options.
.
Document Archiving: #
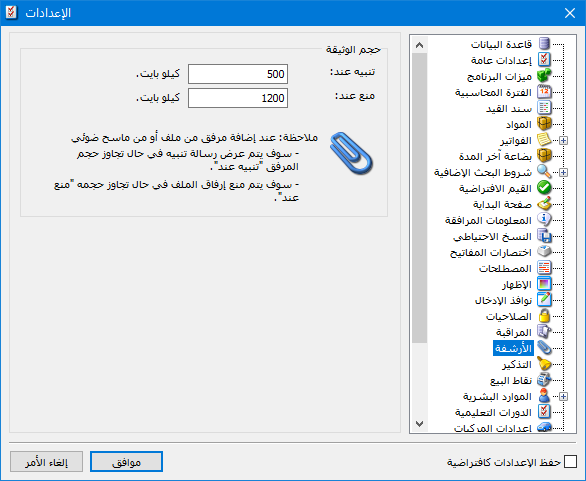
In General Settings and Archiving, set attachment-size thresholds for a warning and for blocking uploads, as illustrated below.
.
Important Note:
The warning threshold must be lower than the blocking threshold. For example, warn at 100 KB and block at 500 KB.
Point of Sale: #
Choose one of the following POS receipt numbering schemes.
Database-Wide Numbering: #
Use one sequence across all POS types in the database.
Numbering by POS Type: #
Use a separate sequence for each defined POS type.
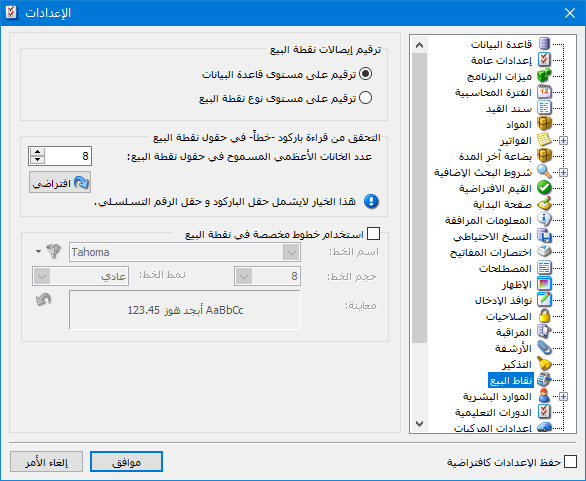
Detect Barcodes Scanned into the Wrong POS Field: #
Prevent a barcode or serial number being entered accidentally in a field such as Price. Set the maximum permitted digit count; the default is eight. Click Default to restore eight.
Use Custom Fonts in POS: #
Set the POS font type, size and style.
.
Peripherals: #
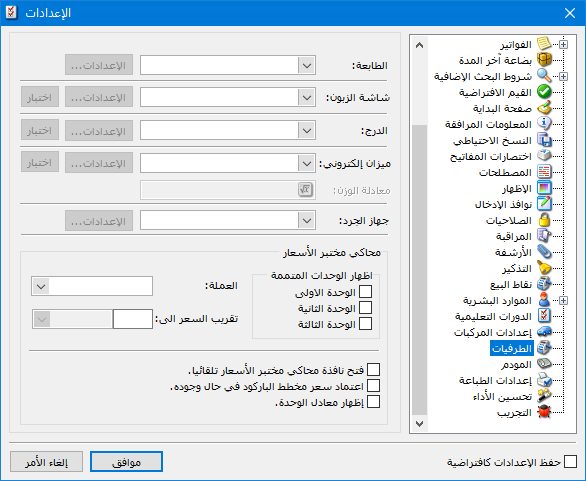
Configure the POS printer, customer display and cash drawer. You can also configure an electronic scale and stocktaking device in the following window.
Price Checker Simulator: #
Choose the displayed units, result currency and rounding settings for the price checker simulator.
.
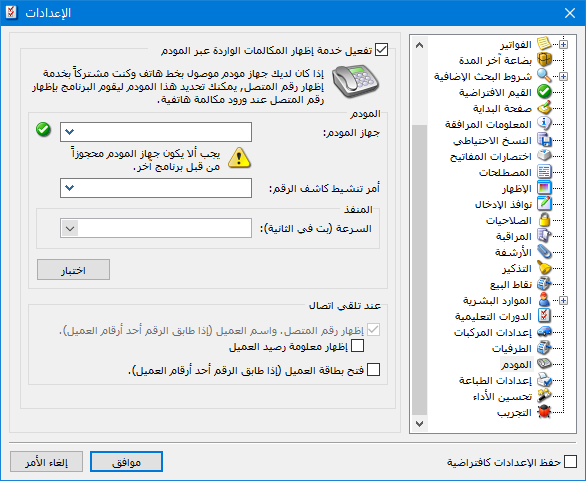
Modem: #
Connect the program to a caller-ID-capable modem to identify incoming callers. Select the modem and configure how caller number and name are shown during calls or matched against customer card fields, as illustrated below.
.
Printer Settings: #
Choose a printing mode supported by the printer. Three main modes are available, as shown below.
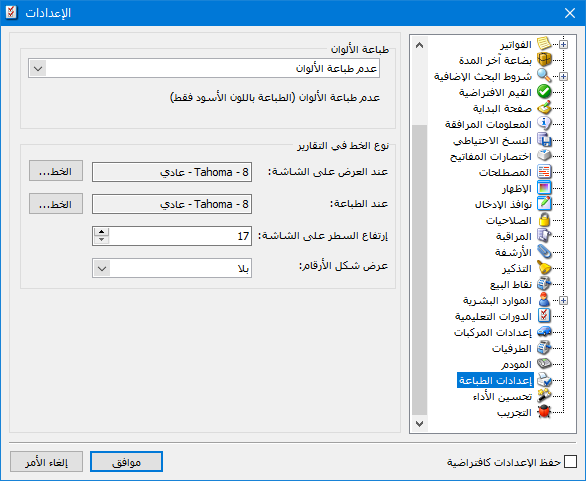
.
Set report font type, size and style for onscreen display and printing.
Onscreen Row Height: Set report row height between 17 and 34.
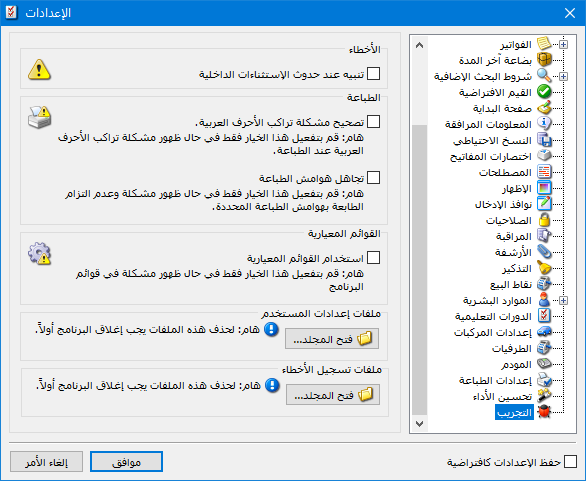
Experimental Settings: #
Enable error notifications and compatibility options for overlapping Arabic characters or printer margins. You can also enable standard menus, which display the main menus without icons. The following window shows these options.
.


