


Custom journal vouchers simplify accounting entry by assigning specific accounts to defined uses, reducing repetitive work and saving time.
:Create a New Custom Journal Voucher #
To add a new custom voucher type, follow these steps:
- Open Definitions in the program.
- Select Custom Voucher Types.
- Click Add New Record on the window toolbar.
- A new window opens where you can enter the required data, assign the account and specify its intended use.
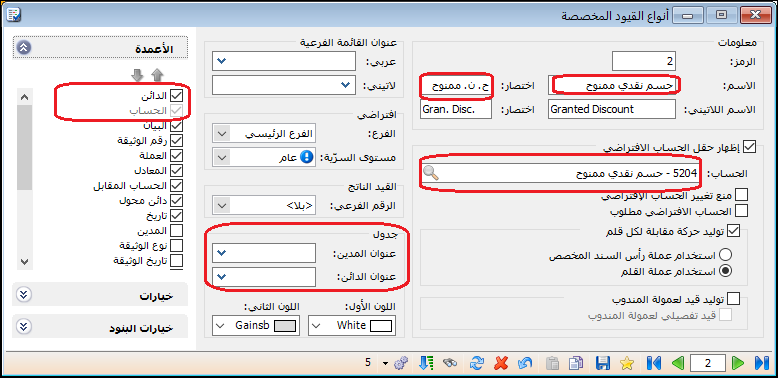
For example, you can create a custom voucher for discounts allowed.
Enter the following settings:
Name : Discount Allowed.
Abbreviation : Disc. Allowed.
Account : Cash Discount Allowed.
Credit Column Heading : Discount Amount.
ColumnsDisable the Debit column, which represents the side generated automatically for the Discount Allowed account. Enable the Credit column for the variable side, which is the customer account, as shown below.
.
.
Return to Journal Entries to find the Discount Allowed voucher.
This makes recording discounts allowed to customers quicker and easier.
Define and Use Cash Receipts: #
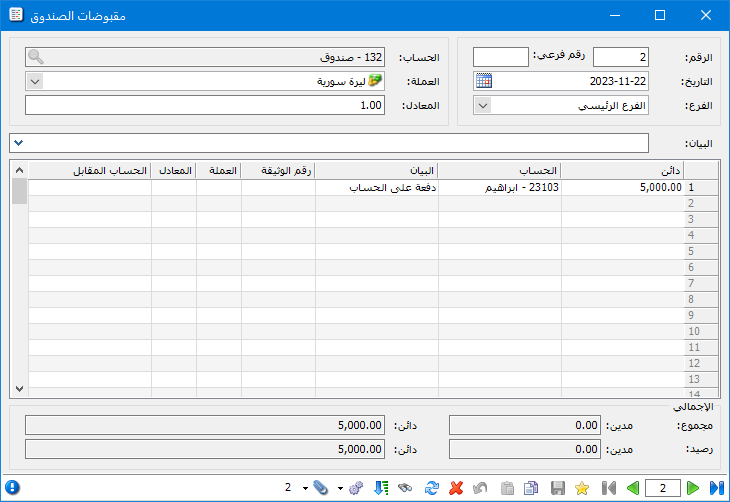
Open Journal Entries and select Cash Receipts to enter cash received by the company from external parties, such as customers, or internal parties, such as employees. This voucher records incoming cash transactions and helps keep company records up to date.
In the Cash Receipts voucher, enter the number, date, currency and branch receiving the payment. Then enter each receipt’s amount, payer account, description, document number, currency and exchange rate. Completing these fields accurately allows the program to record transactions and update the relevant accounts and reports, as shown below.
.
.
Custom Voucher Definitions: #
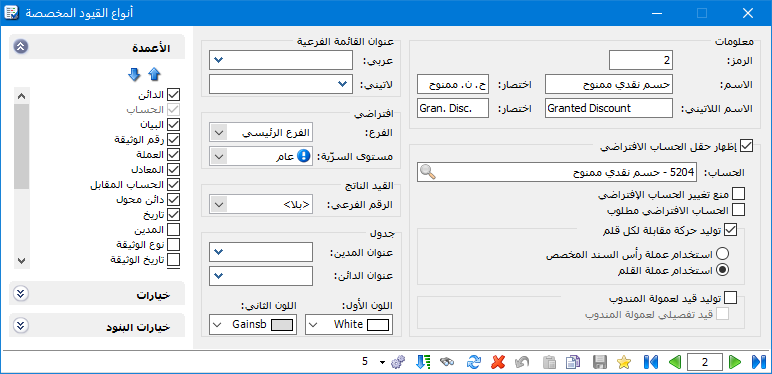
Open Definitions, select Custom Voucher Types and locate Cash Receipts. The following window contains its settings:
Name : The Arabic name shown in Journal Entries.
Latin Name : The name shown in Journal Entries when the interface language is English.
Abbreviation : The name shown in reports.
Show Default Account Field : Enable this option to display the default account in the custom voucher. You then only need to enter the other side, which is the credit side for cash receipts. If disabled, the window behaves like a standard journal voucher, requiring two balanced sides.
Account : The cash account, such as Cash or Bank, to which the receipt amount is posted automatically. It represents the debit side of the receipt entry.
Submenu Title : Use this field to define a submenu in which Cash Receipts appears under Journal Entries.
Custom Voucher Settings: #
Prevent Changes to the Default Account: If enabled and the default account is Cash, it cannot be changed in the Cash Receipts window; the header account field is read-only. If disabled, the field remains editable and can be changed to another account, such as Bank.
Default Account Required : When enabled, the default account must be entered in the custom voucher header. When disabled, the window behaves like a standard journal voucher requiring two balanced sides.
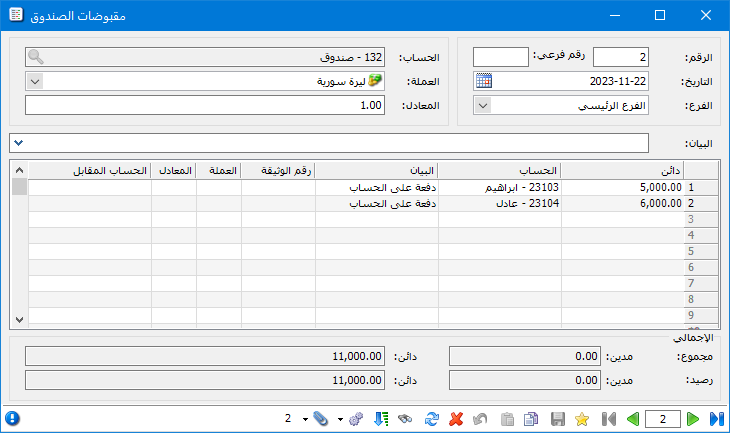
Generate a Counterpart Transaction for Each Line: For example, suppose you receive SYP 6,500 from customer Hisham and SYP 5,000 from customer Hussam and enter the receipts as follows:
.
.
If this option is disabled, one combined entry is generated for both customers, as shown below.
.
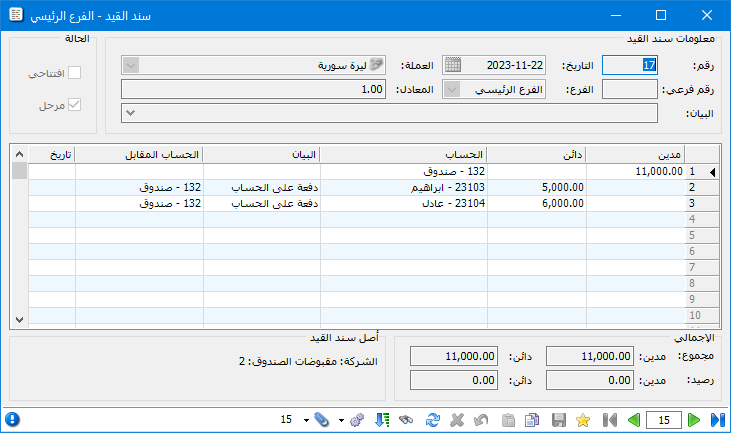
.
If enabled, a separate counterpart transaction is generated for each line in the cash receipt record, as illustrated below.
.
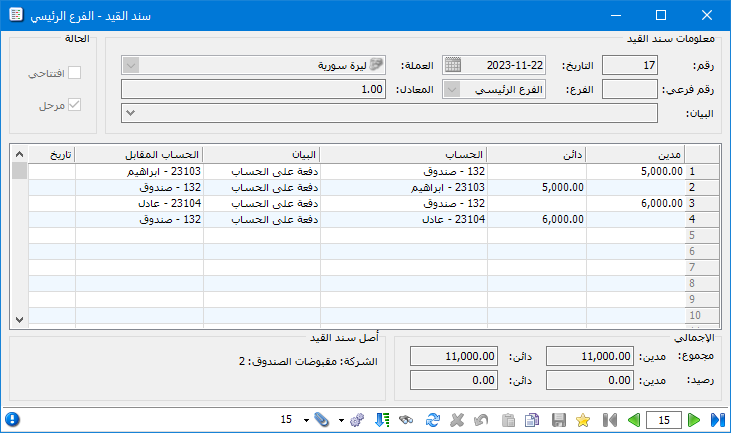
.
Use Custom Voucher Header Currency: Generate the counterpart transaction using the currency and exchange rate in the voucher header.
This option keeps movements in the header account’s currency, regardless of the currency used on individual lines.
Example: The header account is an SYP cash account, and a customer pays USD 1,000 at an exchange rate of SYP 1,000 per US dollar. The accounting entry is shown below.
.
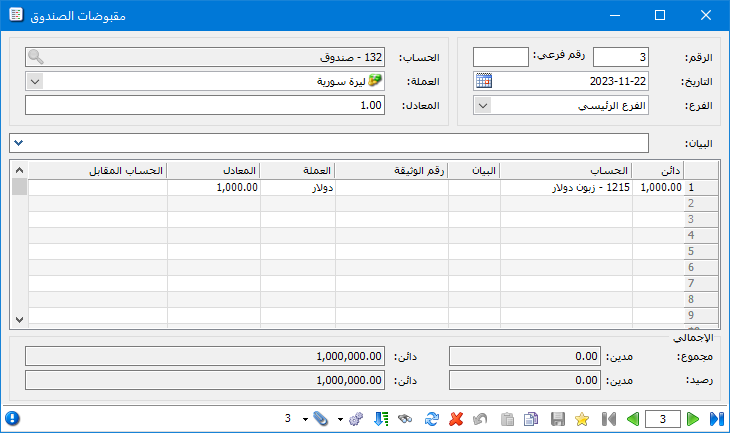
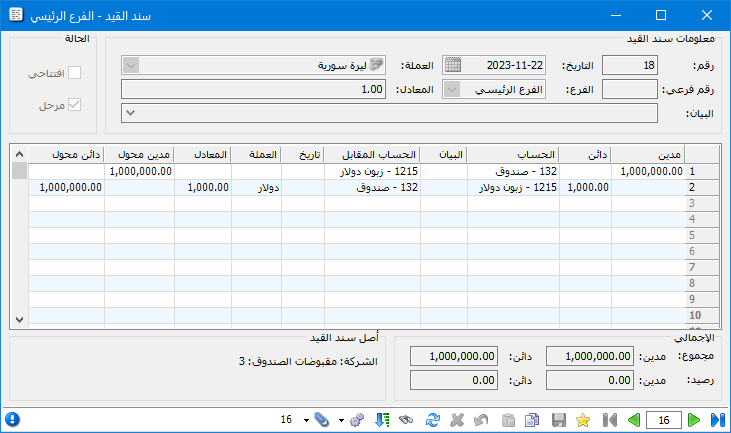
.
Use Line Currency: Generate each counterpart transaction using the currency and exchange rate of the corresponding line.
Example: The header account is an SYP cash account, and a customer pays USD 1,000 at an exchange rate of SYP 1,000 per US dollar. The accounting entry is shown below.
.
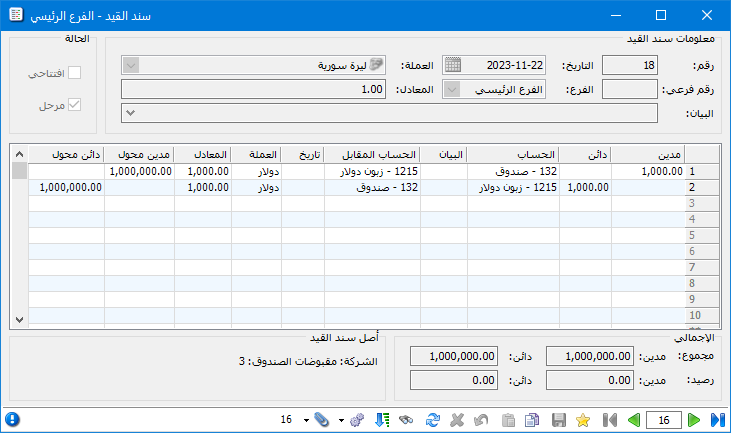
.
Defaults: #
Branch: The branch entered here is inserted automatically when a new Cash Receipts voucher is opened, but it can be changed. It identifies the branch receiving the payment and supports branch-level reports and final accounts.
Confidentiality Level: Enter the default confidentiality level for cash receipt vouchers. It can be changed on individual vouchers. Confidentiality levels are used when configuring user permissions.
Generated Entry: #
Subnumber: Configure automatic subnumbering for entries generated by Cash Receipts. Choose Independent for a separate sequence, or select a shared series for multiple custom voucher types so their generated entries use the same sequence. Choose None if no subnumber is required. #
Table: #
First Color / Second Color: These colors alternate between rows in the Cash Receipts voucher.
Debit Heading / Credit Heading: Set labels for the amount columns in custom vouchers. For example, replace Credit with Amount Received or Debit with Amount Paid.
Columns: Enable the columns you want to display in Cash Receipts and use the arrows above to change their order.
Options: #
These options include the following:
Prevent Changes to the Default Branch: If enabled and Damascus is the default branch, it cannot be changed in Cash Receipts; the header Branch field is read-only. If disabled, it can be changed to another branch, such as Aleppo.
Post Directly to Accounts : When enabled, the entry generated by the receipt record is posted automatically. Otherwise, open the journal entry and post it manually using Operations, or use Process Journal Vouchers under Journal Entries.
Prevent Changes to Automatic Numbering / Prevent Changes to the Default Date : When enabled, the Number and Date fields in Cash Receipts are read-only. The number is assigned sequentially and the date defaults to today.
Prevent Changes to Account Currency: Enable this option to lock the currency field in the custom voucher header.
Subnumber: When Not Specified : Three options are available:
Allow: No message is displayed if the subnumber is not specified.
Warn: The user is warned that a subnumber is missing and may continue or return to correct the voucher.
Block: The user cannot save the record until the missing value is corrected.
Subnumber #
Duplicate Subnumbers: Duplicate subnumbers can similarly be allowed, warned about or blocked. Validation can apply within the same voucher type, such as Cash Receipts, or across all types, including Cash Receipts, Cash Payments and Cash Journal.
Line Options #
When an Account Appears More Than Once: Choose to allow duplicates, warn the user while permitting saving, or prevent the record from being saved when an account appears more than once.
Cash Payments / Cash Journal: These use the same configuration approach as Cash Receipts.
.


