


Many trading and manufacturing companies import raw materials or finished goods. Imports create accounting and warehouse transactions that require specific handling.
The following two approaches illustrate common ways to process imports in the program. Other approaches may be appropriate depending on the company’s import workflow; these examples can be adapted to those requirements.
Approach One: Create a Dedicated Import Account in the Chart of Accounts: #
Follow these steps:
1. Define an Import Transactions account in the Chart of Accounts, as shown below: #
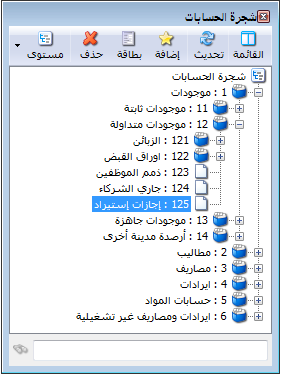
.
2. From Definitions / Invoice Types, define a new Import invoice with the following settings: #
Invoice Class: PurchaseThe Items account is Import Transactions. The invoice generates journal entries for items and expenses but does not affect stock quantities because the goods have not yet arrived in the warehouse. The following window illustrates these settings:
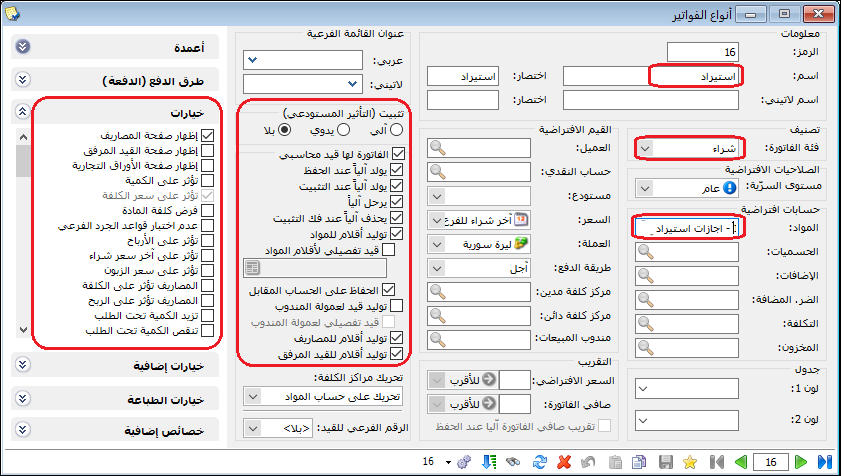
.
3. When the purchase is agreed with the supplier, enter the details in the Import invoice, as shown below: #

.
If the goods are paid for in cash, set the payment method to Cash so the entry uses the Cash account rather than the supplier account.
4. Record expenses associated with the invoice as shown below: #
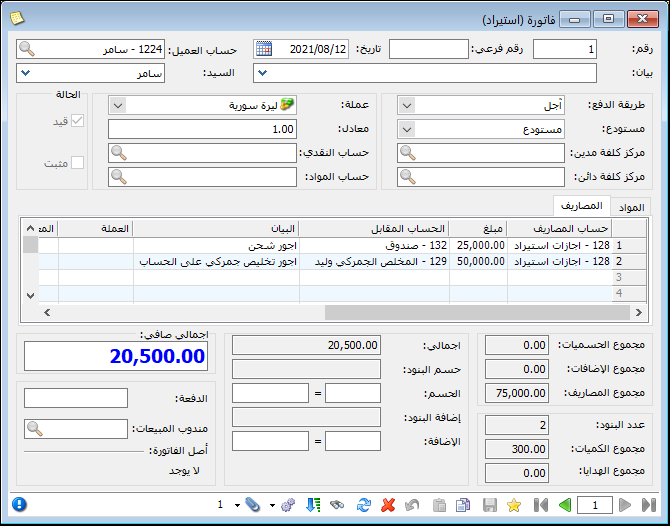
.
The resulting journal entry appears as follows:
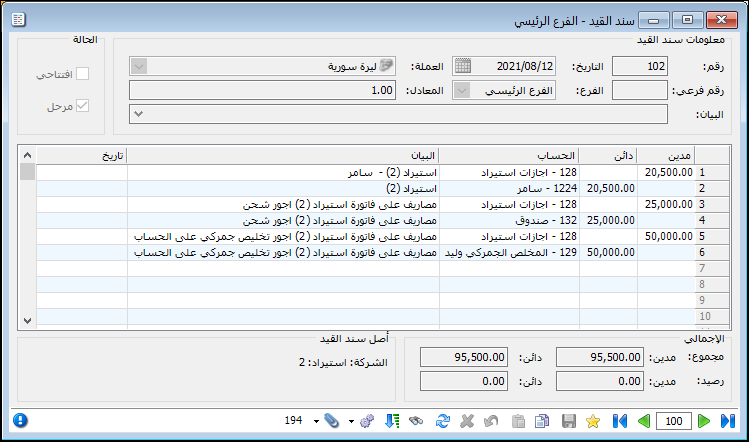
.
5. When the goods arrive, open a purchase invoice and choose Operations / Insert Lines from Invoice, as shown below: #
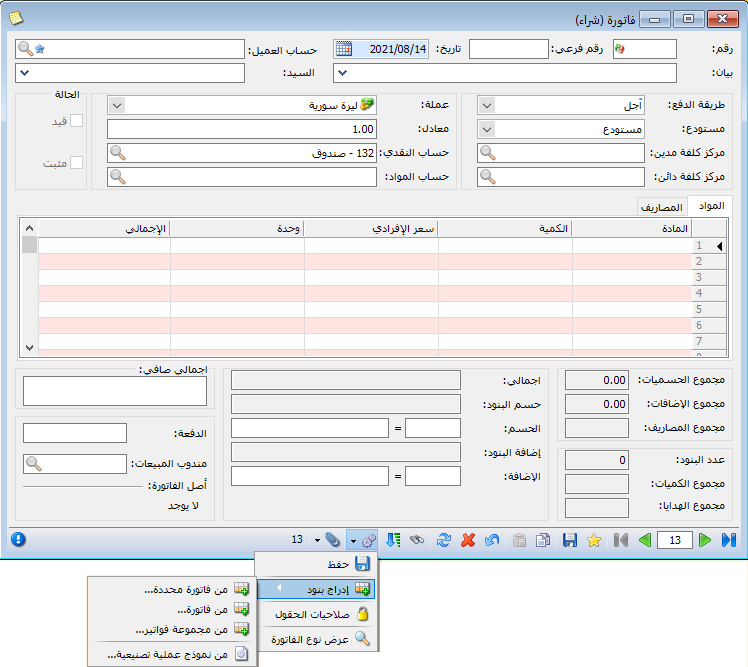
.
In the insertion window, select the Import invoice to convert into a normal purchase invoice. Click Insert and choose Lines with Expenses Allocated to Lines, as shown below:
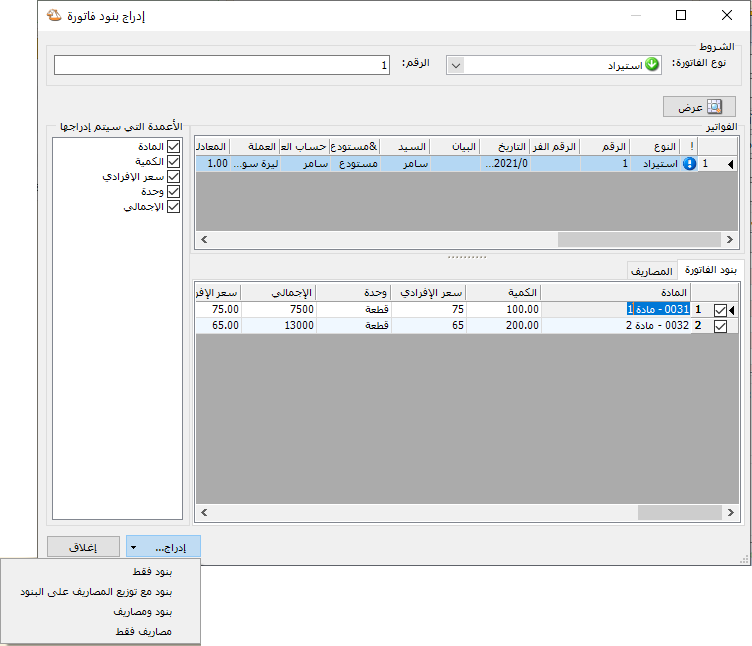
.
The items are inserted into the purchase invoice with expenses allocated directly to them. Set the invoice’s Customer Account to Import Transactions, as shown below:
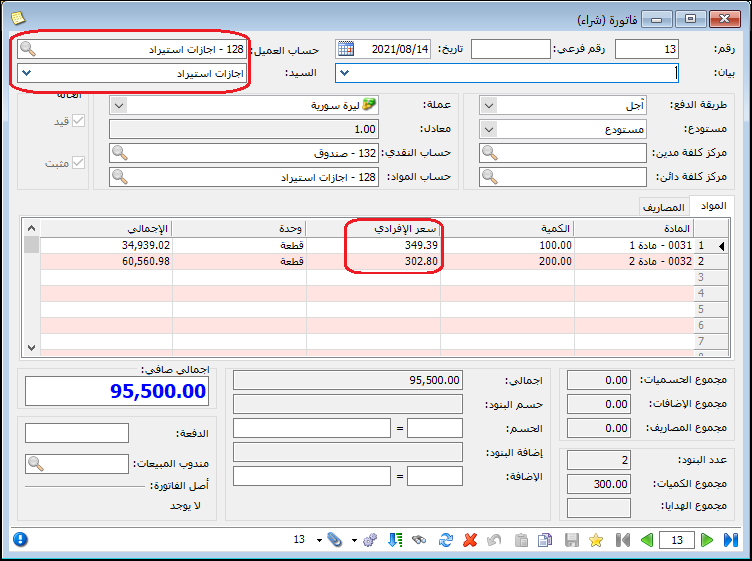
.
The normal purchase invoice now affects warehouse quantities and inventory, records the purchase, and offsets the temporary Import Transactions account. In the example, the Import invoice debits this account by 20,500 for goods and 75,000 for expenses. The purchase invoice credits it by their combined amount of 95,500, as shown below:
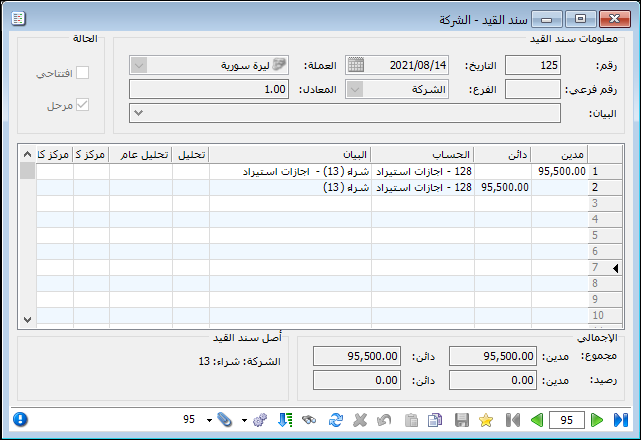
.
The Import invoice initially records the amount payable to the supplier or the cash paid for the goods. Recording expenses recognizes amounts paid or payable to the relevant parties. The subsequent purchase invoice records the purchase, receives the goods into warehouse inventory and clears the temporary Import Transactions account.
Approach Two: Use Existing Accounts Without a Dedicated Import Account: #
Follow these steps:
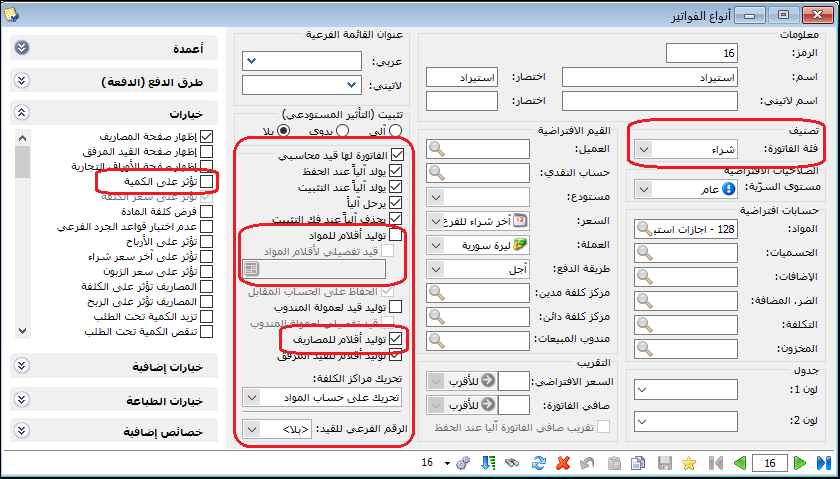
1. Define a new Import invoice with the following settings: #
The invoice does not affect quantities because the goods have not arrived. Its item lines do not generate an accounting entry; only the Expenses tab generates one. Configure it as shown below:
.
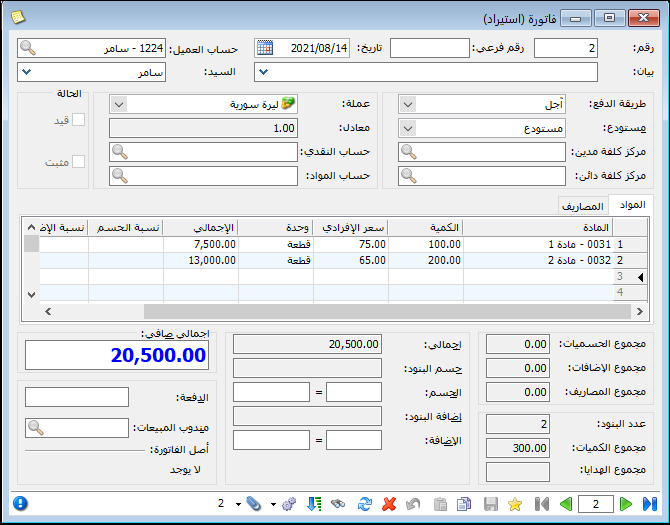
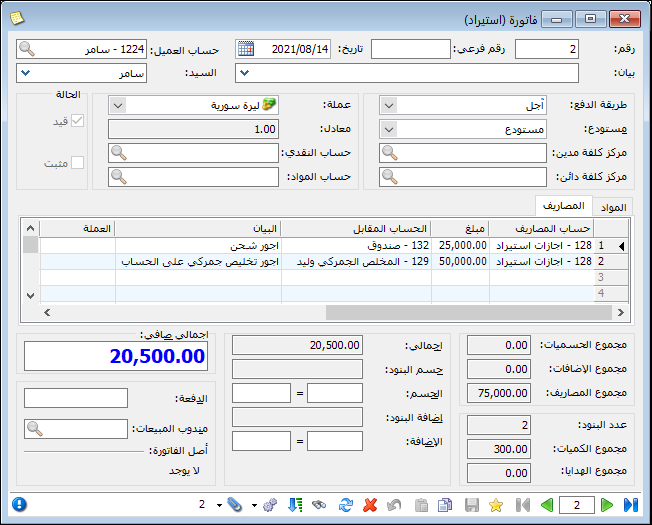
2. Enter the invoice details as shown in the following two images: #
.
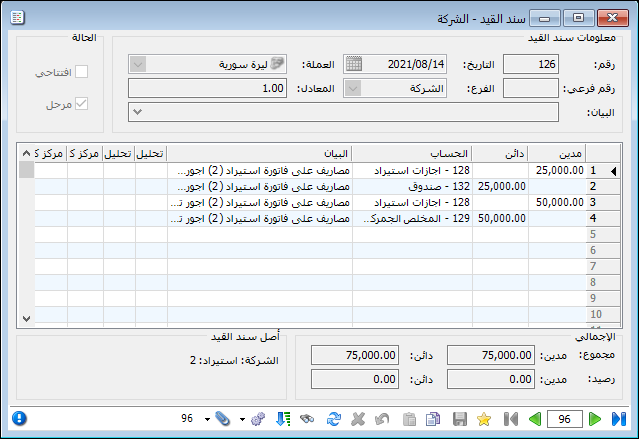
The resulting journal entry appears as follows:
.
3. Modify the Purchase invoice type so its expenses do not generate a separate journal entry, or define a new purchase invoice type with that setting. See the following image: #
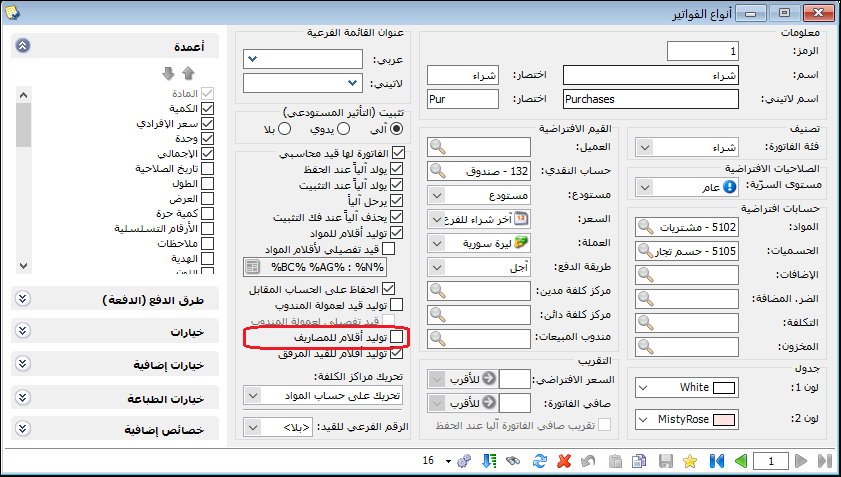
.
4. Open the purchase invoice and choose Operations / Insert Lines from Invoice, as shown below: #
.
Select the Import invoice to convert into a normal purchase invoice. Click Insert and choose Lines and Expenses, as shown below:
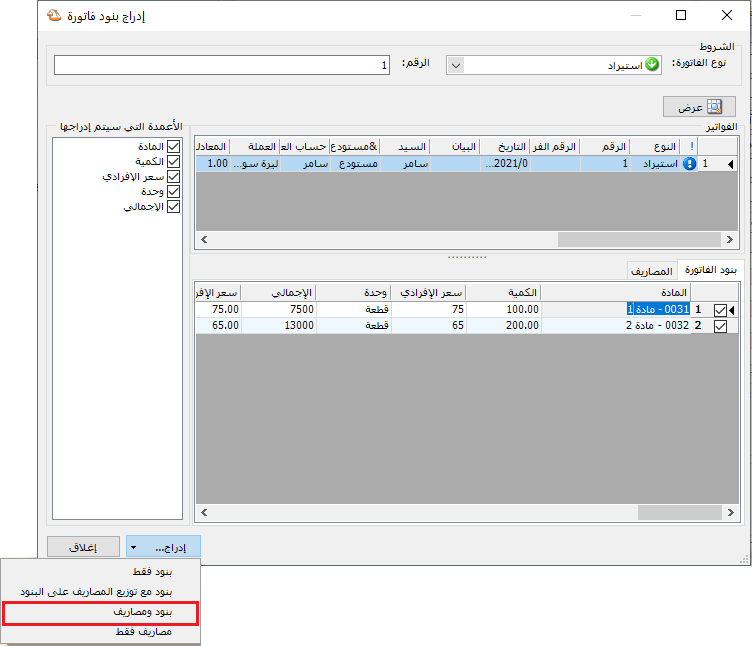
.
Items and expenses are inserted separately into the purchase invoice. Set the Customer Account as shown below:
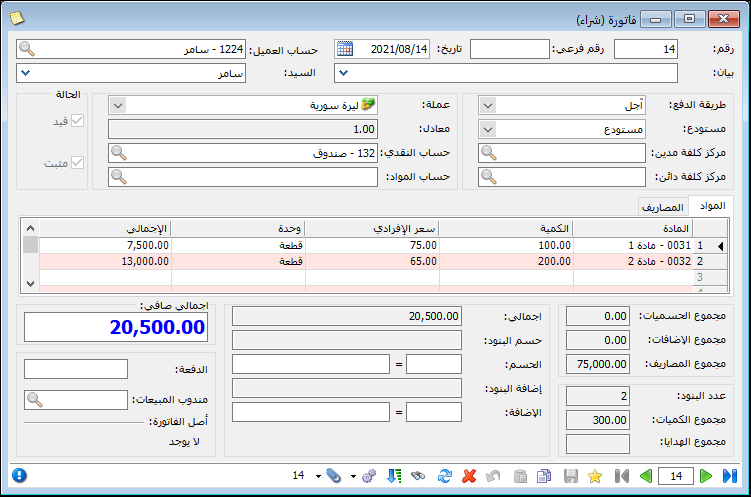
.
This invoice affects warehouse stock and generates the following journal entry:
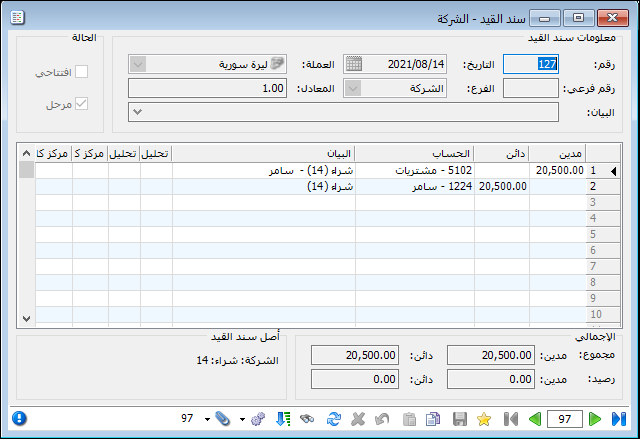
.
Under this approach, the Import invoice first records expenses paid or payable. The subsequent purchase invoice records the purchase and the supplier liability while receiving the goods into warehouse inventory.
Important Note:
Both approaches aim to record the same import costs, using different workflows. In the first approach, allocating expenses to invoice lines makes the item’s full cost visible immediately. In the second, full cost is reviewed through a report such as Item Transactions or Item Inventory. The second approach has fewer steps because it does not use a temporary Import Transactions account. Under the first approach, that account should be cleared at the end of the import transaction; any remaining balance requires investigation.
.


