


Order management organizes customer orders for goods and purchase orders sent to suppliers. Recording and archiving these orders supports useful progress and fulfillment reports.
Al Mizan .NET offers a flexible order system that companies can configure for their own workflows using a visual interface showing each stage clearly.
Record orders with their dates, agreed delivery dates, customers, items, quantities and prices. Orders may contain several stages and invoices. Deliver goods in one batch or multiple invoices, then report on requested, delivered and outstanding quantities and projected stock after fulfillment. The Orders menu contains the following tools.
1. Order Tree #
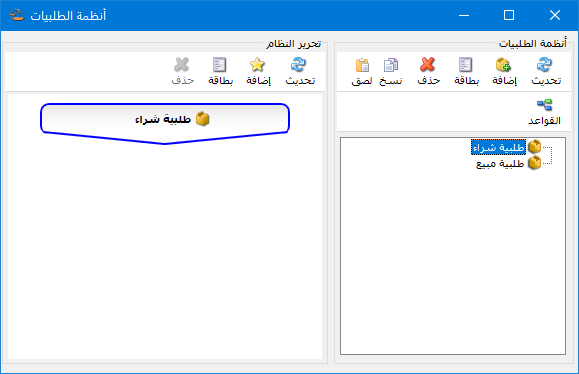
Define the company’s order systems using this window and the following buttons.
.
.
Order Systems Fields: These include:
Refresh: Refresh changes made to order system definitions.
Add: #
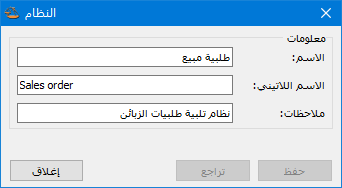
Click Add to define a new order system. Enter its name, Latin name and any notes in the following window.
.
.
Card: Select an existing order system and click Card to open its definition.
Delete: Delete a previously added order system. Select the system and click Delete.
Copy / Paste: Select an existing system, click Copy and then Paste to create a new system from it. Change the new system’s name to distinguish it from the original.
Rules: #
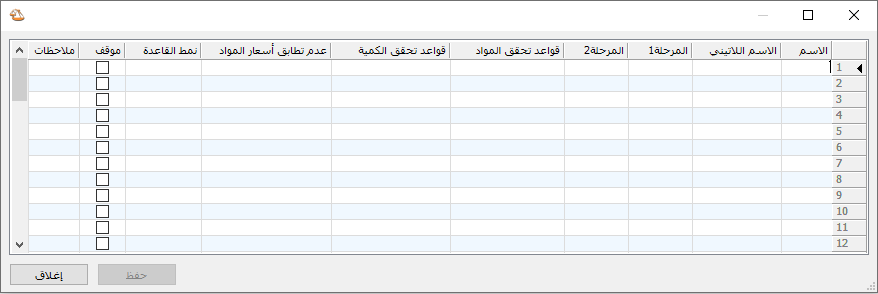
Define validation rules comparing stages already created in Edit System. This window contains:
Name: Enter a name describing the validation rule.
“Latin Name : Enter the rule name in Latin characters.
Stage 1: Select the stage to validate, such as Order Confirmation, by comparing it with Stage 2, such as Delivery.
Stage 2: Select the stage against which Stage 1 is compared.
Item Validation Rules: #
Choose how to respond if the item counts differ between Stage 1 and Stage 2. Available options include:
Allow: Save the Stage 1 invoice without requiring equal item counts between the stages.
Item Count Rules: #
Warn If Stage 1 and Stage 2 Item Counts Differ: Display a warning if the counts differ. Choosing Yes continues saving the Stage 1 invoice.
Block If Stage 1 and Stage 2 Item Counts Differ: Display a blocking message if the item counts differ between the stages. The Stage 1 invoice cannot be saved until the counts match.
Item Inclusion Rules: #
Warn If Stage 1 Items Are Not Included in Stage 2: Warn when Stage 1 contains items not included in Stage 2. Choosing Yes continues saving the Stage 1 invoice.
Block If Stage 1 Items Are Not Included in Stage 2: Prevent saving the Stage 1 invoice unless its items are included in Stage 2.
Warn If Stage 1 Items Are Included in Stage 2: Warn when Stage 1 items are included in Stage 2. Choosing Yes continues saving the Stage 1 invoice.
Block If Stage 1 Items Are Included in Stage 2: Prevent saving the Stage 1 invoice when its items are included in Stage 2.
Quantity Validation Rules: #
Choose how to respond to differences between Stage 1 and Stage 2 quantities.
Allow: Save the Stage 1 invoice without requiring equal quantities between the stages.
Quantity Rules: #
Warn If Stage 1 and Stage 2 Quantities Differ: Warn if quantities differ. Choosing Yes continues saving the Stage 1 invoice.
Block If Stage 1 and Stage 2 Quantities Differ: Prevent saving the Stage 1 invoice unless the quantities match.
Warn If Stage 1 Quantity Exceeds Stage 2: Warn when Stage 1 quantity is greater. Choosing Yes continues saving the Stage 1 invoice.
Block If Stage 1 Quantity Exceeds Stage 2: Prevent saving unless Stage 1 quantity is less than or equal to Stage 2.
Warn If Stage 1 Quantity Is Less Than Stage 2: Warn when Stage 1 quantity is lower. Choosing Yes continues saving the Stage 1 invoice.
Block If Stage 1 Quantity Is Less Than Stage 2: Prevent saving unless Stage 1 quantity is greater than or equal to Stage 2.
Item Prices Do Not Match: #
Choose how to respond when item prices differ between the stages.
Allow: Allow the Stage 1 invoice to be saved even when its prices differ from Stage 2.
Warn: Warn about differing prices while allowing the Stage 1 invoice to be saved.
Block: Prevent saving the Stage 1 invoice when its item prices differ from Stage 2.
Rule Direction: #
Select one of the following options.
- One Way: Apply the rule to the specified stage only.
- “ Two Ways: Apply the rule in both directions between the stages.
Disabled: #
Enable Disabled on a rule row to suspend it without deleting it.
Notes: Enter any notes.
The Rules window is shown below.
.
.
Edit System Fields: #
These include:
Refresh: #
Refresh changes made to order stage definitions.
Add: #
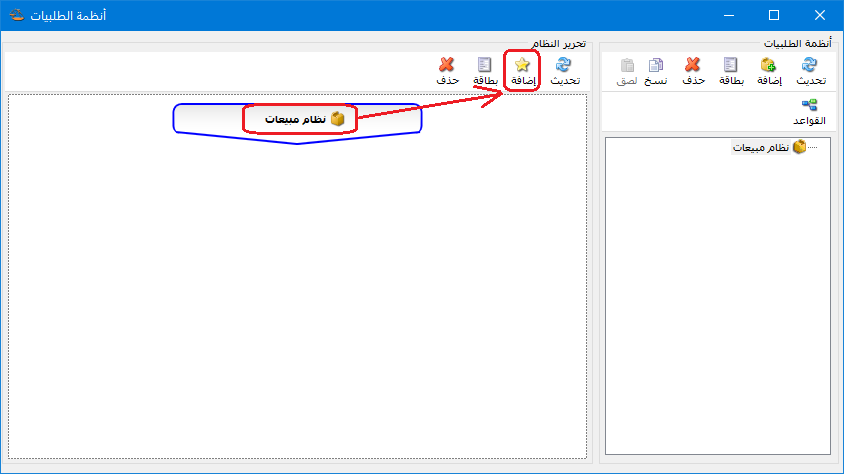
Use Add to create a stage in an existing system. For example, a simple sales order system has Customer Order, using a Sales Order invoice, and Order Delivery, using a Sales Invoice. Define the sales system first, select it and click Add to create Customer Order, as illustrated below.
.
.
The following window defines the Customer Order stage and contains these fields.
.
.
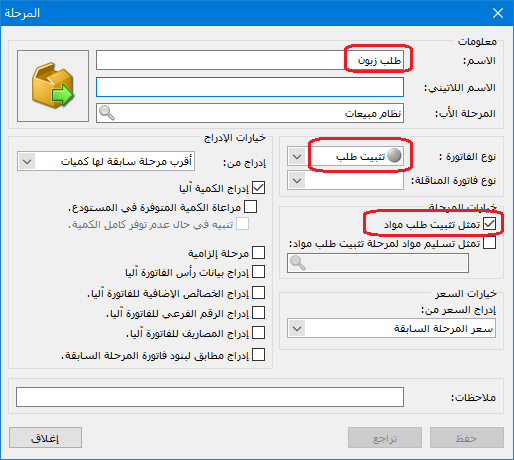
.
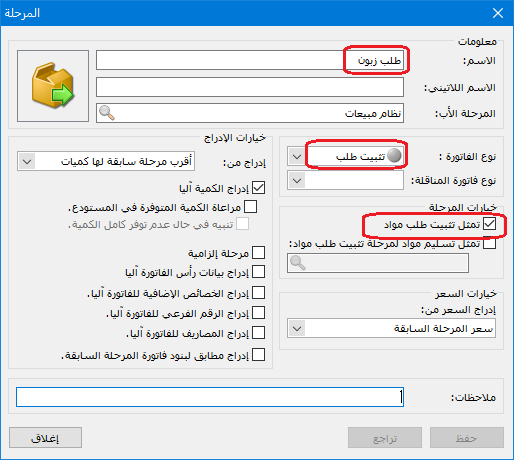
Name: Enter the stage name, such as Customer Order.
Latin Name: Enter its English name.
Parent Stage: Select the parent stage.
Invoice Type: Select the invoice type for this stage. Customer Order usually uses an Order Confirmation or Sales Order type with no accounting or inventory effect, recording customer requests and linking them to the order system. Its settings are shown below.
.
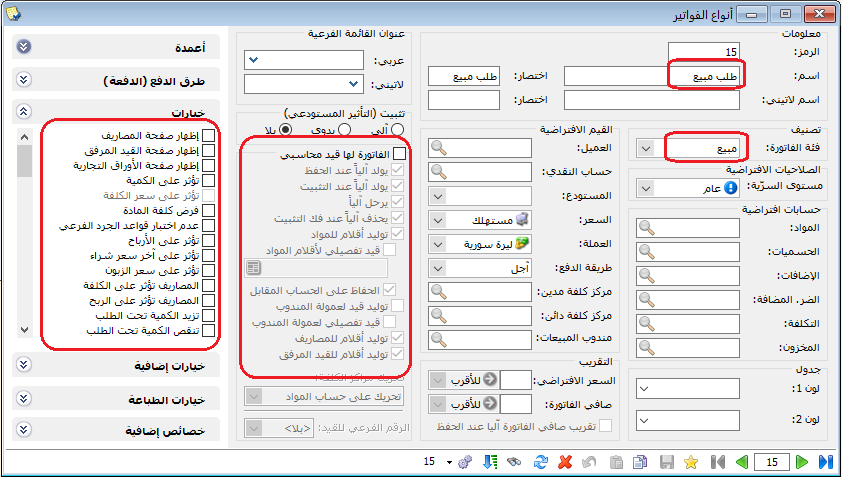
.
Transfer Invoice Type: Select the transfer type if this stage uses warehouse transfers. For example, an internal order from one warehouse to another can be delivered using a transfer invoice without a journal entry.
Notes: Enter notes about this stage.
Stage Options: #
Two options are available.
- Represents an Item Order : Select if this stage confirms the requested items.
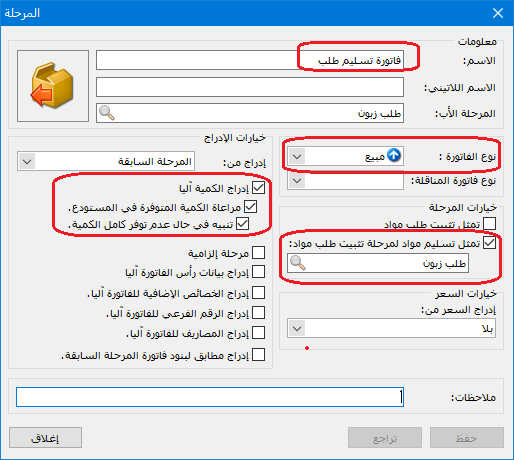
- Represents Delivery for an Order Stage : Select if this stage responds to an order or delivers its requested items. Then specify the order-confirmation stage it fulfills.
Price Options: #
Three options control prices in stages after the initial order stage. The first stage records the agreed order price; later stages use Insert Price From.
- None: Leave prices blank in the later-stage invoice.
Example: Tarek orders three refrigerators at 3,000 each. When creating delivery with this option, the new invoice has no prices, as illustrated below.
.

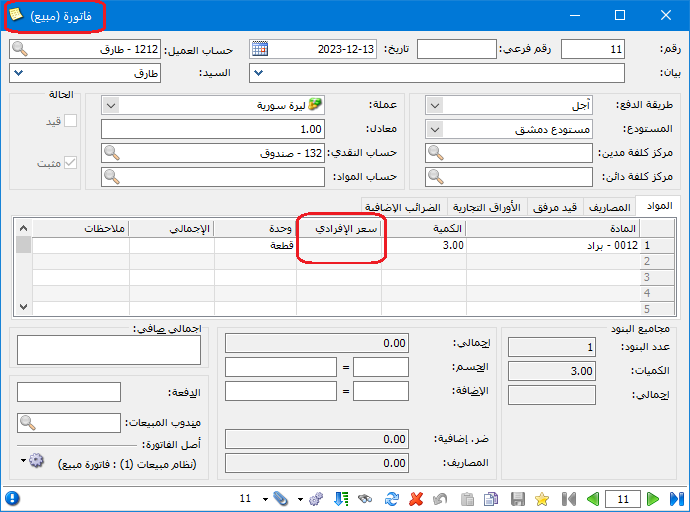
.
Invoice Type Price: Use the pricing level configured in the subsequent invoice type.
Example: Tarek orders three refrigerators at SYP 3,000 each. Their retail price is SYP 2,000 and the invoice type uses Retail. A new delivery invoice uses SYP 2,000, as shown below.
.
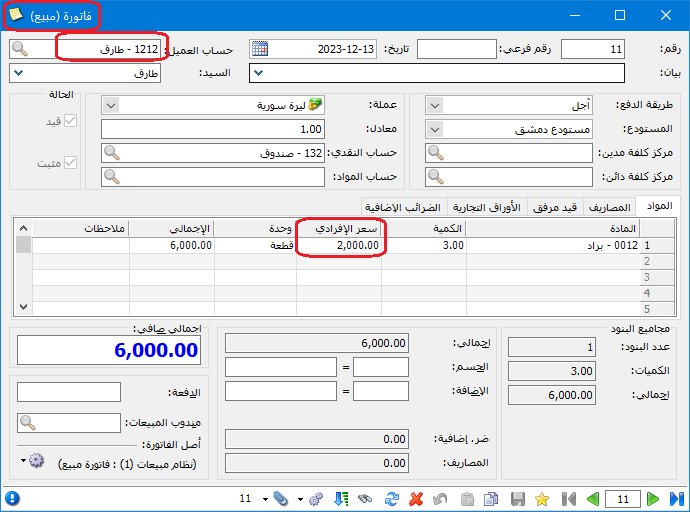
.
- Previous Stage Price: Use the prices recorded in the preceding stage.
Example: Tarek orders three refrigerators at SYP 3,000 each, while retail is SYP 2,000. A new delivery invoice uses SYP 3,000, as illustrated below.
.
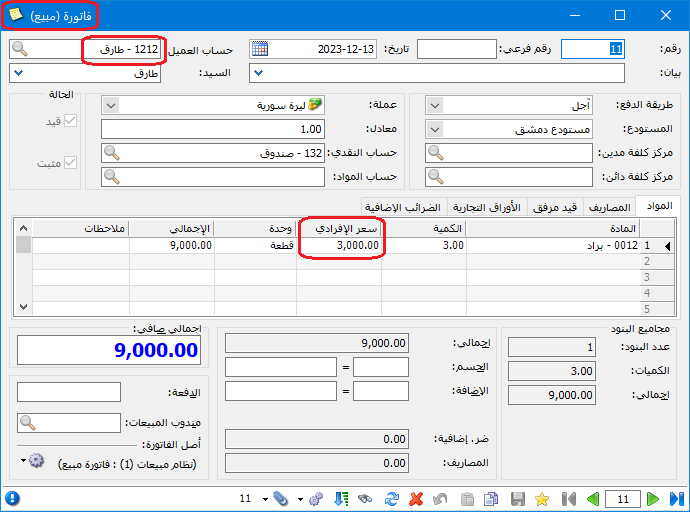
.
Note: If Quantity Options is set to None, creating a delivery invoice produces an empty invoice regardless of the price setting.
Insertion Options: #
Quantity Options also apply to stages following the initial stage, not the initial stage itself. Four Insert From choices are available:
- Insert From:
- None: Do not insert quantities into the later-stage invoice.
Example: Tarek orders three refrigerators at 3,000 each. A new delivery invoice is empty with this setting, as illustrated below.
.


.
- Previous Stage: Insert items and quantities from the immediately preceding stage.
Example: Tarek orders three refrigerators at SYP 3,000 each. A new delivery invoice inserts three refrigerators, as illustrated below.
.
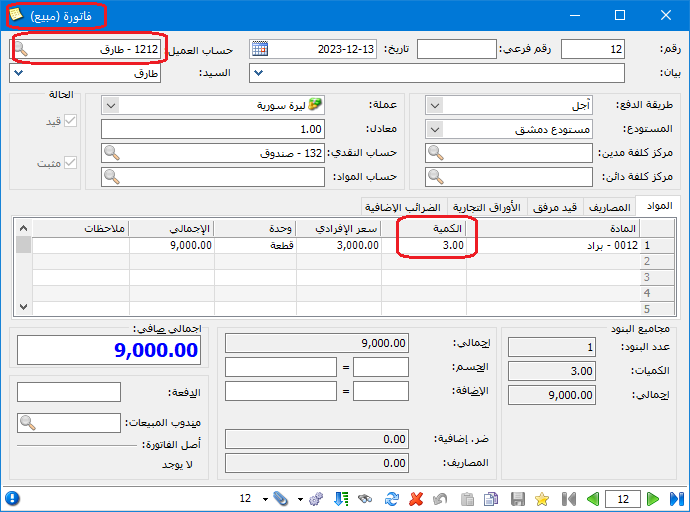
.
Nearest Previous Stage with Quantities: Retrieve quantities from the closest earlier stage containing them, rather than unrelated stages such as quotation, review or other workflow steps.
Order Confirmation Stage: Retrieve quantities specifically from the stage confirming the order, rather than other stages such as quotation or review.
Insert Quantity Automatically: #
This is enabled by default and includes:
Consider Available Warehouse Quantity: At delivery, insert only items with available stock and limit quantities to warehouse availability. This depends on Insert Quantity From.
The following image illustrates the setting:
.
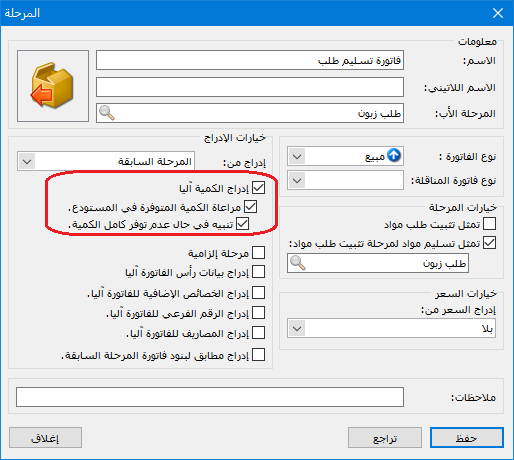
.
- Warn If Full Quantity Is Unavailable: At delivery, display a warning and a table showing item name, available quantity, requested quantity and shortage.
The following image illustrates the setting:
.
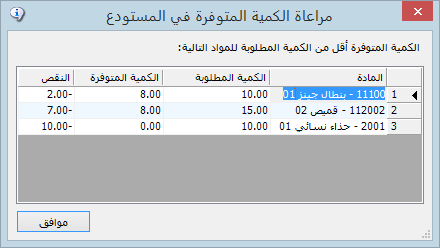
.
Mandatory Stage: This stage must be completed before proceeding to the next.
Insert Invoice Header Data Automatically: Copy header data from the previous stage.
Insert Additional Properties Automatically: This follows the source selected in Insert Quantity From.
Note: Additional properties are not inserted unless Show Additional Properties Tab is enabled in the invoice type, even if automatic insertion is selected.
Insert Invoice Subnumber Automatically:
This follows the source selected in Insert Quantity From.
Note: If the selected source stage has multiple invoices with different subnumbers, use the subnumber of its first invoice.
- Insert Expenses Automatically: Copy invoice expenses from the previous stage.
- Insert Exact Previous-Stage Invoice Lines: Copy the previous invoice’s line data without adjusting for quantities still awaiting delivery.
- The following illustration shows this option.
The Customer Order stage definition is shown below.
.
.
The Customer Order Delivery stage definition is shown below.
.
.
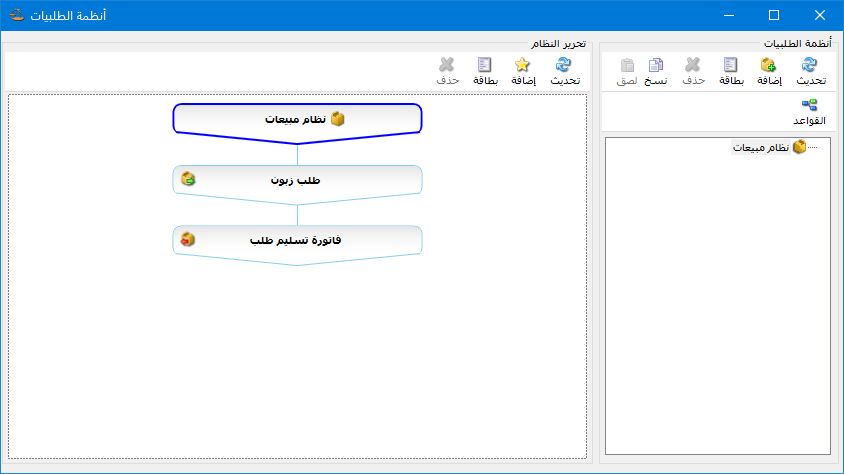
The completed order system appears as follows.
.
.
2. Enter Orders #
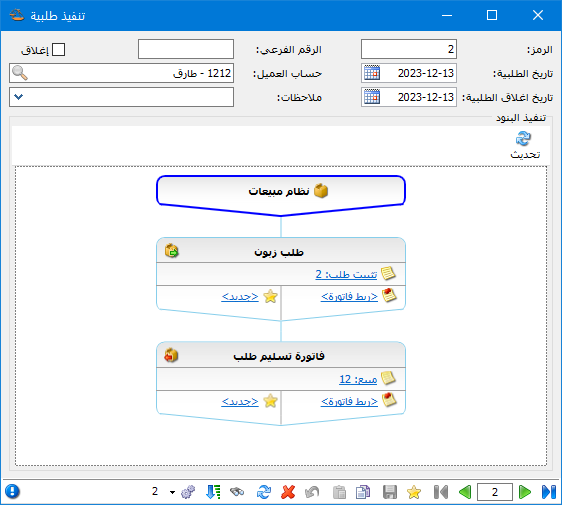
The defined system appears under Orders. Open it to create a customer order using the following fields.
.
.
Code: Enter the order code or leave it blank for automatic numbering.
Order Date: Enter the order creation date. It defaults to today.
Order Closing Date: Enter the expected closing date or agreed completion date. It also defaults to today.
Notes: Enter notes about the order as a whole.
Close: Enable this option if the order is closed.
Save the order record, then add a Sales Order invoice to its Customer Order stage. Three methods are available to insert invoices into an Al Mizan order.
Method 1: #
Add a New Invoice from the Order Window:
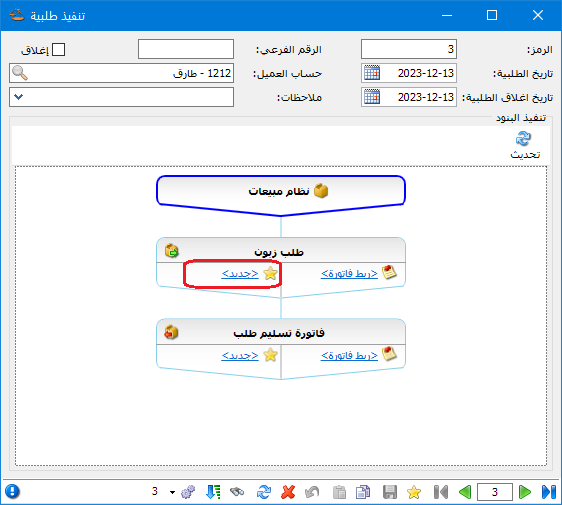
Click New within the required stage. For example, click New under Customer Order in Tarek’s order, as shown below.
.
.
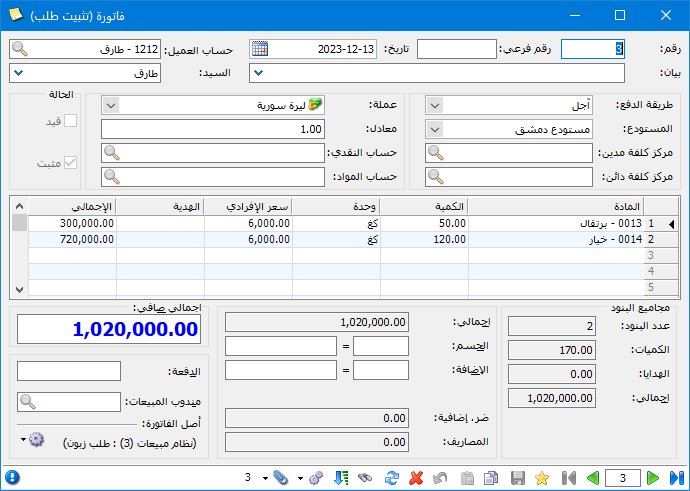
Enter the requested items, quantities and prices in the invoice window, as illustrated below.
.
.
The invoice then appears in the order window, as shown below.
.

.
Method 2: #
Add a New Invoice from the Invoice Window:
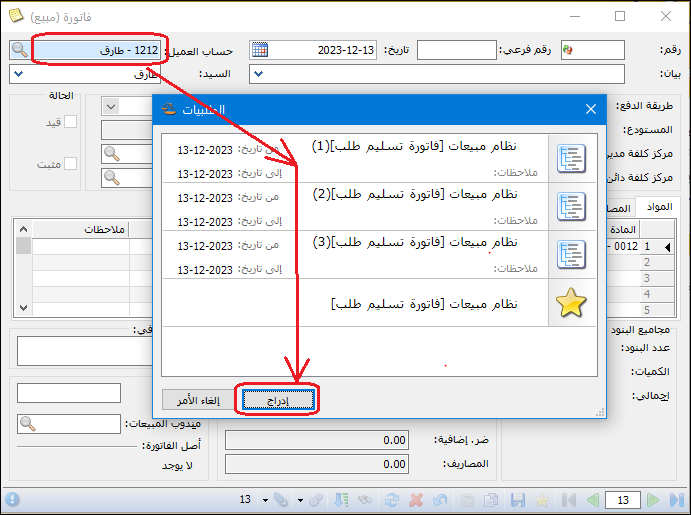
Open Invoices and Order Confirmation, then enter Tarek in Customer Account. A window automatically displays his open orders. Select the order to link to this invoice, as illustrated below.
.
.
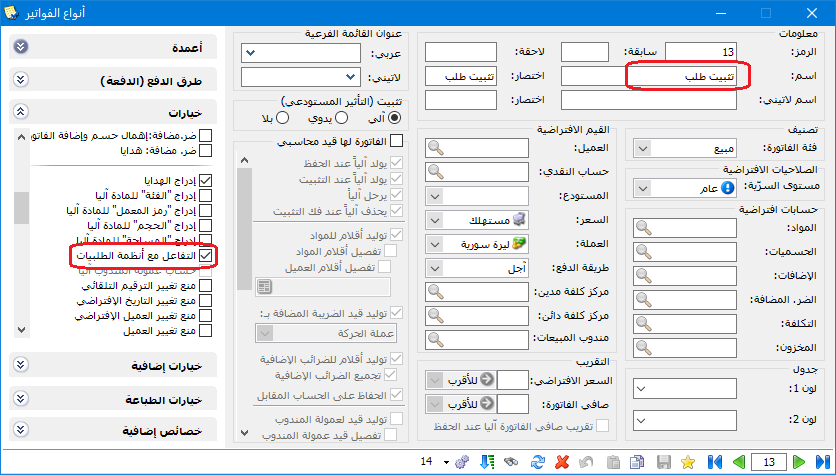
Important Note:
For this to work, enable Interact with Order Systems in the Sales Order invoice type settings, as shown below.
.
.
Method 3: #
Link an Existing Invoice to the Order:
If order management is introduced into a database with existing invoices, use Link Invoice. For example, open Tarek’s order and click Link Invoice to associate an existing Sales Order invoice numbered 1, as illustrated below.
.
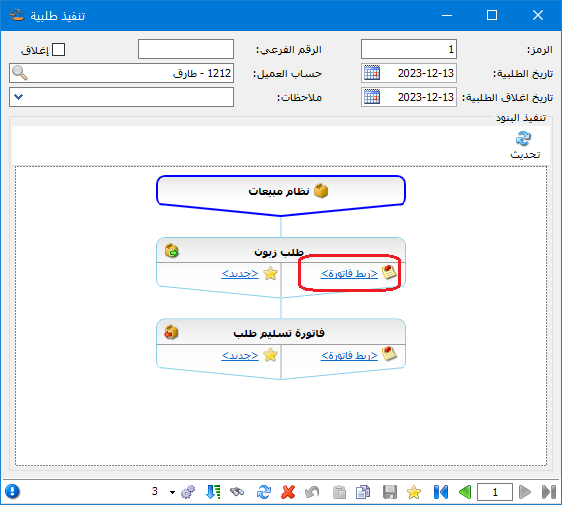
.
Select Sales Order invoice 1 in the following window.
.
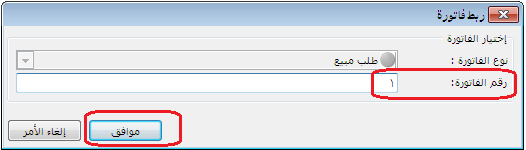
.
Returning to the order record, the invoice is now linked and displayed in the first stage.
.
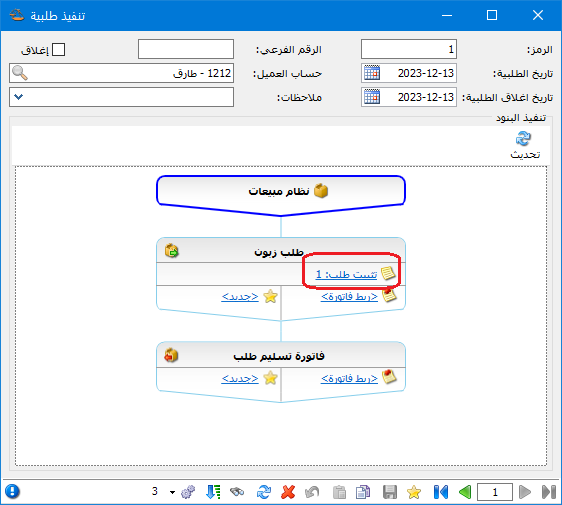
.
Note 1:
The same three methods apply to other stages, including delivery or response to an order.
Note 2:
For delivery or response stages, the program automatically suggests the items to fulfill, avoiding manual re-entry. This applies when creating invoices from either the order window or the invoice window.
3. Process Orders #
View recorded orders and filter them using the following criteria.
.
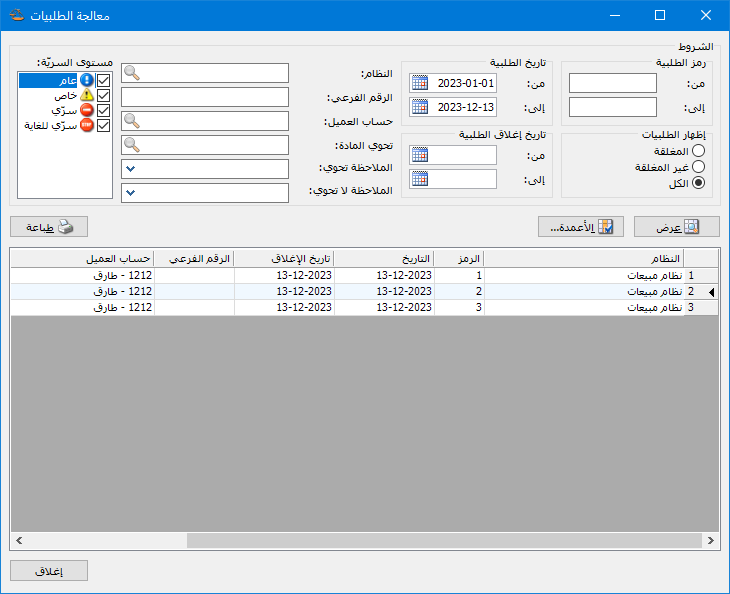
.
Order Code: From / To: Set a number range to display orders whose codes fall within it.
Order Status: #
Three options are available:
- Closed: Display closed orders.
- Open: Display orders not yet closed.
- All: Display both closed and open orders.
Order Date: From / To: Set a date range to display orders created within it.
Order Closing Date: From / To: Set a date range to display orders whose closing dates fall within it.
System: Select the order system whose records should be displayed.
Secondary Number: Enter a subnumber to display associated order records.
Customer Account: Select a customer account to display that customer’s orders.
Contains Item: Select an item to display orders containing it.
Notes Contain / Notes Do Not Contain: Filter order records using words in their notes.
Show: Click this button to display orders matching the criteria.
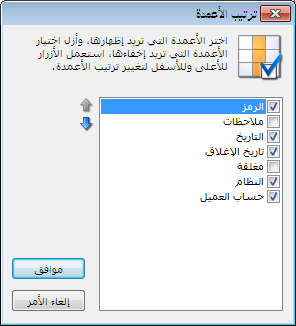
Columns: Choose the order-information columns to display, enable or disable them and adjust their order in the following window.
.
.
Print: Print the order records displayed in this window.
Close: Close Process Orders.
4. Order Inventory #
This report shows requested items, ordered quantities, delivered quantities and the delivery completion percentage for each item.
Use it to review quantities requested and delivered and track fulfillment progress.
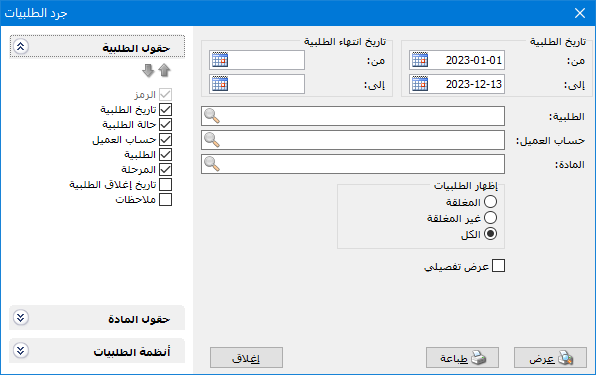
The Order Inventory report contains the following fields and criteria.
.
.
Order Date: From / To: Set a date range for the orders to include.
Order End Date: From / To: Set a date range for order closing dates.
Order: Select a particular order to report on it only.
Customer Account: Select a customer to report on their orders.
Item: Select an item to include only that item.
Show Orders: #
Three options are available:
- Closed: Include closed orders.
- Open: Include open orders.
- All: Include both closed and open orders.
Detailed Display: Show details of the requested criteria, such as order dates, end dates and customer information.
Order Fields: Choose the order information to show in this report.
Item Fields: Choose the item information to show in this report.
Order Systems: #
Select one or more systems to include their order records.
Show: Display the report.
Print: Print the report directly.
Close: Close the report criteria window.
Report Example:
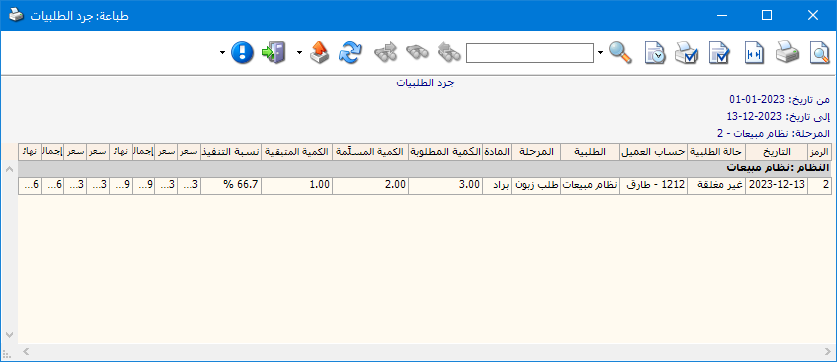
Tarek orders 50 kg of oranges and 120 kg of cucumbers. He receives a partial delivery of 15 kg of oranges and 65 kg of cucumbers. The resulting Order Inventory report appears as shown below.
.
.
Important Note:
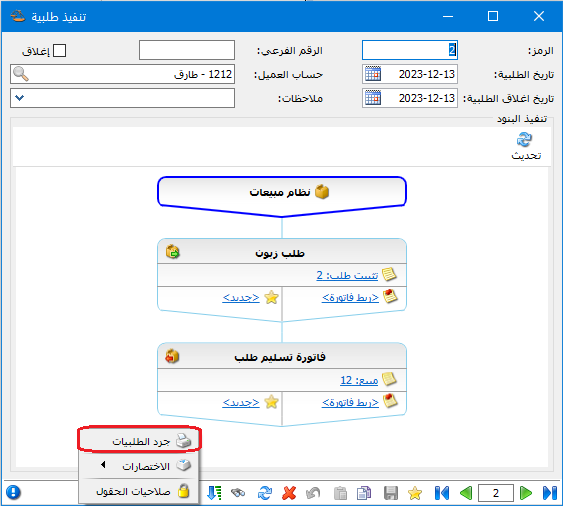
You can also open an individual order’s inventory report from Operations and Order Inventory in its order window, as illustrated below.
.
.
5. Item Inventory Including Orders #
This report projects inventory after outstanding orders are fulfilled, showing expected quantities if all relevant orders were completed.
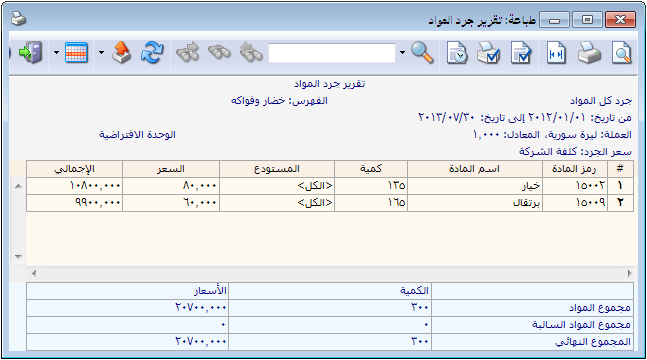
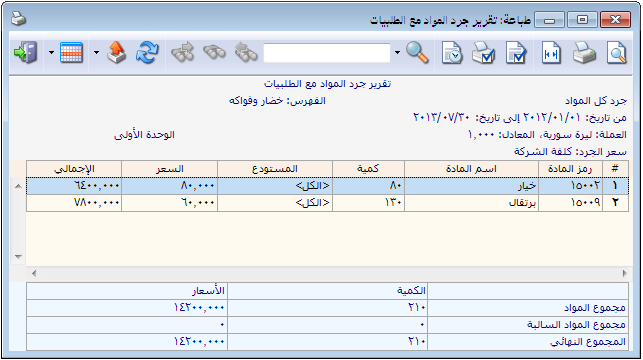
Using the previous order example, suppose 200 kg of cucumbers and 180 kg of oranges were purchased. The following illustrations compare ordinary Item Inventory with Item Inventory Including Orders.
Item Inventory Report:
.
.
Item Inventory Including Orders Report:
.
.
Projected quantities are lower than current stock because the report treats outstanding sales order quantities as delivered.
Purchase orders are handled differently. Outstanding sales orders reduce projected stock, while purchase order receipts are included according to the report’s date range. Consider the following example.
Example: #
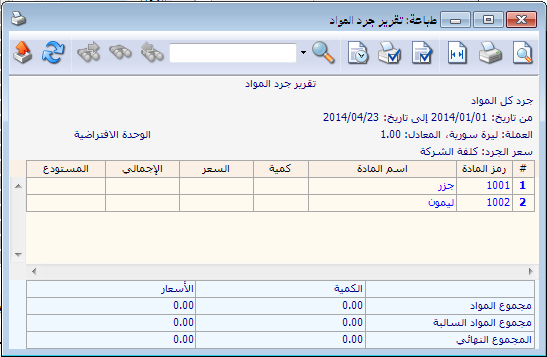
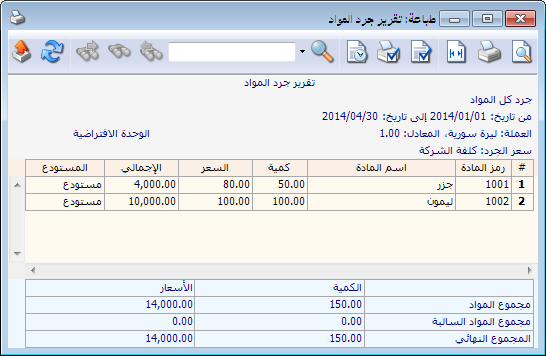
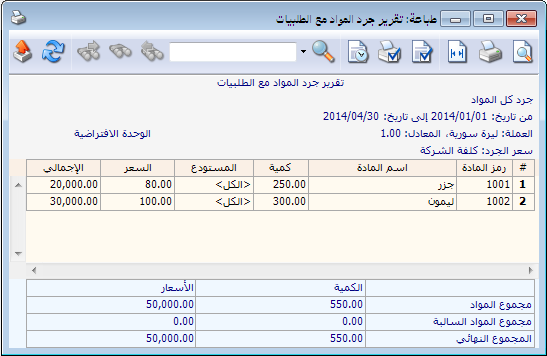
Suppose 300 kg of lemons and 250 kg of carrots are ordered on 23 April 2014, with closing scheduled for 30 April 2014. Neither item has existing stock. For a report period ending 23 April, neither ordinary nor projected inventory shows stock, as illustrated below.
.

.
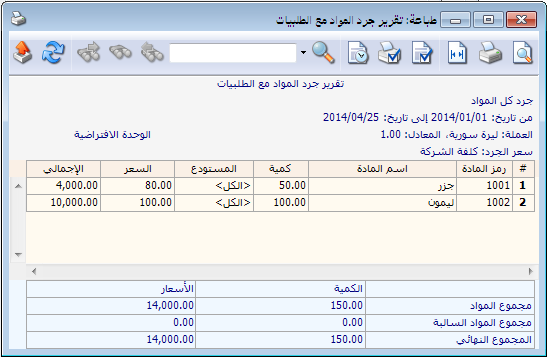
If 100 kg of lemons and 50 kg of carrots are received on 25 April 2014, both reports show these received quantities, as illustrated below.
.

.
If the remaining goods have not arrived, a projected report ending 30 April shows 300 kg of lemons and 250 kg of carrots. Ordinary Item Inventory still shows only the 100 kg and 50 kg actually received.
.
.
6. Horizontal Item Inventory Including Orders #
This provides the same projection, displaying warehouse quantities in separate columns.
.


