


Use the Real Estate module to list properties held by the business and record each property’s details, including floors, apartments, shops or offices, views, rooms, area and occupancy contract type, such as sale, rental or investment.
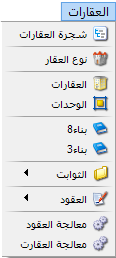
.
1. Property Tree #
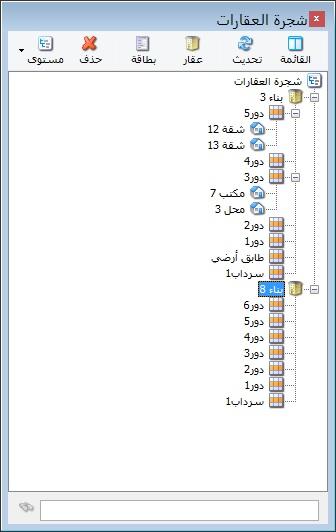
Define properties and classify them as parent properties or units using Property Types. You can also browse previously defined properties.
.
2. Define Property Types #
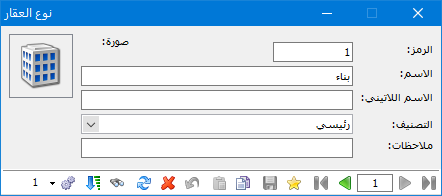
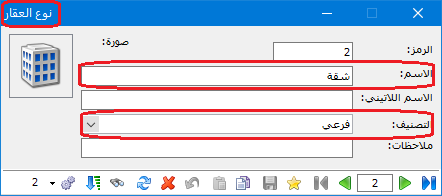
Define parent property types, such as buildings, malls or hospitals, and unit types, such as apartments, shops, offices or clinics. The Property Type window contains the following fields:
.
- Name: Define the property type.
- Latin Name: Enter the type name in Latin characters.
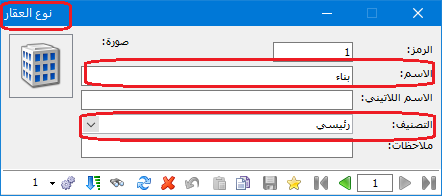
- Classification: Choose Parent or Unit.
Use Parent for the main property, such as a building, mall or hospital, and Unit for its apartments, shops, offices or clinics.
This is illustrated in the following two images.
3. Property Card #
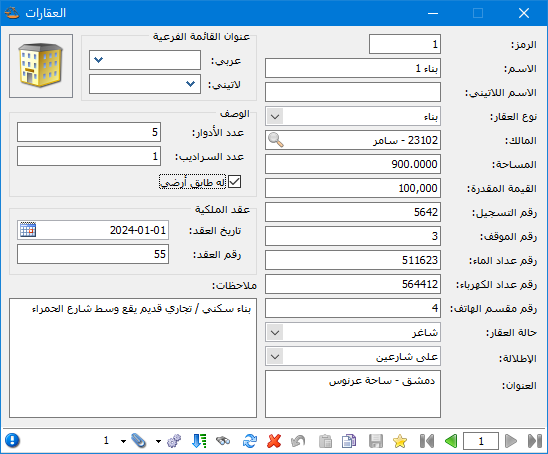
Define properties held by the business using this window, as shown below.
Details: #
- Code: A unique property identifier. Enter it manually or allow the program to assign a sequential number.
- Property Name: Enter the building name.
- Latin Name: Optionally enter the building name in Latin characters.
- Property Type: Select a previously defined type.
- Owner: Select the property owner’s account.
- Area: Enter the property area.
- Estimated Value: Enter the estimated property value, a statistical figure representing its cost.
- Registration Number: Enter the property registration number.
- Parking Number: Enter the assigned parking number.
- Property Status: Select a status defined in Property Status, such as vacant or occupied.
- View: Select the property view, such as none, two streets or sea view.
- Address: Enter the detailed property address.
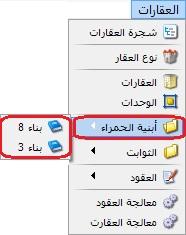
Submenu Title: #
This classification list organizes properties into tabs, as shown below.
.
Description: #
Number of Floors: Enter the number of floors in the building.
Number of Basements: Enter the number of basement levels.
- Has Ground Floor: Enable this option if the building contains ground-floor units.
Ownership Contract: #
- Contract Date: Enter the building ownership contract date.
- Contract Number: Enter the building ownership contract number.
Notes: #
Enter any notes about the property.
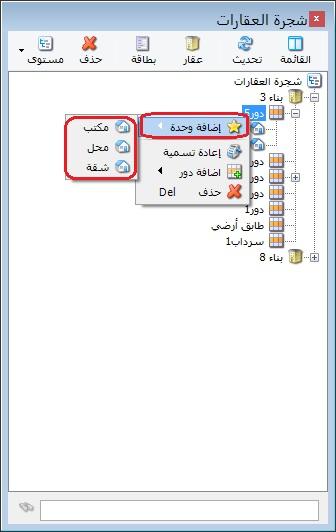
After defining a property, such as Building 8 below, and setting its floors, basements and ground floor, define the units on each level. Right-click the required level and choose Add Unit, then enter its details. Unit cards follow the same approach as property cards, with the differences explained below.
.
Define a unit in the same way as a property, with the following field differences, as illustrated below.
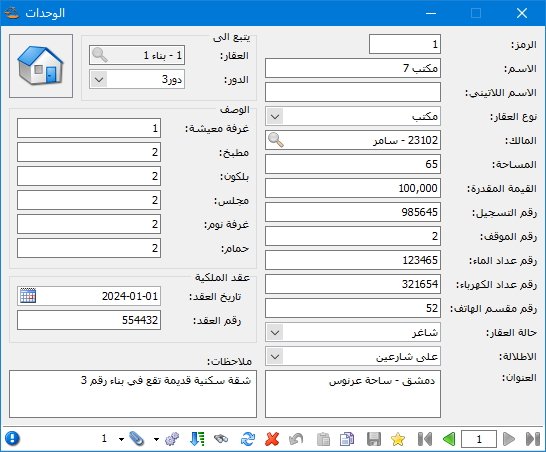
.
Define Units: #
- Code: A unique unit identifier. Enter it manually or allow the program to assign a sequential number.
- Name: Enter the unit name, such as Office 7.
- Latin Name: Optionally enter the unit name in Latin characters.
- Property Type: Select the previously defined type appropriate to the unit.
- Owner: Select the property owner’s account.
- Area: Enter the property area.
- Estimated Value: Enter the estimated property value, a statistical figure representing its cost.
- Registration Number: Enter the property registration number.
- Parking Number: Enter the assigned parking number.
- Property Status: Select a status defined in Property Status, such as vacant or occupied.
- View: Select the property view, such as none, two streets or sea view.
Address: Enter the detailed property address.
Belongs To: #
- Property: Select the parent property containing this unit.
- Floor: Select the floor, basement or ground level containing the unit.
Description: #
Describe the unit’s contents, such as rooms and reception areas.
After completing the fields and saving, the card appears in the Property Tree as shown below.
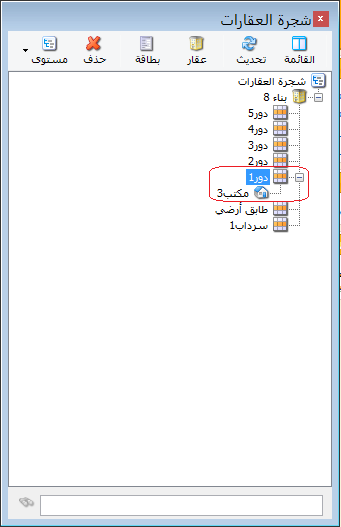
.
4. Contract Types #
Define the contract types used by your business, such as Rental Contract or Sales Contract.
The Contract Type window is configured as follows:
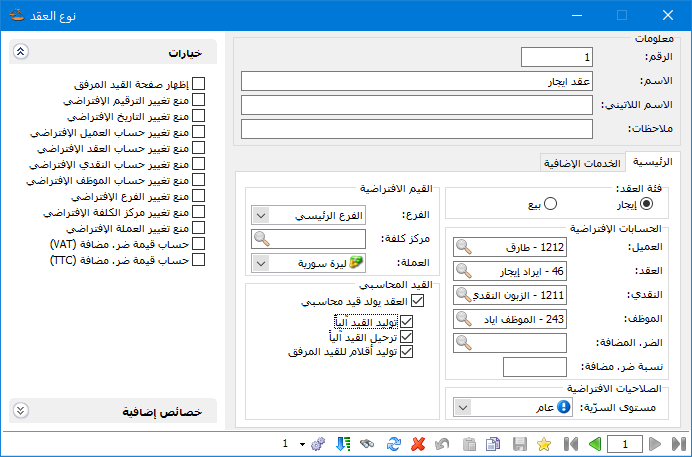
.
Information #
- Number: A unique contract type identifier. Enter it manually or allow sequential numbering.
- Name: Enter a name such as Rental Contract, Sales Contract or Investment Contract.
- Latin Name: Optionally enter the contract name in Latin characters.
- Notes: Enter any notes about the defined contract type.
Contract Category: #
Choose Rental or Sale according to the contract type.
Default Accounts: #
- Account Customer : Set the customer account inserted by default in a new contract record, often a general customer account. It can be changed in the individual contract.
- Contract Account : Set the revenue account receiving income from the contract. It can be changed in the individual contract.
- Account Cash Account : Set the Cash or Bank account receiving any initial customer payment entered in the contract. It can be changed in the individual contract.
- Account of the Employee : Select the account of the employee handling the contract. It can be changed in the individual contract.
- Default Permissions : Set the required confidentiality level according to employee permissions, as shown below.
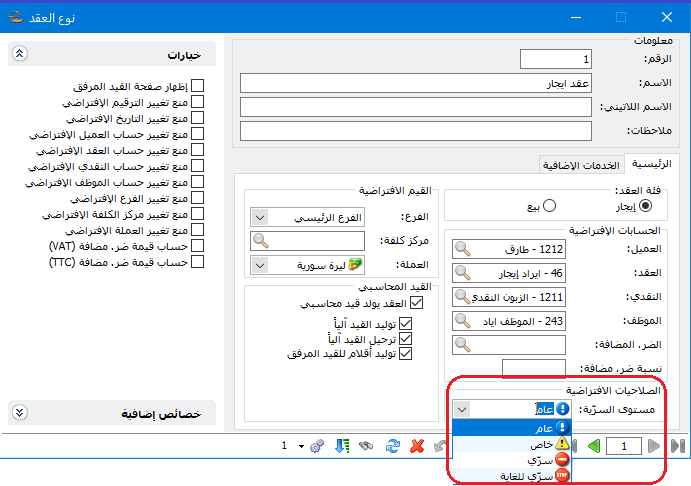
Default Values: #
- Branch: Select the branch associated with the contract type.
- Cost Center: Optionally select a cost center to which contract revenue will be assigned.
- Currency: Select the currency appropriate to the contract type.
- Journal Entry: Enable or disable automatic entry generation and posting according to your workflow.
- Options: Configure contract record restrictions and tax calculation options, including VAT and TTC.
- Additional Properties: Use this tab for contract-specific characteristics. Enable Show Additional Properties Tab, then select a previously defined Contract Additional Property to appear by default in new contracts, as illustrated below.
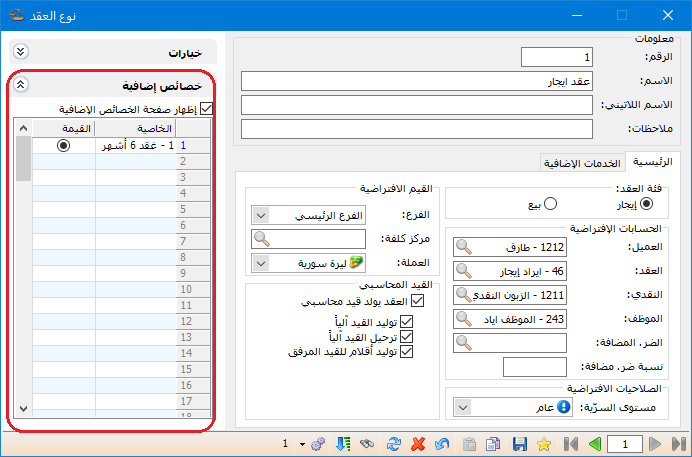
.
The Contract Additional Properties window is shown below.
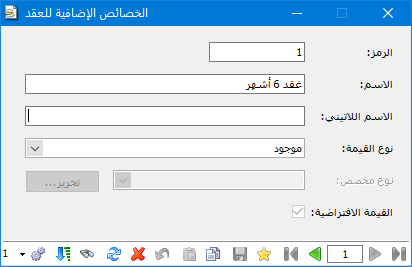
.
- Code: A unique additional property identifier. Enter it manually or allow sequential numbering.
- Name: Enter the additional property name.
- Latin Name: Optionally enter the property name in Latin characters.
- Value Type: Choose a format appropriate to the property. For example, Six-Month Contract can use Present.
- Default Value: Enable this if the value should be selected by default.
5. Create a Contract #
Open Contracts in the Real Estate module and select the type to use with the customer, such as a sale, rental or investment contract.
Create the contract as illustrated below.
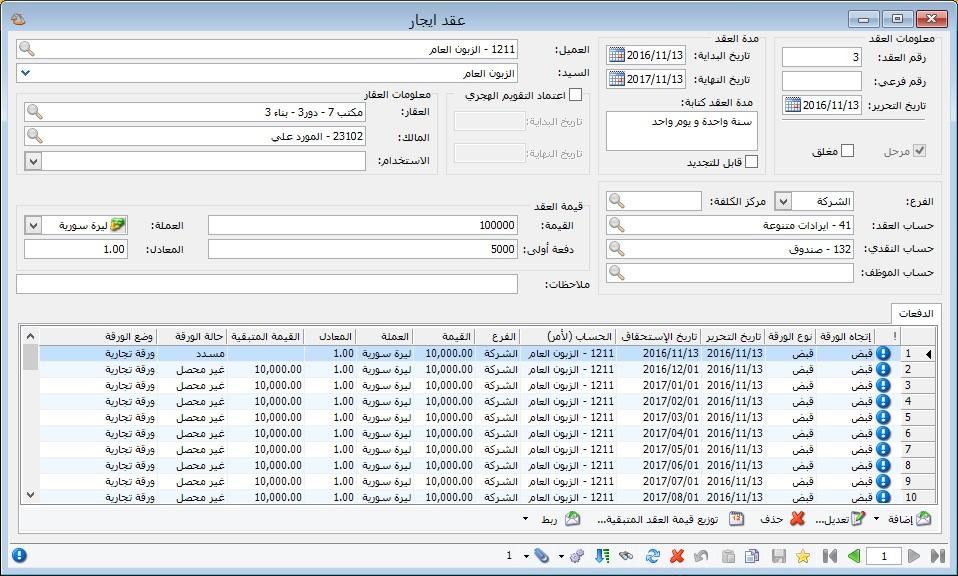
.
Contract Information: #
Contract Number: A unique record number, entered manually or assigned sequentially.
Subnumber: Enter a subnumber if the contract has one.
Issue Date: Specify the date the contract is prepared.
Posted: This indicator reflects the contract’s accounting-entry status as displayed by the program.
Closed: Select this option if the contract is closed; leave it clear if still open.
Contract Duration: #
Start Date and End Date define the contract period.
Duration in Words: The program generates a written duration from the start and end dates. You can edit the text.
Renewable: For rental or investment contracts, set this according to the parties’ renewal agreement.
Branch: #
The Branch field defaults to the contract type’s branch and can be changed.
Contract Account: Defaults to the account configured for the type. You can change the revenue account for this contract.
Cost Center: Defaults to the center configured for the type and can be changed.
Cash Account: Defaults to the account configured for the type. You can change the account receiving contract payments.
Employee Account: Defaults to the employee account configured for the type and can be changed to the employee handling this contract.
Use Hijri Calendar: Enable this option to specify the contract’s start and end using Hijri dates, entered as dates or text.
Property Information: #
This section contains:
- Property: Select the property covered by the contract.
- Owner: The program automatically retrieves the selected property’s owner account, which can be changed.
- Purpose of Use: Optionally select the agreed use of the property.
Note: Define purposes in Reference Data and Purpose of Use, as shown below.
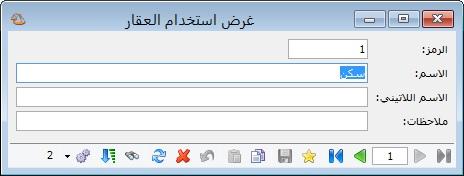
.
- Code: A unique purpose-of-use identifier, entered manually or assigned sequentially.
- Name: Enter a purpose such as Investment or Residential.
- Latin Name: Optionally enter the purpose in Latin characters.
- Notes: Enter any notes about the purpose of use.
Contract Value: #
This section records the contract’s financial amounts:
- Amount: Enter the contract value.
- Initial Payment: Enter any initial amount paid by the customer.
- Currency: Select the contract currency.
- Exchange Rate: Specify the rate when the currency differs from the base currency.
- Notes: Enter any notes about the contract.
Payments: #
Record payments or receipts using commercial papers. You can also divide the remaining contract value into installments by clicking Distribute Remaining Contract Value and configuring the following window.
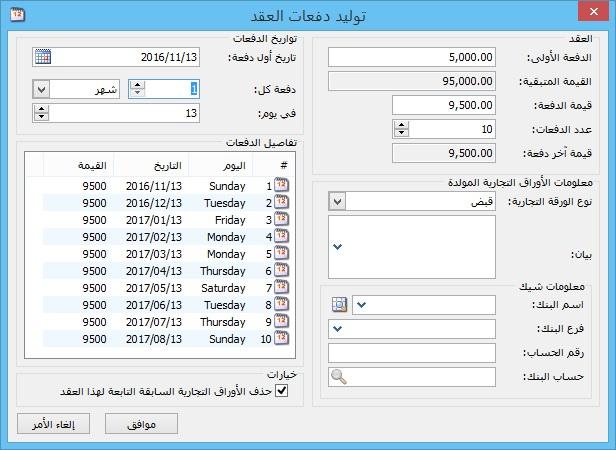
See Defining and Using Commercial Papers.
.
6. Process Contracts #
Use Process Contracts to view database contracts and filter them using the fields at the top. Right-click a contract row to open it. To undo posting, select one or more contracts, right-click and choose Undo Posting, avoiding the need to open each contract individually.
Open Real Estate and select Process Contracts.
The window contains the following sections, as shown below.
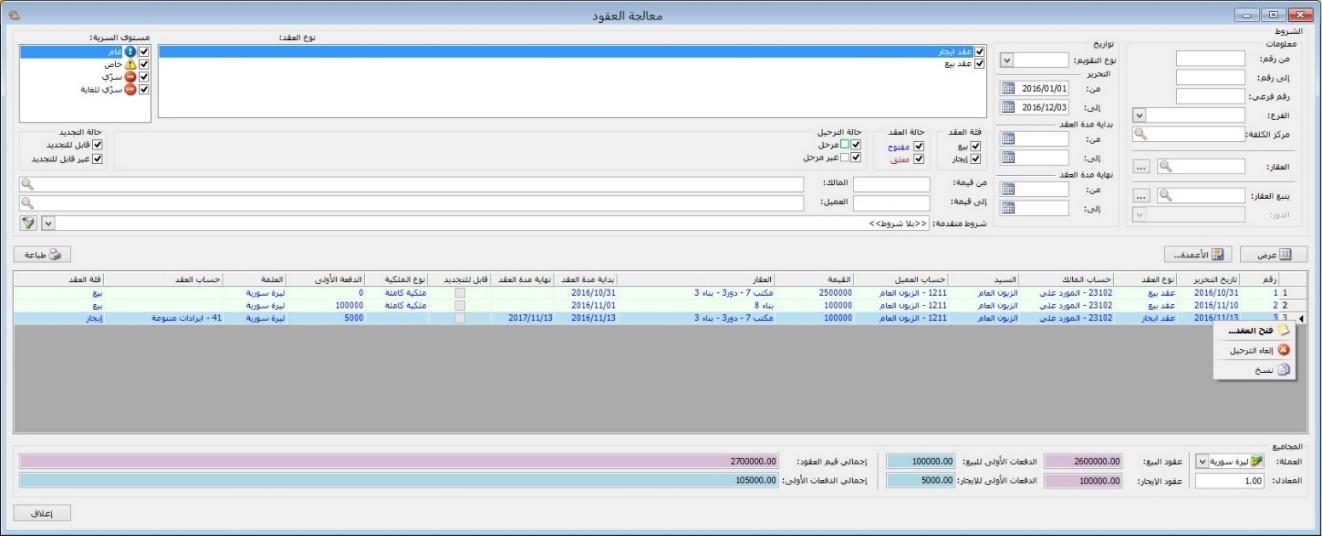
Conditions: #
Filter criteria determine which contracts appear. Their defaults display all contracts in the database. Available criteria include:
Information: #
This section contains the following fields:
- From Number / To Number: Set a number range to display contracts whose numbers fall within it.
- Secondary Number: Enter a subnumber to display the contract using it.
- Branch: Select a branch to display its contracts.
- Cost Center: Select a cost center to display contracts assigned to it.
- Property: Select a property to display its contracts.
- Belongs to Property: Select a parent property to display contracts for its units.
Dates: #
Set date criteria for Calendar Type, Issue Date, Contract Start and Contract End.
Contract Type: #
Select the types to display, such as rental or sales contracts.
Confidentiality Level: #
Select the confidentiality level of invoices to display.
Contract Category: #
Select the contract category to display.
Contract Status: #
Select the contract status to display.
Posting Status: #
Select the posting status of contracts to display.
Renewal Status: #
Select the renewal status of contracts to display.
From Amount / To Amount: Set an amount range to display contracts whose values fall within it.
Owner: Select an owner to display their contracts.
Customer: Select a customer to display their contracts.
Advanced Conditions: #
Set advanced contract criteria using fields such as contract type, amount or subnumber.
Currency and Exchange Rate: Set the currency used to display contract totals and its exchange rate against the base currency.
Show: Display invoices matching the preceding conditions.
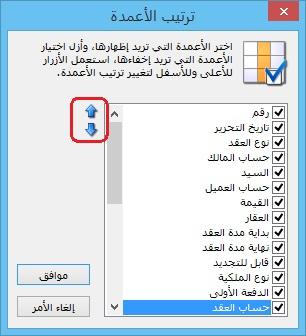
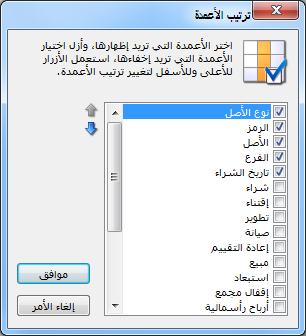
Columns: Choose which columns appear in the report and change their order using the two blue arrows at the upper left.
.
Print: Print the report information.
Totals: Totals provide summary figures for contracts displayed in the report.
7. Process Properties #
This window summarizes operations on selected properties. Open Real Estate and Process Properties to display the following fields.
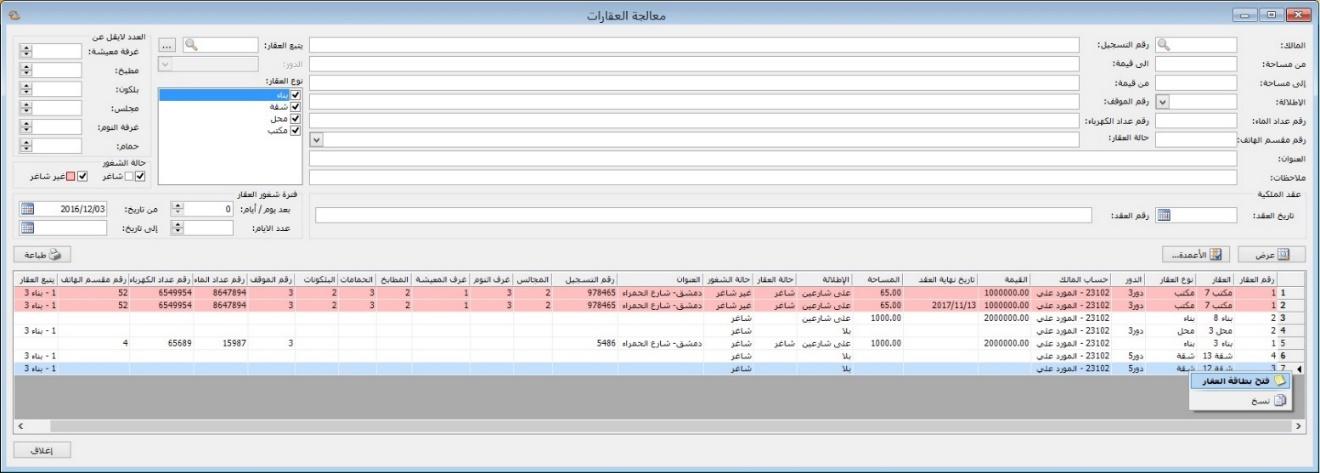
.
Conditions: #
Owner: Select the owner account whose properties should be displayed.
From Area / To Area: Set an area range to display matching properties.
View: Select the view of the properties to display.
Water Meter Number: Filter properties by water meter number.
Telephone Exchange Number: Filter properties by telephone exchange number.
Address: Filter properties by address.
Notes: Filter properties by their notes.
.
Registration Number: Filter properties by registration number.
From Amount / To Amount: Set a value range to display matching properties.
Parking Number: Filter properties by parking number.
Electricity Meter Number: Filter properties by electricity meter number.
Property Status: Select the property status to display.
Belongs to Property: #
Select a parent property to display its units.
Floor: Select the level containing the properties to display.
Property Type: Select the unit type to display.
Minimum Number Of: #
Set minimum counts for living rooms, kitchens, balconies, reception rooms, bedrooms and bathrooms.
Vacancy Status: #
Display vacant properties, occupied properties or both.
Ownership Contract: #
This section contains:
- Contract Date: Filter properties by contract date.
- Contract Number: Filter properties by contract number.
Property Vacancy Period: #
This contains the following options:
After Days / From Date: Enter how many days from today the required vacancy period should begin. The program automatically fills From Date with today plus that number of days.
Number of Days / To Date: Enter the required occupancy duration. The program calculates To Date from From Date plus the entered duration and displays properties available throughout that period.
Show: Display invoices matching the preceding conditions.
Print: Print the report information.
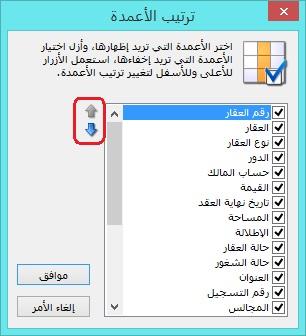
Columns : Open the columns window, enable the property information columns to display and use the two blue arrows at the upper left to change their order. The window is shown below.
.


