


Delete, Add and Move Accounts: #
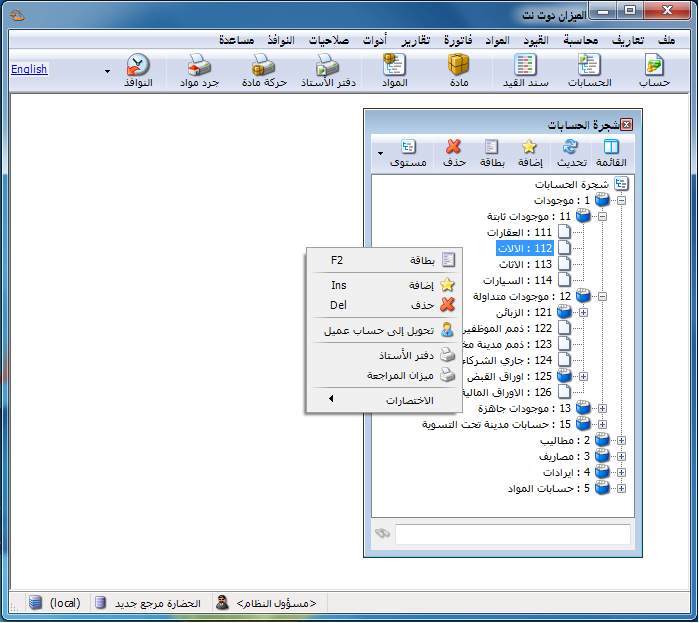
Open Accounting and Chart of Accounts to define company accounts. The Simple-Acc-Tree template contains basic accounts suitable for many companies. Remove unnecessary accounts by right-clicking and choosing Delete, or selecting the account and clicking Delete on the toolbar. You can also add accounts or move them between parent groups.
Note:
An account cannot be deleted if it has movements from an invoice, journal entry, commercial paper or other transaction. A parent account cannot be deleted until its child accounts are moved or deleted. Accounts used in program settings also cannot be deleted, such as Sales when linked to a Sales Invoice type.
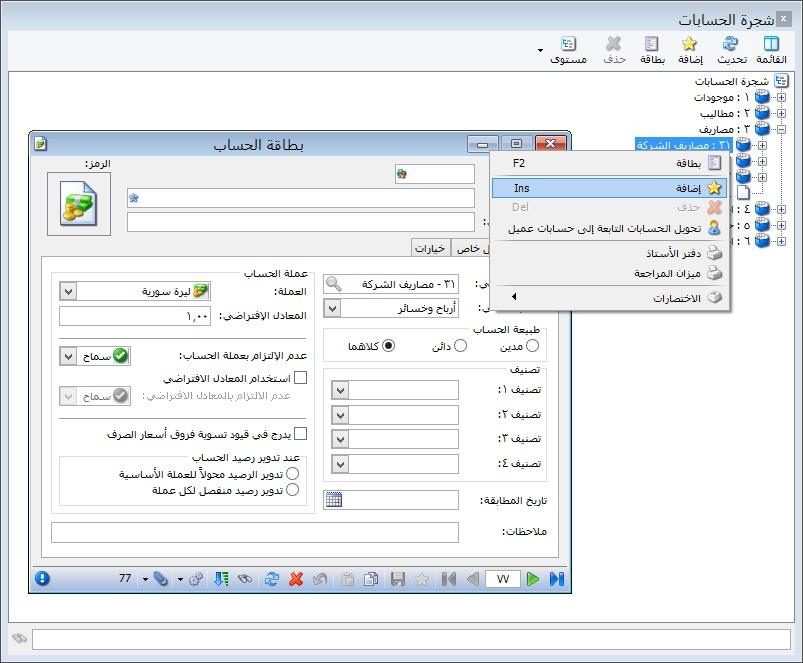
Select the parent account and click Add to open a new account card. Enter the name, parent account and final account classification, then click Save on the card toolbar. Refresh the tree to see the new account. You can also drag accounts to another parent.
Delete an Account: #
.
.
Add and Move an Account: #
.
.
Important Note:
Moving an account to another parent does not change its code because the account is independent of its parent. To change its code, edit the Code field manually. By contrast, an item’s full code changes when moved between item categories.
Account Card: #
Use this card to define new accounts or review existing ones. In Chart of Accounts, select an account and click Add to define a child account under it, or open Accounting and Account Card.
The account card contains the following main sections:
Card Toolbar: #
.

.
Use the toolbar to operate on card data. Its main buttons are illustrated above.

 Add a New Record. #
 Save the Current Record. #


- Undo: Revert changes made to the card.
- Delete: Delete the account card.
- Refresh: Refresh the account card.
- Search: Find an account using general card fields such as its name, parent account or final account.

Filter: #
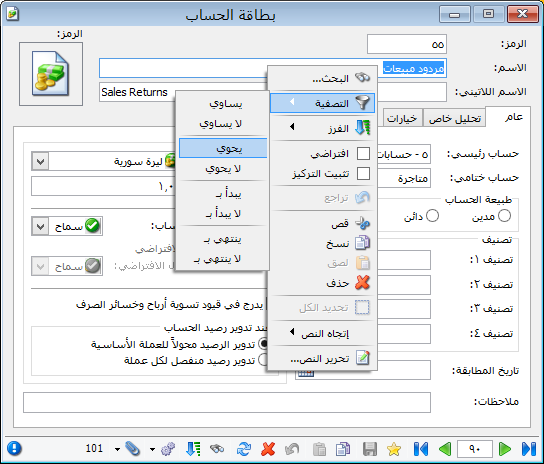
Apply criteria to show only accounts that meet them.
.
.
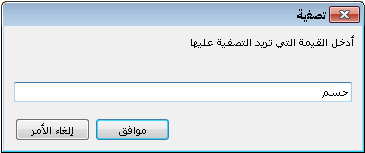
Example : For example, to find accounts whose names contain Discount, right-click and choose Filter, Contains and Discount, as illustrated below.
.
.
Only matching accounts are displayed. Record navigation buttons then move between the filtered results.
After applying a filter, two options are available:
- Return to Filter and click Remove Filterto display all records again.
The previous criteria remain temporarily stored. Choose Apply Filter to reuse them.
- Or return to Filter and clickClear Filter Criteriato remove the filter and discard its stored criteria.
Sort: #
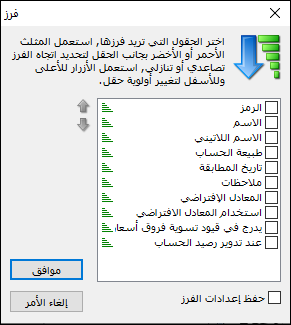
Sort records in ascending or descending order. Click Sort, select the sort fields and direction, and move fields up or down to change their priority, as illustrated beside the text.

- Add –From File : Store the attachment in the database. It remains available if the original file is deleted.
- Add – From Scanner : Import directly from a scanner and store the attachment in the database, independently of the original file.
- Capture from Camera : Capture directly from a connected camera and store the attachment in the database.
- Add – Link to File : Link the card to a file on a computer drive without storing it in the database. An attachment shortcut opens the file; it stops working if the original is deleted or moved.
Manage : View, change or remove the card’s attachments.
Set the account confidentiality level using this button. The four levels, from right to left, are Public, Private, Confidential and Highly Confidential. These levels are used when configuring database user permissions, explained later.

Card Header: 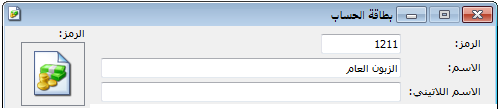 #
#
Contains the account name and code.
Code:
The code is usually based on the parent account. For example, if Customers is 121 and fewer than one thousand customers are expected, the first two customer codes can be 121001 and 121002. If up to ten thousand are expected, the first can be 1210001. Choose the numbering length according to the company’s expected needs.
Name:
This is the account name, such as Trade Discount Allowed or Cash.
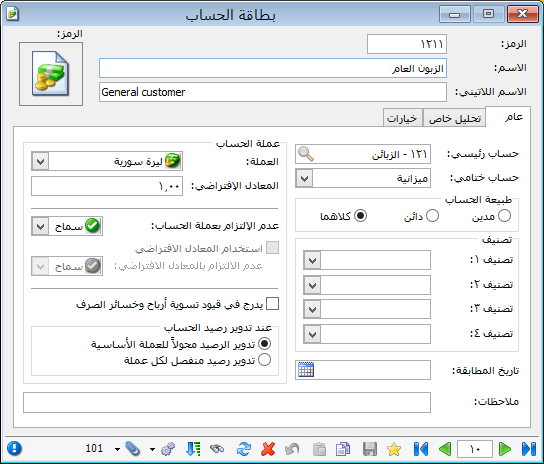
General Tab: Main Fields
.
.
Parent Account: The immediate parent account under which this account is placed.
Final Account: The account’s final classification, such as Balance Sheet, Trading, Profit and Loss or Operating.
Account Currency: #
Currency: The account’s default currency.
Default Exchange Rate: The currency’s exchange rate against the base currency.
Currency Options: #
- Allow a Different Account Currency : Control transactions in currencies other than the account card’s currency using three options:
- Allow : Permit transactions in multiple currencies.
- Warn : Display a warning when a transaction uses a different currency.
- Reject : Prevent transactions in a currency other than the account card’s currency.
Note : Changing this option preserves existing entries but affects new transactions. Editing an earlier record also applies the updated setting.
Use Default Exchange Rate : Populate the Exchange Rate field in invoices, journal vouchers and commercial papers using the rate recorded in the account card.
Allow a Different Default Exchange Rate: #
Three options are available:
- Allow : Permit transactions at different exchange rates.
- Warn : Warn when a transaction uses a rate other than the default.
- Block : Prevent transactions at a rate other than the account card’s default.
- Include in Exchange Gain or Loss Adjustment Entries : Include this account’s foreign-currency transactions in Process Exchange Gains and Losses. Accounts without this option are excluded even if they have foreign-currency transactions.
- During Account Rollover:
- Carry Balance in Base Currency: Transfer the converted balance into the opening entry.
- Carry a Separate Balance for Each Currency: Transfer separate balances for every currency used by the account.
Account Classifications: #
Four classification keys let users organize accounts as needed, such as customer area or credit quality. They can be used as report criteria in Trial Balance. For example:
Notes:
- Define a classification once on one account; it then becomes available for reuse on other accounts.
- You can also define classifications in Accounting and Account Reference Data. Open Classification 1, add Damascus and save, then click Add to define Rural Damascus.
- Use these classifications as filters in Trial Balance and Customer Balances. Filter by one classification or combine several, offering flexibility beyond organizing customers only by parent accounts.
- Account Nature : This determines the account’s position in final accounts. Cash normally appears on the debit side of the Balance Sheet, Miscellaneous Expenses on the debit side of Profit and Loss, while Bank can be debit or credit, such as an overdraft.
- Notes: Enter any notes about this account.
Reconciliation Date: Primarily used for customer and supplier accounts, this records the latest agreed balance reconciliation date. General Ledger or Customer Statement can then display transactions beginning from that date.
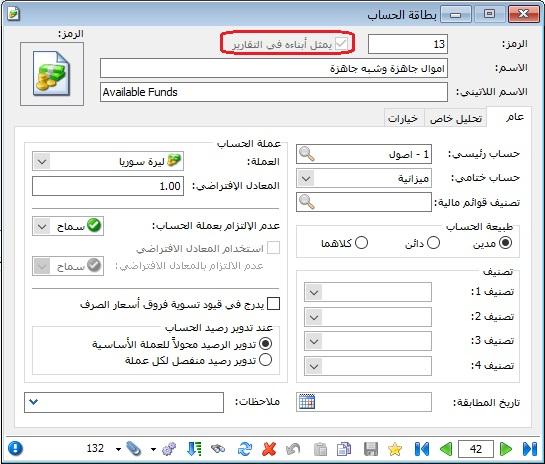
Represents Child Accounts in Reports: #
Enable this option on a parent account to show it beside Code in the account card. The parent then represents its child accounts in Trial Balance and Final Accounts.
This is illustrated below.
.

.
Important Note:
The Default property is available by right-clicking fields in the account card and many other records, including item cards, invoices and journal vouchers. It retains the current field value when creating a new record. For example, enable Default on Parent Account while viewing customer Tarek under Customers; new account cards then default to Customers, as illustrated below.
.

.
After Default is enabled, the Parent Account label becomes bold. Click Add New Record and its value remains Customers, as shown below.
.

.
Account-Specific Analysis Tab: #
Account-specific analysis groups detailed entries under an account without creating a separate child account for each. For example, Miscellaneous Expenses can contain analyses for Cleaning Supplies, Food and Transport. Assign the analysis when entering a journal voucher to track each expense while keeping the chart of accounts concise. See Account-Specific Analysis for details.
See: Account-Specific Analysis
Options Tab: #
Options Tab Configure how the program responds in these cases:
- In Manual and Custom Journal Entries:
- When Account-Specific Analysis Is Missing: Three options are available: Allow, Warn and Block.
- When General Analysis Is Missing: Three options are available: Allow, Warn and Block.
- Carry Forward Account-Specific Analysis: Enable this option to carry account-specific analyses into the new database..
- Carry Forward General Analysis: Enable this option to carry general analyses into the new database..
- Cost Centers:
- When a Cost Center Is Missing: Three options are available: Allow, Warn and Block.
- Warning / Blocking Conditions: Three options are available:
- Debit Cost Center Only: Warn or prevent saving when no debit cost center is specified.
- Credit Cost Center Only : Warn or prevent saving when no credit cost center is specified.
- Debit or Credit Cost Center, or Both: Warn or prevent saving unless at least one debit or credit cost center is specified.
.


