


Al Mizan .NET lets you define multiple commercial paper types and adjust their properties to suit your business. These may be used for payments or receipts, whether as simple payment instruments such as cheques and receipts, or as commercial papers with accounting workflows for receipt, bank deposit, endorsement and settlement.
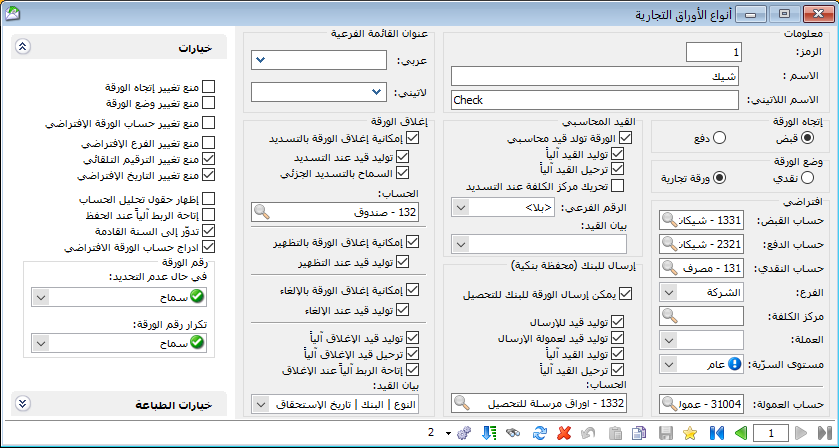
To define a commercial paper, open Definitions and select Commercial Paper Types. The window shown below lets you define the required type and configure its properties. It contains the following fields:
.
.
Paper Type: #
This section includes the following fields:
- Code: Enter a code or use the automatically generated sequential number.
- Name: Enter the paper type’s Arabic name.
- Latin Name: Enter the paper type’s English name.
- Submenu Title: Enter a title to place this paper type in a submenu with that name.
Paper Direction: #
Two options are available:
- Receipt: Select Receipt for papers received from customers or other parties toward amounts owed to the company. The resulting entry reduces the originating party’s receivable balance.
- Payment: Select Payment for papers issued to suppliers or other parties toward amounts owed by the company. The resulting entry reduces the originating party’s payable balance.
Paper Mode: #
Two options are available:
Cash: Treat the document as a cash receipt or cash payment, posting the amount to the cash account.
Commercial Paper: Treat the document as a receivable or payable instrument, posting its amount to the configured receipt or payment account according to its direction.
Default Fields: #
These fields are filled automatically because their values usually remain the same across commercial papers. When defaults are configured, they are inserted into each new paper. Otherwise, enter the values whenever you record a new commercial paper. Default fields include:
Receipt Account: This is the account used opposite the customer or other debit-balance account in the paper’s journal entry. It will commonly be one of the following:
Cash Account: For a cash receipt, the resulting journal entry uses:
| Debit | Credit | Account |
| ××× | Cash | |
| ××× | Customer |
- Notes Receivable Account (or Cheques Receivable): Use this account when receiving an instrument intended for collection at a specified time, which may be deposited with a bank or endorsed. The resulting entry uses:
| Debit | Credit | Account |
| ××× | Notes Receivable / Cheques Receivable | |
| ××× | Customer |
Payment Account: This is the account used opposite the supplier or other credit-balance account in the paper’s journal entry. It will commonly be one of the following:
Cash Account: For a cash payment, the resulting journal entry uses:
| Debit | Credit | Account |
| ××× | Supplier | |
| ××× | Cash |
- Notes Payable Account (or Cheques Payable): Use this account when issuing an instrument to a supplier for payment at a specified time. The resulting entry uses:
| Debit | Credit | Account |
| ××× | Supplier | |
| ××× | Notes Payable / Cheques Payable |
Cash Account: Select the account used when Paper Mode is Cash. The amount is posted as a debit or credit according to the paper’s direction.
Branch: Select the default transaction branch.
Cost Center: Select the default cost center.
Defaults: #
Currency: Select the paper’s currency.
Confidentiality Level: Select the default confidentiality level.
Commission Account: Select the account used for bank commissions charged for collecting these papers.
Accounting Entry: #
Configure whether the paper generates a journal entry and how that entry is processed. The available options are:
- Paper Generates an Accounting Entry: Enable this option for the paper to have an accounting effect and generate a journal entry.
- Generate Entry Automatically: Enable this option to generate the paper’s journal entry automatically when it is saved.
- Post Entry Automatically: Enable this option to post the generated journal entry automatically.
- Use Cost Center on Settlement: Enable this option to propose the cost center automatically in the settlement window.
- Secondary Number: Select whether generated journal entries use independent numbering or a linked numbering sequence.
- Entry Description: Configure the automatic description for the paper’s journal entry. For example, include paper type, sequential number and due date.
Send to Bank for Collection (Bank Portfolio): #
Configure whether received papers can be sent to a bank for collection, including the associated commissions. The following options are available:
Allow Sending the Paper to a Bank for Collection: Enable this option to send a paper to the bank for collection subject to the configured commission.
Generate an Entry for Sending: Enable this option to transfer the amount from the original receipt account to the account selected in this section, such as Papers Sent for Collection. This reclassifies the instrument while it is held by the bank for collection.
Generate an Entry for Sending Commission: Enable this option to record the sending commission using the commission account configured above.
Generate Entry Automatically: Enable this option to generate the journal entry automatically when the operation is completed.
Post Entry Automatically: Enable this option to post the generated entry automatically rather than manually.
Account: Select the account used to distinguish papers sent to a bank for collection from other papers.
Close the Commercial Paper: #
Configure the ways in which the paper can be closed. The following options are available:
Allow Closing by Settlement: Closing by settlement clears the paper by collecting or paying its amount in cash.
Generate an Entry on Settlement: Enable this option to generate the settlement entry, clearing the paper against the cash transaction.
Allow Partial Settlement: Enable this option to settle the paper in installments. Each installment clears the corresponding portion of the paper amount.
Account: Select the cash or bank account used for settlement.
Allow Closing by Endorsement: #
Closing by endorsement transfers the paper amount to another account.
Generate an Entry on Endorsement: Enable this option to clear the paper against the account selected for endorsement.
Allow Closing by Cancellation: #
Closing by cancellation restores the amount to the originating account. In other words, it reverses the entry generated when the paper was created.
Generate an Entry on Cancellation: Enable this option to generate an entry opposite to the one recorded when the paper was created.
Generate the Closing Entry Automatically: Enable this option to generate the closing entry automatically when settlement, endorsement or cancellation is performed.
Post the Cancellation Entry Automatically: Enable this option to post the generated entry automatically rather than manually.
Enable Automatic Linking on Settlement: When you cancel a paper, the account transaction linking window opens automatically.
Entry Description: Use this field to configure the automatic description of the journal entry generated when the commercial paper is settled. For example, the description can include the paper type, serial number and due date.
Options: #
This group contains the following options:
Prevent Changes to Paper Direction: The paper cannot be changed from a receipt to a payment, or vice versa.
Prevent Changes to Paper Mode: The paper cannot be changed from commercial paper mode to cash mode, or vice versa.
Prevent Changes to the Default Paper Account: Prevent changes to the receipt or payment account configured in Commercial Paper Types.
Prevent Changes to the Default Branch: The branch where the paper was recorded cannot be changed.
Prevent Changes to Automatic Numbering: The number assigned automatically to the paper cannot be changed.
Prevent Changes to the Default Date: The date assigned automatically to the paper cannot be changed.
Show Account Analysis Fields: Enable this option to add General Analysis and Account-Specific Analysis fields to the paper record.
Enable Automatic Linking on Save: Enable this option to open Account Transaction Matching automatically when the paper is saved.
Roll Forward to the Next Year: When the database is rolled forward, papers with this option enabled are carried into the new database.
Insert the Account by Default: This option fills the Paper Account field with the configured default account.
Paper Number: #
If Not Specified: Choose Allow, Warn or Prevent when the paper number is missing.
Duplicate Paper Number: Choose Allow, Warn for Duplicates in This Type, Warn for Duplicates Across All Types, Prevent Duplicates in This Type, or Prevent Duplicates Across All Types.
Print Options: #
The options section contains:
Print Automatically When Saving a New Paper: Enable this option to print the paper automatically after it is saved.
Ask Before Automatic Printing: Display a prompt asking whether to print the paper.
Show the Printer Selection Dialog: Enable this option to choose a printer or click Cancel to stop printing.
Number of Print Copies: For automatic printing, select how many commercial paper receipts to print.
.


