


Report Toolbar: #
The toolbar contains the following buttons:
 Preview: #
Preview the report before printing.
 Print: #
Print the report. The dialog lets you select settings such as the printer and number of copies.
 Auto Fit: #
Adjust field widths automatically to fit the available report display area. This helps keep the fields visible and readable when the report is opened at full size.
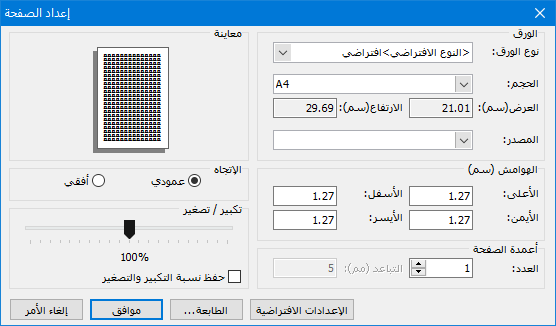
Page Setup: #
Open the page settings dialog to choose paper type and size, print margins and other page settings required by the report.
.
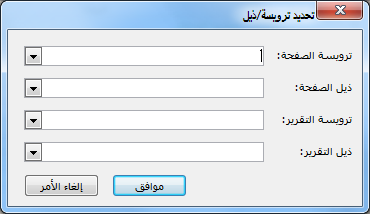
Page and Report Headers and Footers: #
Open the following window containing these fields:

.
Page Header: Select a design to print at the top of every report page.
Page Footer: Select a design to print at the bottom of every report page.
Report Header: Select a design to print on the first report page.
Report Footer: Select a design to print on the last report page.
See: Report Headers and Footers
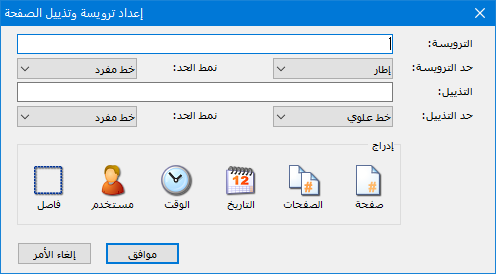
 Print Date, Time and Page Count: #
Open a dialog to print the print date, time and page count. It contains these fields:
.
- Header: Information inserted here, such as date and time, appears at the top of each report page.
- Header Border: Choose a top line, bottom line or frame for the header.
- Footer: Information inserted here, such as date and time, appears at the bottom of each report page.
- Footer Border: Choose a top line, bottom line or frame for the footer.
- Insert: Insert one of the following fields into the header or footer:
- Page: Display the current page number: 1 on the first page, 5 on the fifth page, and so on.
- Pages: Display the total page count. For example, on the first page of a five-page report, the text shows Page 1 when Page is inserted, and of 5 when Pages is inserted.
- Date: Display the print date in the header or footer.
- Time: Display the print time in the header or footer.
- User: Display the name of the user printing the report.
- Separator: Insert a space between the preceding fields.
- Find Previous
- Find Next
- Refresh: Update the report results to reflect values changed or added since it was generated.
Export: #
Export the report results using the following options:
(EXCIL – WORD – HTML – Email)
- Color Rows: Select a report row and click Color to choose a highlight color. You can also highlight the selected row by pressing a number key on the keyboard.
- Close
.


