


Manufacturing Management tracks raw materials, quantities and costs, manages actual and estimated production expenses, and calculates finished-product costs. It also supports standard manufacturing templates and production plans.
The manufacturing module contains the following sections:
1. Manufacturing Template Tree #
Organize defined manufacturing templates into categories. Select the tree root, right-click and choose Add Category, as illustrated below.
.
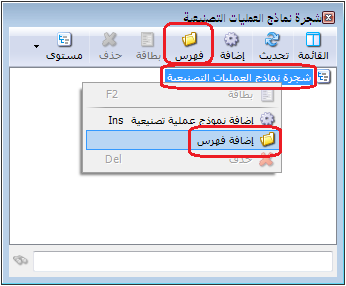
.
Enter the following details in the category card.
.
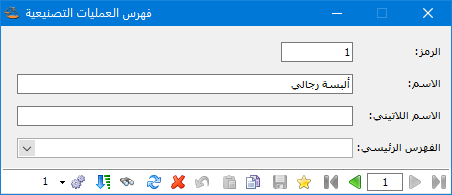
.
- Code: Enter the category code.
- Name: Enter the category name, such as Menswear.
- Latin Name: Enter a Latin name for the English interface.
- Parent Category: For a multilevel hierarchy, select the parent category, producing the tree shown below.
.
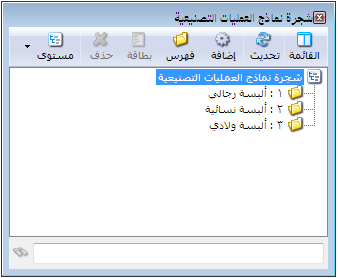
.
2. Manufacturing Expenses #
Define production expenses and choose one of three processing methods.
- Actual Only.
- Actual and Estimated — Expense and Accrued Expense Accounts.
- Actual and Estimated Charged to a Clearing Account.
Case 1: Actual Only #
Use this when all manufacturing expenses have known actual amounts. Configure it as follows.
- Enable Actual Only.
- Define all manufacturing expenses and assign each an Expense Account, usually classified under Operating. The Accrued Expense Account column is unavailable in this mode.
.
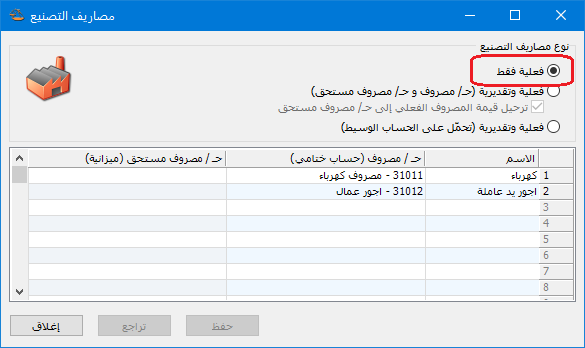
.
- When entering a manufacturing operation, select the expense counterpart. For immediate payments, use Cash or Bank. If payment is owed, use an accrued expense payable account and consider the following possibilities.
- Accrued Expense Payable has a zero balance: No further adjustment is needed.
- A balance remains because of settlement differences, such as a discount received when paying. Close the difference with the appropriate entry below.
- If Accrued Expense Payable has a credit balance:
Debit: Accrued Expense Payable
Credit: Standard Manufacturing Variances
If Accrued Expense Payable has a debit balance:
Debit: Standard Manufacturing Variances
Credit: Accrued Expense Payable
Example:
Suppose a clothing manufacturer incurs the following production costs.
SYP 50 in labor per unit, paid immediately.
Solution:
If labor is paid directly from Cash, record the following entry.
Debit: Labor Expense
Credit: Cash
If labor is to be paid later, record the following entry.
Debit: Labor Expense
Credit: Labor Payable
Case 2: Actual and Estimated — Expense and Accrued Expense Accounts #
Use this when manufacturing involves both actual and estimated expenses. Configure it as follows.
- Enable Actual and Estimated — Expense and Accrued Expense Accounts.
- Define manufacturing expenses with an Expense Account, usually under Operating, and an Accrued Expense Account under the Balance Sheet.
.
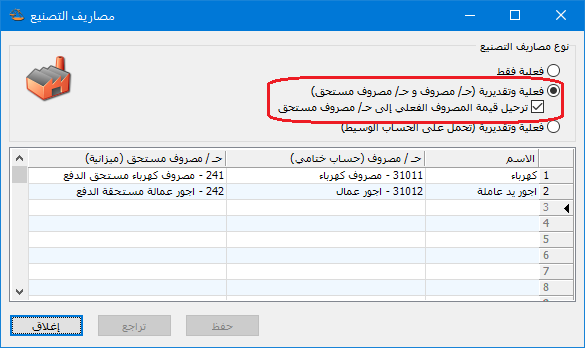
.
- In the Manufacturing Operation window, two Expense Type options are available:
- Estimated: Generate an entry debiting Expense and crediting Accrued Expense, using the accounts defined in Manufacturing Expenses.
- Actual: Generate the estimated-style entry above, then a second entry debiting Accrued Expense and crediting the counterpart selected in Manufacturing Operation.
Note : If Expense Type is Actual and Post Actual Expense Through Accrued Expense Account is disabled, generate a single entry debiting the configured expense and crediting the Credit Account selected on Expenses.
Process Accrued Expenses #
Consider the following balances:
- Accrued Expense Payable is zero: No adjustment is needed.
- A credit balance remains: Estimated expense exceeded actual expense; close the difference using the following entry.
Debit: Accrued Expense Payable
Credit: Standard Manufacturing Variances
- A debit balance remains: Estimated expense was below actual expense; close the difference using the following entry.
Debit: Standard Manufacturing Variances
Credit: Accrued Expense Payable
Usage Example: #
Suppose a clothing manufacturer incurs the following production costs.
SYP 50 in labor per unit, paid immediately.
SYP 35 of estimated electricity expense per unit.
Solution with Post Actual Expense Through Accrued Expense Account Enabled:
Labor per unit has a known amount and is paid immediately. Select Actual on Expenses and Cash as Credit Account. The following two entries are generated.
Debit: Labor Expense
Credit: Labor Payable
Debit: Labor Payable
Credit: Cash
Electricity per unit is estimated because its actual amount is not yet known. Select Estimated on Expenses to generate the following entry.
Debit: Electricity Expense
Credit: Electricity Payable
Solution with Post Actual Expense Through Accrued Expense Account Disabled:
Labor per unit has a known amount and is paid immediately. Select Actual and Cash as Credit Account to generate the following single entry.
Debit: Labor Expense
Credit: Cash
Electricity per unit is estimated because its actual amount is not yet known. Select Estimated on Expenses to generate the following entry.
Debit: Electricity Expense
Credit: Electricity Payable
Case 3: Actual and Estimated Charged to a Clearing Account #
Used for specific workflows.
- Enable Actual and Estimated Charged to a Clearing Account.
- Set Actual Expense Account and Estimated Expense Account in Manufacturing Expenses.
- The Manufacturing Operation window offers two Expense Type options:
- Estimated: Debit the configured Estimated Expense Account and credit the Clearing Account selected in Manufacturing Operation.
- Actual: Generate the estimated-style entry, plus an entry debiting Actual Expense Account and crediting the Credit Account selected on Expenses.
See Allocating Expenses to Cost Centers.
4-Manufacturing Operation Types: #
Define the manufacturing operations used by your company, often associated with a finished-product type such as shirts or trousers. The window contains the following fields:
.
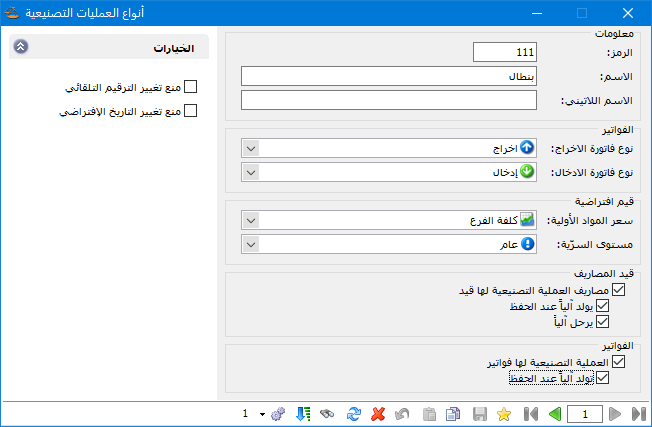
.
Information: #
- Code: Enter the manufacturing operation code.
- Name: Enter the operation’s Arabic name.
- Latin Name: Enter its English name.
Invoices: #
- Issue Invoice Type: Select the invoice type used to issue raw materials from warehouses, usually an Issue invoice.
- Receipt Invoice Type: Select the type used to receive finished goods into warehouses at cost, usually a Receipt invoice.
Default Values: #
- Raw Material Price: Select the valuation price for issuing raw materials to production, usually cost. This directly affects finished-product cost, which combines raw material values and production expenses.
Accurate raw material valuation is important because it affects finished-product cost. Evaluate raw materials and other production costs consistently when setting product prices.
Confidentiality Level: Set the confidentiality level of manufacturing records.
Options: #
These options include:
- Manufacturing Expenses Generate an Entry: Generate a journal entry for the operation’s expenses.
- Generate Automatically on Save: Generate the expense entry when the manufacturing record is saved.
- Manufacturing Operation Has Invoices: Allow receipt and issue invoices to be generated manually or automatically when saving.
- Generate Automatically on Save: Generate the invoices automatically when saving.
- Prevent Changes to Default Numbering: Manufacturing records are numbered sequentially. Enable this option to prevent changing automatically assigned numbers.
- Prevent Changes to the Default Date: The operation date defaults to today and is normally editable. Enable this option to prevent changing the default date.
5. Manufacturing Operation Template #
Define standard templates with the raw material quantities and expenses needed to produce a specified quantity of finished goods. For example, define a template for one unit, then multiply it by the required production quantity when recording an operation, as explained later.
The Manufacturing Operation Template window contains the following fields.
.
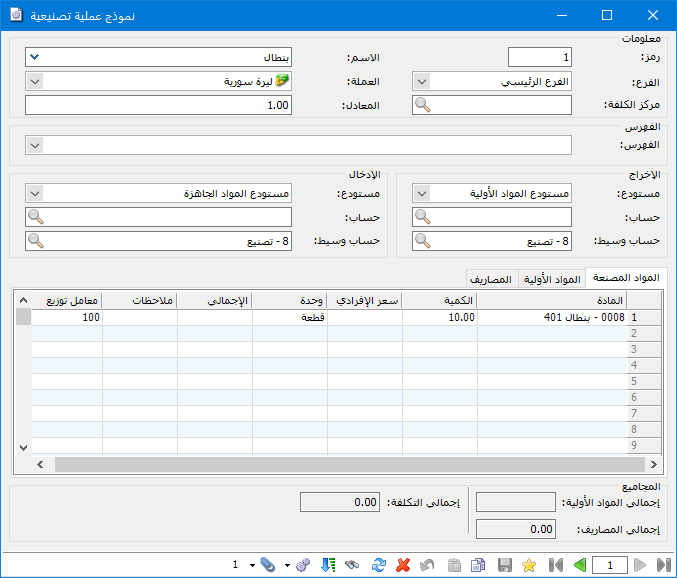
.
Information: #
- Code: Enter a template code or allow automatic numbering.
- Name: Enter a template name, usually identifying the finished product, such as Trousers.
- Branch: Enter the branch carrying out production.
- Cost Center: Enter the cost center assigned to production.
- Currency and Exchange Rate: Set the operation currency and its exchange rate against the base currency.
- Category: Select a category from Manufacturing Template Tree, or define a new category directly in this field.
- Warehouse: Issue Warehouse supplies raw materials. Receipt Warehouse receives the finished goods.
- Account: The item account to which raw material and finished-good values are posted in the generated receipt and issue invoice entries.
- Clearing Account: The customer-account counterpart used in the receipt and issue invoices described under Manufacturing Operation Types.
Finished Goods Tab: #
This tab contains:
Item: Select the item produced by the operation.
Quantity: #
Enter the quantity of finished units defined by the template.
Unit Price: #
Calculated automatically as raw material and production expense value divided by finished quantity. It cannot be entered manually.
Unit: #
The unit used to measure finished quantity.
Total: #
The total finished-good value.
Notes: #
Enter notes about the finished goods in this template.
Allocation Factor: #
If multiple finished goods are produced, enter factors to distribute costs among them. Leaving the factors blank allocates costs equally. The illustration below shows an equal split between two products.
.
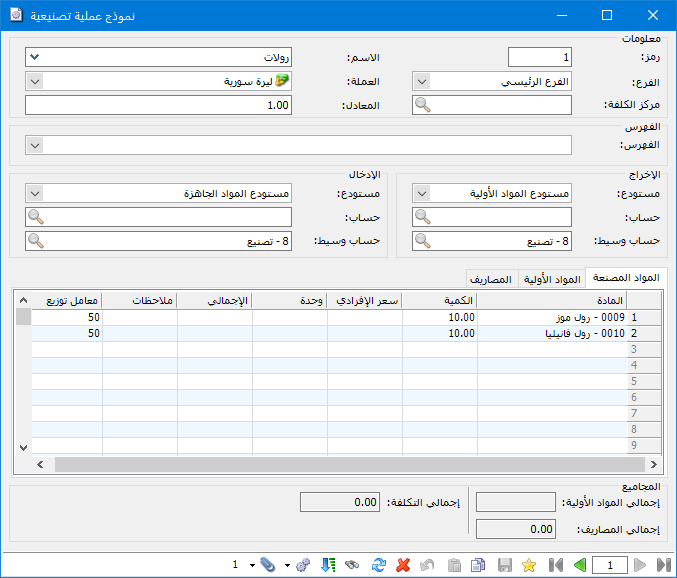
.
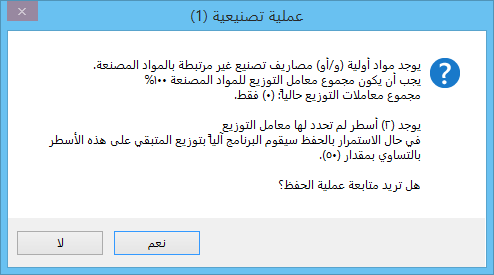
If allocation factors total less than 100% and some are blank, the program warns that raw material or expense costs are not fully allocated. It displays the total and the number of blank lines, and offers to distribute the remaining percentage equally among them when Yes is selected.
.
.
Raw Materials Tab: #
This tab contains:
- Item: Select the raw materials used in production.
- Quantity: Enter the raw material quantities needed for the finished quantities defined on Finished Goods.
- Unit: The unit used to measure raw material quantity.
- Total: The total value of each raw material used.
- Notes: Enter notes about the raw materials in this template.
- Finished Product: Optionally assign this raw material to a particular finished product.
- Unit Price: Select the raw material issue price from statistical values, such as Branch Cost or Latest Branch Purchase, or item-card prices, such as Retail, Wholesale or Distributor.
Expenses Tab: #
This tab contains:
- Expense: Select an expense previously defined in Manufacturing Expenses.
- Value: Enter the expense amount required for the finished quantities on Finished Goods..
- Currency and Exchange Rate: Set the expense currency and its exchange rate against the base currency..
- Expense Type: Choose Actual or Estimated.
- Credit Account: Select the expense counterpart. Use Cash for immediate payment, Supplier if provided on account, or an accrued expense liability otherwise.
- Finished Product: Optionally assign the expense to a particular finished product.
- Date: Enter the expense recognition date.
- Debit Cost Center / Credit Cost Center: Assign expenses to a debit or credit cost center if required.
6. Manufacturing Plan #
Use plans to determine finished-good targets and raw material requirements, avoiding shortages or excessive production. Plans do not directly change warehouse quantities. They help identify required materials and shortages before production begins.
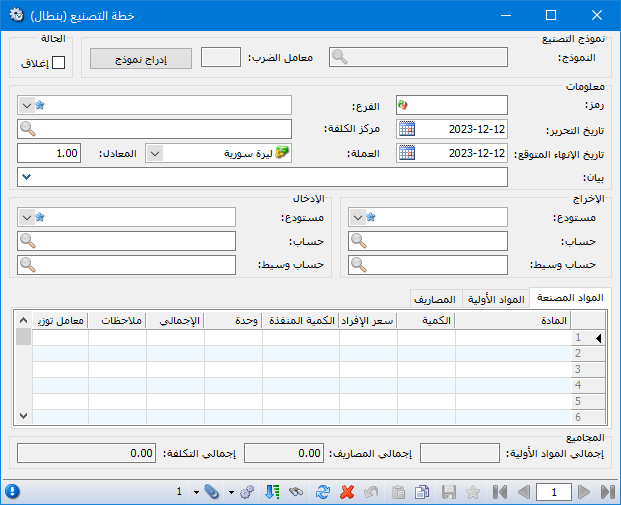
Open Manufacturing and Manufacturing Plan, then choose a previously defined operation type to display the following window.
.
.
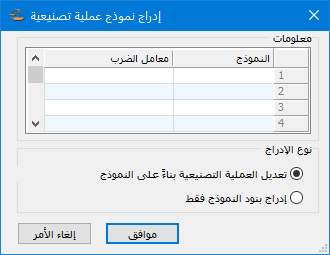
Click Insert Template to create a plan from an existing manufacturing template. The following window contains:
.
.
Insert Template: #
Select one or more defined templates.
Multiplier: Enter a factor that, multiplied by the template quantities, gives the planned production quantities.
Multiplier Example:
A template produces fifteen pairs of trousers. To plan one hundred and fifty, select that template and use a multiplier of ten, multiplying all its quantities by ten.
The plan contains the same tabs and fields as the template, with these additional controls:
Closed Option: #
Enable when the plan is finished so it no longer requires follow-up.
Date: #
Issue Date is the planned raw material withdrawal date. Receipt Date is the planned completion and finished-stock receipt date.
Completed Quantity on the Finished Goods Tab: #
Record the actual finished quantity received into stock to compare it with the planned quantity. Raw material requirements exclude quantities already completed. Linked manufacturing operations update Completed Quantity automatically.
Generate Manufacturing Operation in the Plan Toolbar’s Operations Menu: #
Create a linked operation fulfilling all or part of a plan. The operation window inserts the finished goods required; specify quantities and other details. Consider the following example.
Example: #
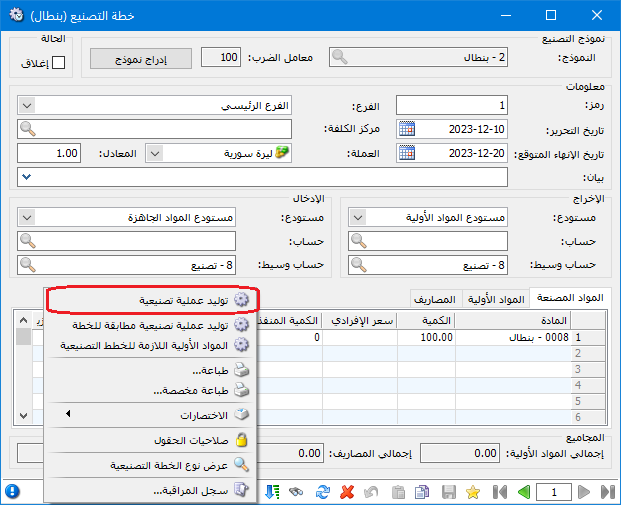
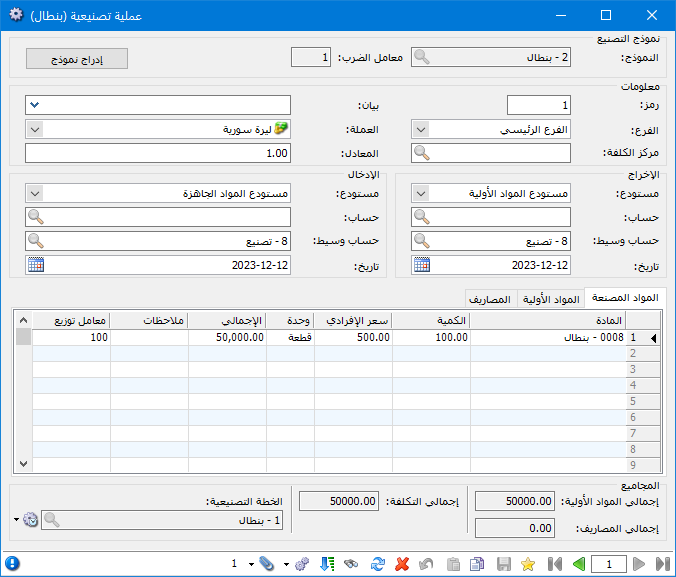
A clothing company has a template for one pair of trousers and a plan for one hundred. Click Generate Manufacturing Operation from the plan, as illustrated below.
.
.
The following operation is generated to fulfill the plan.
.
.
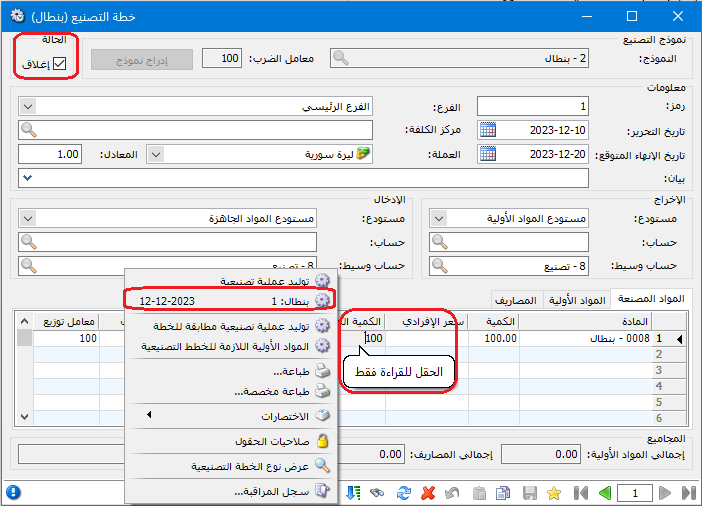
After saving the operation and refreshing the plan, Completed Quantity becomes one hundred, Closed is enabled automatically and some fields become read-only. The generated operation appears in Operations, as illustrated below.
.
.
Generate Manufacturing Operation Matching the Plan instead uses the finished goods, raw materials and expenses entered in the plan, rather than recalculating them from its template.
Important Notes on Plans and Generated Operations: #
Note 1: #
For partial completion, generate an operation and reduce its finished quantity before saving. The first generated operation initially contains the full planned amount.
Note 2: #
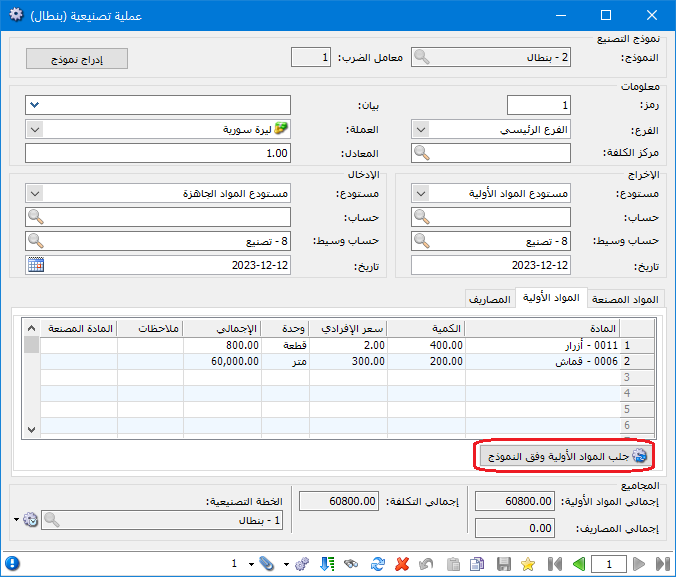
After changing the finished quantity, open Raw Materials and click Fetch Raw Materials According to Template to recalculate raw quantities and expenses for the new amount, as illustrated below.
.
.
Note 3: #
A newly generated operation uses the following quantity formula.
Finished Quantity = Planned Finished Quantity − Automatically Completed Quantity
Previously completed linked operations are deducted when generating another operation for the same plan.
Note 4: #
Standard generation calculates required raw materials and expenses using the plan’s linked template, rather than the raw materials and expenses entered directly in the plan.
Note 5: #
When completed quantity reaches or exceeds planned quantity, the plan closes automatically, becomes read-only and hides Generate Manufacturing Operation because no planned quantity remains.
Note 6: #
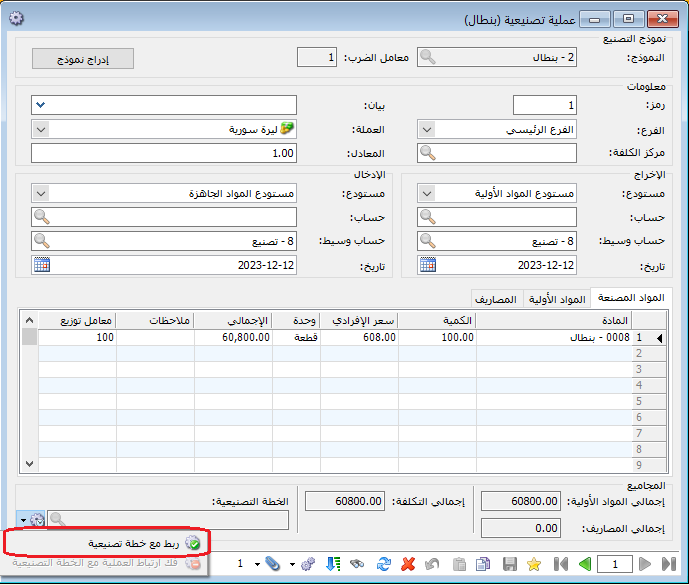
You can also link an existing saved operation to a plan using Link Manufacturing Operation, as illustrated below.
.
.
Click Link to Manufacturing Plan and select a plan record from the displayed list.
Note 7: #
Three conditions must be met:
1. The operation and plan must use the same manufacturing operation type.
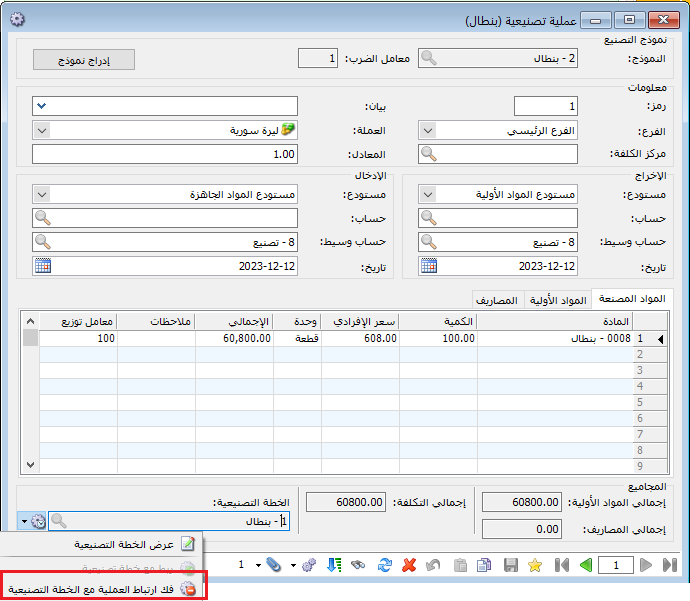
2. The operation must not be linked to another plan. You can unlink it first and assign another plan, as shown below.
3. The plan must remain open. Closed plans cannot accept linked operations.
.
.
Note 8: #
Completed Quantity and Closed can be set manually only if no manufacturing operations are linked to the plan.
7. Manufacturing Operation #
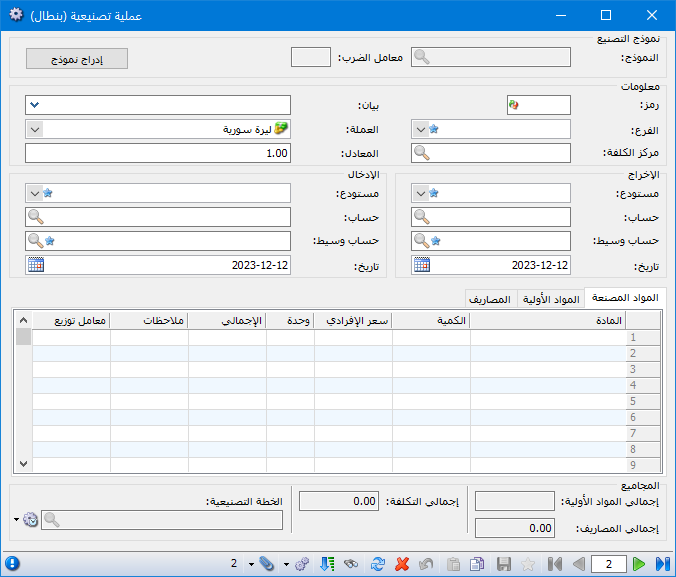
Open Manufacturing and Manufacturing Operation, then choose a previously defined operation type to display the following window.
.
.
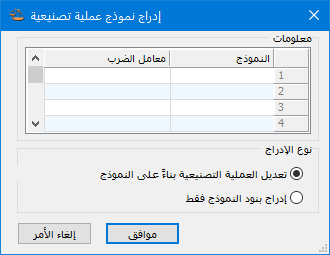
Click Insert Template to base the operation on a defined template. The following window contains:
.
.
Template: #
Select defined manufacturing templates.
Multiplier: #
Enter a multiplier that scales the template quantities to the required finished production.
8. Process Manufacturing Operations #
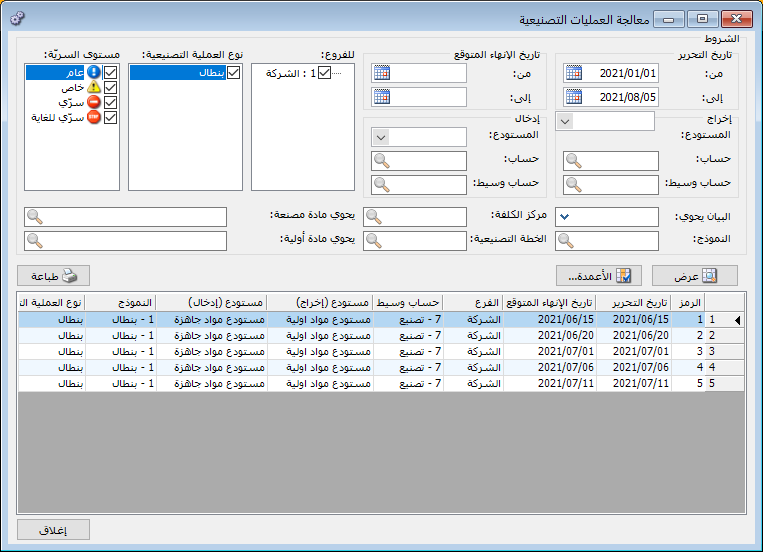
Display recorded manufacturing operations or filter them using criteria in the window header. The following controls are available.
.
.
Issue Criteria: Filter by issue invoice fields: Warehouse, Account, Clearing Account, From Date and To Date.
Receipt Criteria: Filter by receipt invoice fields: Warehouse, Account, Clearing Account, From Date and To Date.
Branches: #
Select one or more branches to display only their operations.
Operation Type: #
Select one or more manufacturing operation types.
Confidentiality Level: #
Select one or more confidentiality levels.
Description Contains: Enter text to display operations whose descriptions contain it.
Template: #
Select a manufacturing template to display operations based on it.
Cost Center: Select a cost center to display operations assigned to it.
Manufacturing Plan: #
Select a plan to display its linked operations.
Contains Finished Product: #
Select an item to display operations containing it on Finished Goods.
Contains Raw Material: #
Select an item to display operations containing it on Raw Materials.
Show: Display operations matching the criteria above.
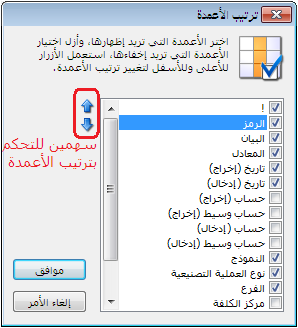
Columns: Click Columns to choose operation information fields and use the two blue arrows on the left to change their order, as shown below.
.
.
- Print: Print the displayed manufacturing operation report.
- Close: Close Process Manufacturing Operations.
9. Process Manufacturing Plans #
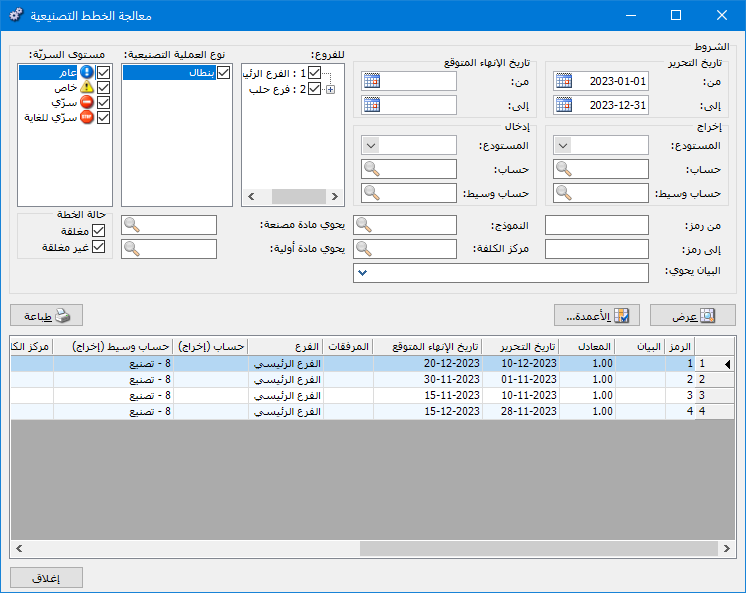
Display recorded manufacturing plans or filter them using the header criteria. The following information is available.
.
.
- Issue Criteria: Filter by issue-related plan fields: Warehouse, Account, Clearing Account, From Date and To Date.
- Receipt Criteria: Filter by receipt-related plan fields: Warehouse, Account, Clearing Account, From Date and To Date.
- Branches: Select one or more branches to display their plans.
Manufacturing Operation Type: #
Select one or more operation types to display matching plans.
Confidentiality Level: Select one or more confidentiality levels.
Description Contains: Enter text to display plans whose descriptions contain it.
Template: #
Select a template to display plans based on it.
Cost Center: Select a cost center to display plans assigned to it.
Contains Finished Product: Select an item to display plans containing it on Finished Goods.
Contains Raw Material: Select an item to display operations containing it on Raw Materials.
Plan Status: #
Closed: Display closed plans.
Open: Display plans not yet closed.
Show: Display plans matching the criteria.
Columns: Click Columns to choose plan information fields and use the blue arrows on the left to change their order, as shown below.
.
- Print: Print the displayed manufacturing plan report.
- Close: Close Process Manufacturing Plans.
10. Raw Materials Required for Manufacturing Plans #
This report identifies raw materials needed for outstanding plans. It can also show current stock and any shortage between available quantities and requirements.
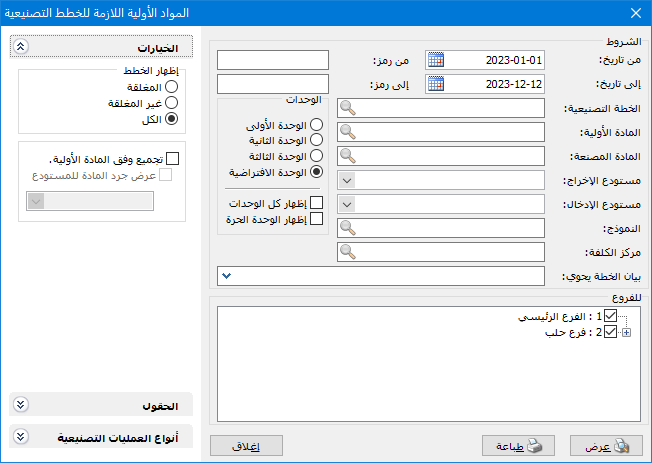
The report criteria window contains the following fields.
.
.
- From Date, To Date: Set a date range to include plans dated within it.
- Raw Material: Select a raw material to report its required quantity.
- Finished Product: Select a finished product to report the raw materials required to produce it.
- Issue Warehouse: Select an issue warehouse to include plans issuing materials from it.
- Receipt Warehouse: Select a receipt warehouse to include plans receiving finished goods there.
- Template: Select a template to include plans based on it.
- Cost Center: Select a cost center to include plans assigned to it.
- Plan Description Contains: Enter text to include plans whose descriptions contain it.
Units: #
Select the unit in which report quantities are displayed.
Branches: #
Select a branch to include its manufacturing plans.
Options: #
The options section contains:
Group by Raw Material / Show Warehouse Stock: When grouping is disabled, show raw material requirements separately for each plan. When enabled, combine all plans into one total per raw material.
Consider the following example: #
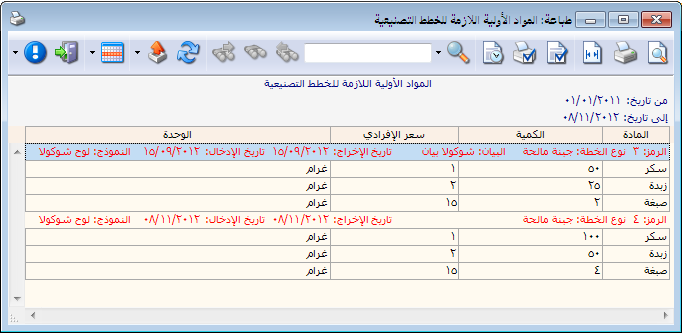
For example, one plan produces one chocolate bar and another produces two. The following illustrations compare the report with and without Group by Raw Material.
Report Without Group by Raw Material:
.
.
Requirements appear separately for each plan.
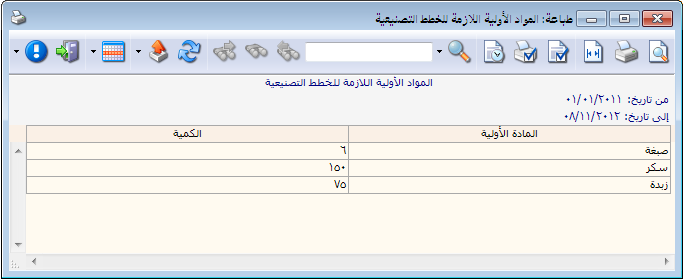
Report With Group by Raw Material:
.
.
Each raw material’s requirement is combined across all plans, without separate plan-level details.
Warehouse Options: #
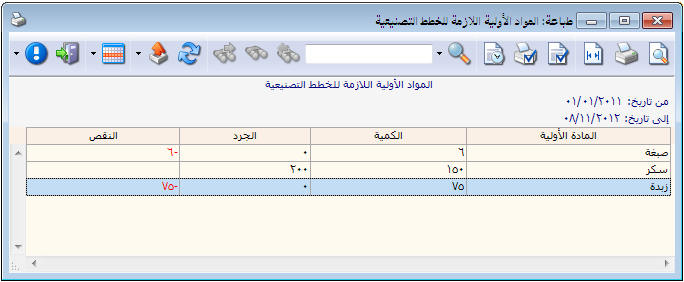
Show Warehouse Stock: Add Stock and Shortage columns. Stock displays the current warehouse quantity; Shortage shows any amount by which it falls below the manufacturing requirement.
Warehouse: Select the warehouse whose stock should be shown.
The resulting report is illustrated below.
.
.
Fields Tab: #
Enable the fields to display in the report.
Manufacturing Operation Types Tab: Select one or more types to include their manufacturing plans and raw material requirements.
.
Manufacturing with Periodic Inventory in Al Mizan: #
1. Define the Following Accounts by Final Classification: #
- Accounts Classified under Operating:
- Opening Raw Material Inventory.
- Raw Material Purchases.
- Raw Material Purchase Expenses.
- Raw Material Purchase Returns.
- Closing Raw Material Inventory — Operating.
- Manufacturing Expenses
- Operating.
- Accounts Classified under Profit and Loss:
- Standard Manufacturing Variances.
- Accounts Classified under the Balance Sheet:
- Closing Raw Material Inventory — Balance Sheet.
- Production Expenses Payable.
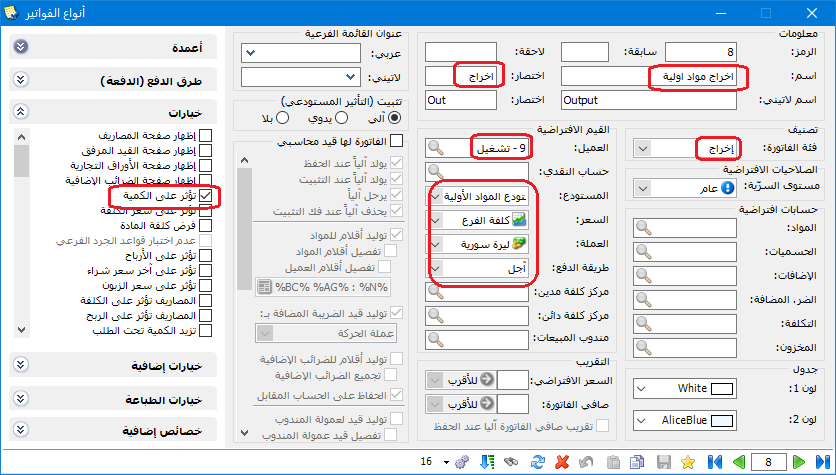
2. Create a Raw Material Issue Invoice: #
- Invoice Category: Issue.
- Default Values:
- Customer: Operating.
- Warehouse: Raw Materials Warehouse.
- Price: Branch Cost.
- Payment Method: On Account.
- Invoice Has a Journal Entry: Disabled.
- Options:
- Affects Quantity: Enabled.
As illustrated below:
.
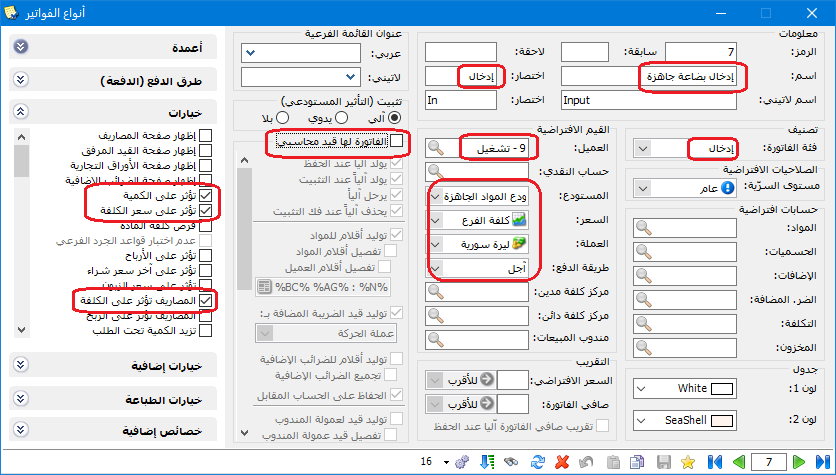
3. Create a Finished Goods Receipt Invoice: #
- Invoice Category: Receipt.
- Default Values:
- Customer: Operating.
- Warehouse: Finished Goods Warehouse.
- Price: Branch Cost.
- Payment Method: On Account.
- Invoice Has a Journal Entry: Disabled.
- Options:
- Affects Quantity: Enabled.
- Affects Cost Price: Enabled.
- Expenses Affect Cost: Enabled.
As illustrated below:
.
4. Define an Operating Accounting Group and Link It to the Raw Material Category: #
The following image illustrates the setting:
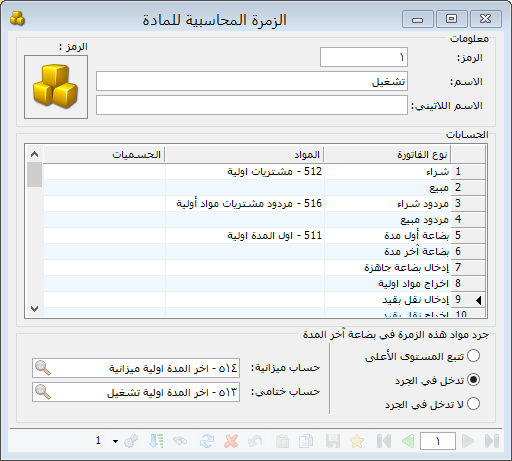
.
5. Manufacturing Expenses Window: #
- Three options are available:
- Actual Only.
- Actual and Estimated — Expense and Accrued Expense Accounts.
- Actual and Estimated Charged to a Clearing Account.
Case 1: Actual Only #
Use this method when all manufacturing expenses have known actual amounts. Configure it as follows.
- Enable Actual Only.
- Define each manufacturing expense with an Expense Account, usually classified under Operating. Leave Accrued Expense Account blank.
- When entering a manufacturing operation, select the expense counterpart: Cash or Bank for immediate payment, otherwise an accrued expense payable account. Consider the following balances.
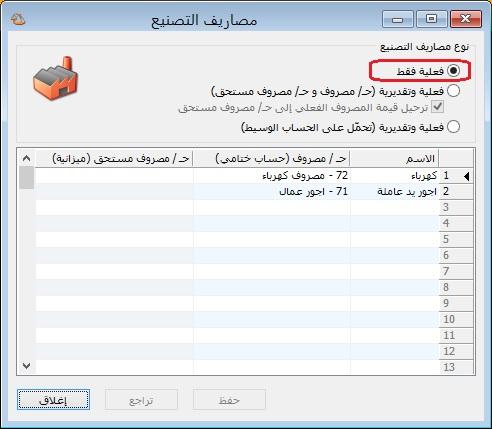
.
- Accrued Expense Payable is zero: No further adjustment is required.
- A balance remains because of settlement differences, such as a discount received when paying. Close the difference with the appropriate entry below.
- If Accrued Expense Payable has a credit balance:
Debit: Accrued Expense Payable
Credit: Standard Manufacturing Variances
- If Accrued Expense Payable has a debit balance:
Debit: Standard Manufacturing Variances
Credit: Accrued Expense Payable
Case 2: Actual and Estimated — Expense and Accrued Expense Accounts: #
Suitable for Mixed Actual and Estimated Costs:
Use this method when production involves both actual and estimated expenses. Configure it as follows.
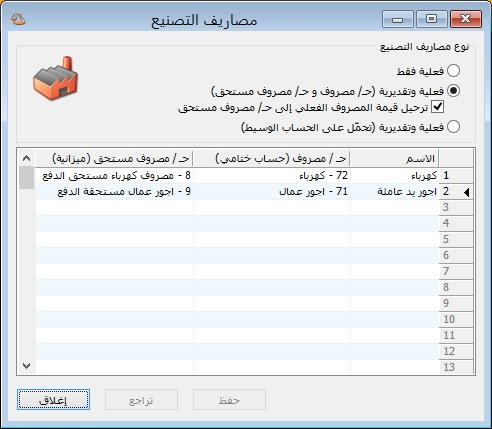
.
- Enable Actual and Estimated — Expense and Accrued Expense Accounts.
- Define manufacturing expenses with an Expense Account, usually under Operating, and an Accrued Expense Account under the Balance Sheet.
- In Manufacturing Operation, choose between the two Expense Type options.
- Estimated: Generate an entry debiting Expense and crediting Accrued Expense, using the accounts defined in Manufacturing Expenses.
- Actual: Generate the estimated-style entry above, then a second entry debiting Accrued Expense and crediting the counterpart selected in Manufacturing Operation.
Note: If Actual is selected and Post Actual Expense Through Accrued Expense Account is disabled, generate one entry debiting the configured expense and crediting the Credit Account selected on Expenses.
Consider the following balances:
- Accrued Expense Payable is zero: No further adjustment is required.
- A credit balance remains: Estimated expense exceeded actual expense; close the difference using the following entry.
Debit: Accrued Expense Payable
Credit: Standard Manufacturing Variances
- A debit balance remains: Estimated expense was below actual expense; close the difference using the following entry.
Debit: Standard Manufacturing Variances
Credit: Accrued Expense Payable
Case 3: Actual and Estimated Charged to a Clearing Account #
Used for specific workflows.
- Enable Actual and Estimated Charged to a Clearing Account.
- Set Actual Expense Account and Estimated Expense Account in Manufacturing Expenses.
- The Manufacturing Operation window offers two Expense Type options:
- Estimated: Debit the configured Estimated Expense Account and credit the Clearing Account selected in Manufacturing Operation.
Actual: Generate the estimated-style entry, plus an entry debiting Actual Expense Account and crediting the Credit Account selected on Expenses.
Manufacturing with Perpetual Inventory in Al Mizan: #
1. Define the Following Accounts by Final Classification: #
- Accounts Classified under Operating:
- Raw Materials.
- Operating.
- Manufacturing Expenses
- Accounts Classified under Trading:
- Finished Goods.
- Accounts Classified under Profit and Loss:
- Standard Manufacturing Variances.
- Accounts Classified under the Balance Sheet:
- Raw Material Inventory.
- Finished Goods Inventory.
- Production Expenses Payable.
2. Create a Raw Material Issue Invoice: #
Invoice Category: Issue.
Default Accounts:
Items: Raw Material Inventory.
Default Values:
Customer: Raw Materials.
Warehouse: Raw Materials Warehouse.
Price: Company Cost.
Payment Method: On Account.
Invoice Has a Journal Entry: Enabled.
Options:
Affects Quantity: Enabled.
As illustrated below:
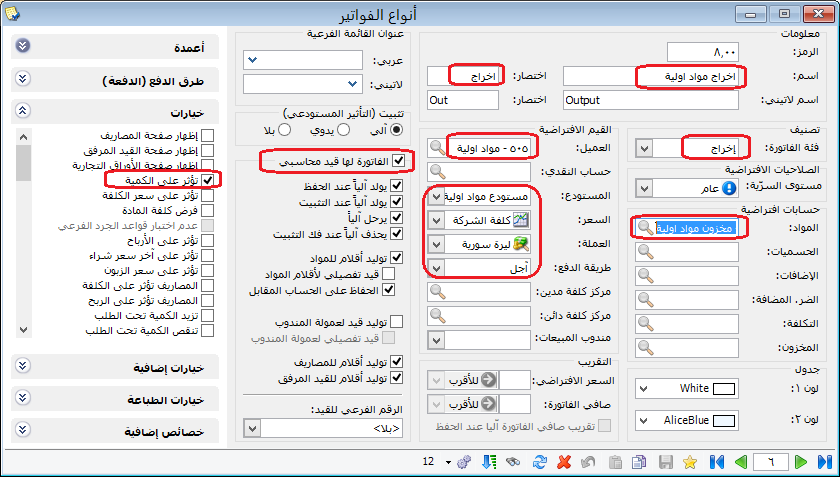
.
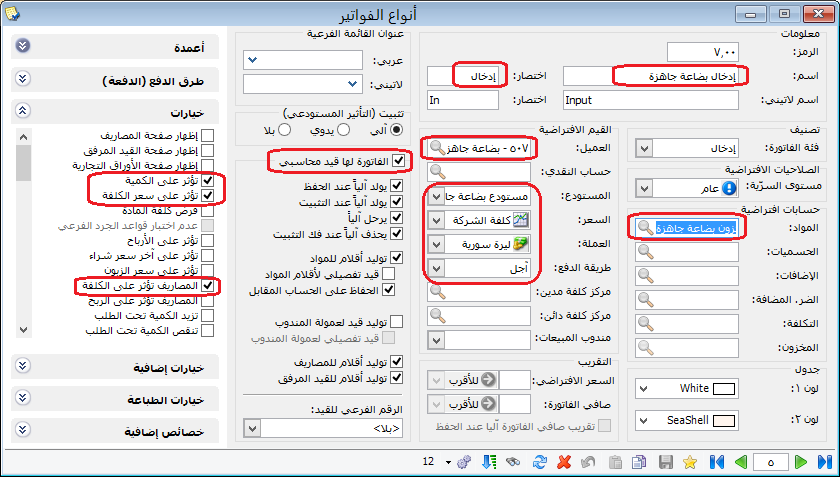
3. Create a Finished Goods Receipt Invoice: #
Invoice Category: Receipt.
Default Accounts:
Items: Finished Goods Inventory.
- Default Values:
Customer: Finished Goods.
Warehouse: Finished Goods Warehouse.
Price: Company Cost.
Payment Method: On Account.
Invoice Has a Journal Entry: Enabled.
Options:
Affects Quantity: Enabled.
Affects Cost Price: Enabled.
Expenses Affect Cost: Enabled.
As illustrated below:
.
Note: For companies with multiple branches, select Branch Cost as Price.
4. Manufacturing Expenses Window: #
Handle manufacturing expenses under perpetual inventory using the same methods described for periodic inventory.


